3ds Max 2022以前的版本要借助Python的api来实现Python编程达到编辑绘图脚本的功能,但是好消息来了,3ds Max 2022 起,MaxPlus 不再作为 3ds Max 的 Python API 包含在内。而是3ds Max 将 Python 3.7 的标准版本包涵其中了,位于 [3ds Max Install]\Python37 下。可以将标准的预编译扩展库与此版本的 Python 配合使用。
参考官网:https://help.autodesk.com/view/MAXDEV/2024/ENU/?guid=MAXDEV_Python_using_pymxs_html
文章目录
一、让3dmax带着我写代码
我们初次使用3dmax来写Python脚本肯定会遇到各种困难,关键是会面临有问题不知道去问谁的窘境和尴尬。现在好了,我们可以让3dmax的宏录制带着我们来编写Python代码。
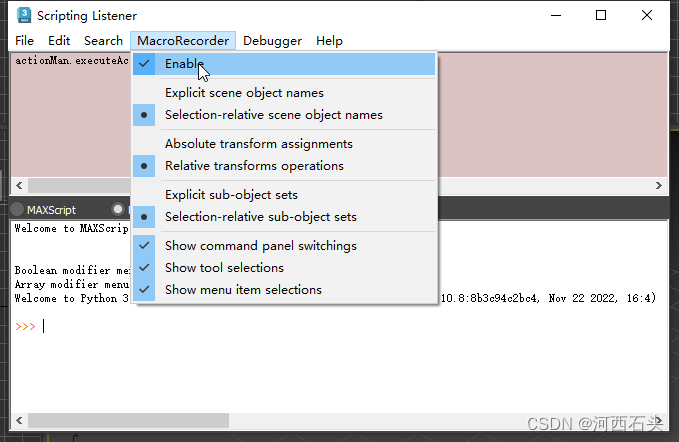
1、打开宏录制
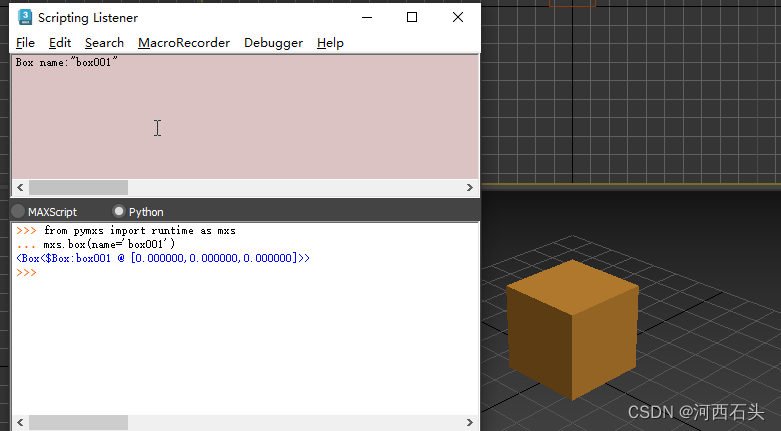
首先,我们可以按快捷键F11来打开脚本监听器,如下图(记得勾选宏录制为Enable):
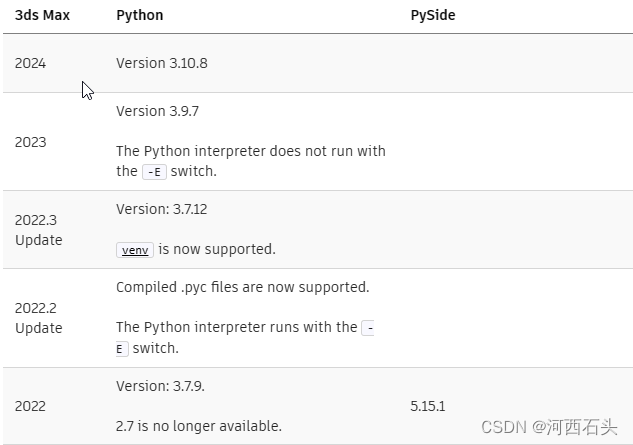
2、支持的python版本
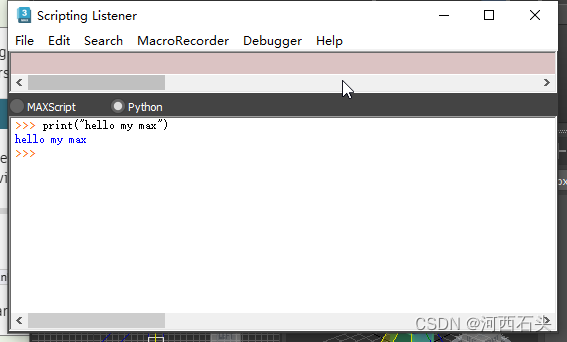
3、开始我们的python
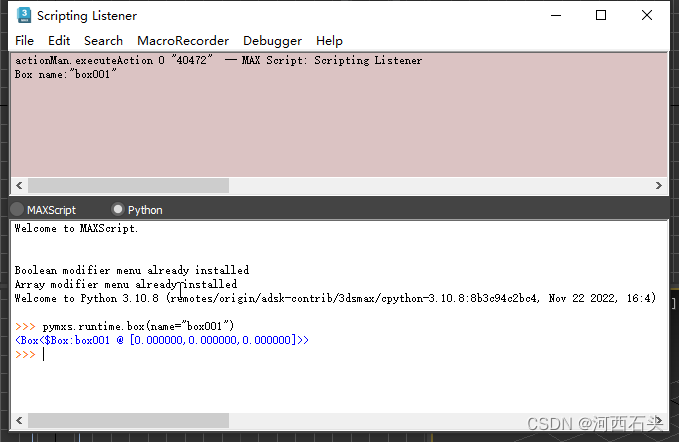
4、创建一个几何体
要创建几何体,我们必须导入pymxs runtime库,方式如下:
from pymxs import runtime as mxs
比如我们要创建一个几何体box,一句话:
pymxs.runtime.box(name="box001")
这里name后面表示名称的字符串可以是单引号也可以是双引号,这个不影响正确性。
除此意外你还可以创建sharp
 pymxs.runtime.circle(name="circle001")
pymxs.runtime.rectangle(name="rect001")
引入库文件
当然,如果每次都写一个 pymxs.runtime,那很麻烦,我们还是将这个库引入后方便后面多次使用,代码如下:
from pymxs import runtime as mxs
mxs.box(name="box001")
属性修改:官网属性修改
修改位置:
https://help.autodesk.com/view/MAXDEV/2024/ENU/?guid=MAXDEV_Python_using_pymxs_pymxs_module_html
咱们挪挪吧,下面的代码就是想box001移动到200,200,200的位置:
t1=mxs.getNodeByName("box001") #通过节点名称获取box001对象
t1.position = rt.Point3(200,200,200)
带参数创建
或者,我们在新建的时候,给点参数吧,否则每次都在原点。
mxs.box(pos=rt.Point3(75,75,0))
带参数创建了一个茶壶,并且事后指定它的半径和位置及分段。
teapot_position=pymxs.runtime.point3(100,20,10)
my_teapot = pymxs.runtime.teapot(radius=50, pos=teapot_position, segments=2)
from pymxs import runtime as rt

t1 = rt.teapot()
t2 = rt.teapot(pos=rt.point3(20,20,0))
通过选择来移动
pp=pymxs.runtime.selection[0]
pp.position=rt.point3(200,200,200);
改个颜色吧
sb=rt.selection[0]
sb.wirecolor=rt.color(120,0,0)
给个材质吧!
材质修改,可以直接借助maxscript脚本
rt.execute(“$Box*.material = standard()”)
https://help.autodesk.com/view/MAXDEV/2024/ENU/?guid=MAXDEV_Python_using_pymxs_pymxs_materials_html
当然,我们既然选择了python脚本,那么我们还是希望能够通过Python脚本来实现
m = pymxs.runtime.standardMaterial()
m.diffuse = pymxs.runtime.color(100,10,10)
m.specular = pymxs.runtime.color(100,0,0)
有了上面的材质,我们可以给我们创建的几何体来赋予材质了
m = pymxs.runtime.standardMaterial()
m.diffuse = pymxs.runtime.color(100,10,10)
m.specular = pymxs.runtime.color(100,0,0)
t = pymxs.runtime.teapot()
t.material=m
我们刚刚是以标准材质为例来展示材质的创建和修改的,当然,我们知道,3dmax中有三种典型的材质Standard, Physical, 及 MultiMaterial我们后面将对其逐个讲解。
增加修改器
其实,我们可以编辑一下box啦
加载修改器代码:
my_modifier = pymxs.runtime.taper()
my_modifier.amount = 2.0
my_modifier.curve = 1.5
pymxs.runtime.addmodifier(my_teapot, my_modifier)
from pymxs import runtime as rt

my_teapot = rt.teapot()
rt.convertTo(my_teapot, rt.editable_poly)
my_mod = rt.UVWMap()
rt.addModifier(my_teapot, my_mod)
直接调用maxscript的指令也可以,如下代码就是调用maxscript的box()创建了一个box
pymxs.runtime.execute('box()')
如果打开文件
pymxs.runtime.execute('max file open')
复制
 sb=rt.selection[0]
rt.copy(sb)
设置坐标系
pymxs.runtime.toolMode.coordsys(pymxs.runtime.Name("world"))
二、转战maxscript编辑器
基于上面的测试和实验,我们初步了解了Python脚本如何调用3dmax的基本指令,我们不可能永远这么测试下去,玩玩还可以,如果我们想编写一个插件或者有正式作用的脚本,还是要在maxscript中来进行,尽管他的只能感知和语法提示作用还不好(如果我们真要编写比较复杂的脚本后面我们将转战pycharm或者sublime text或者VSCode)。
2、整一个动画
rt = pymxs.runtime
t = rt.teapot()
with pymxs.animate(True):
    # go to frame 0
    with pymxs.attime(0):
        t.pos = rt.point3(0,0,0)
    # go to frame 100
    with pymxs.attime(100):
        t.pos = rt.point3(100,100,100)
上面这个动画将我们创建的茶壶从原点移动到100,100,100的位置,耗时100帧。
3、整一个图形拉伸试试
rt.rectangle()
shp=rt.selection[0]
shp.position=rt.point3(100,100,0)
rt.convertTo(shp, rt.editable_poly)
通过convertTo转化为了一个可编辑多边形
4、旋转
https://help.autodesk.com/view/MAXDEV/2024/ENU/?guid=MAXDEV_Python_using_pymxs_pymxs_objects_html
# define function for rotating only the pivot point
def RotatePivotOnly( obj, rotation):
    rotValInv=rt.inverse (rt.r2q(rotation))
    with pymxs.animate(False):
        obj.rotation*=rotValInv
        obj.objectoffsetpos*=rotValInv
        obj.objectoffsetrot*=rotValInv


b=rt.box(pos=rt.Point3(75,75,0)) # create a 25x25x25 box, vertex 1 at [62.5,62.5,0] (world)
rt.convertToMesh (b) # convert box to mesh so we can access the vertex location
DumpXForms(b) # print transforms
b.pivot= rt.Point3(50,50,0)# move pivot only to [50,50,0]
DumpXForms (b) # print transforms
rotation = rt.EulerAngles( 0, 0, 35)
RotatePivotOnly (b, rotation) # rotate pivot only 35 degrees about local Z
DumpXForms (b)# print transforms