前言
作为开发者的我们,经常会做一些上传图片和和保存图片啦 但是由于一些图片非常大,我们在上传或者保存的时候会占用大量的网络资源和本地资源,那么我们需要做的就是对图片就行压缩。以下介绍常见的两种压缩方式:质量压缩,尺寸压缩。你可以自己封装成一个工具类。贴过去直接使用
介绍
图片存在的几种形式:
File
流的形式
Bitmap的形式—内存
1. 什么是质量压缩 ?
图片的质量压缩 降低图片质量(大小)。
原理 :
通过算法扣掉(同化)了 图片中的一些某个点附近相近的像素,达到降低质量 减少 文件大小的目的。注意 : 他其实只能 实现对 file 的影响,对加载这个图片出来的bitmap 内存是无法节省的 ,还是那么大。 因为 bitmap 在内存中的大小是按照 像素 计算的 ,也就是width * height ,对于质量压缩,并不会改变图片的真实的像素(像素大小不会变)。
使用场景 :
将图片保存到本地 ,或者将图片上传 到服务器 ,根据实际需求来 。
2.什么是尺寸压缩?
就是按照一定的倍数对图片减少单位尺寸的像素值。
原理:
通过减少单位尺寸的像素值,真正意义上的降低像素值。使用场景:
缓存缩略图 (头像的处理)代码实操
效果图
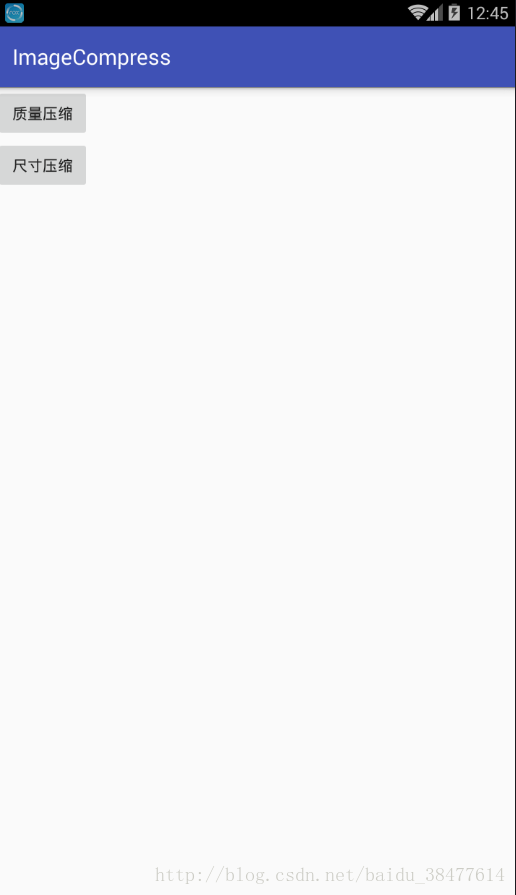
这是 页面的图,哈哈哈有点大,但是只有两个 button
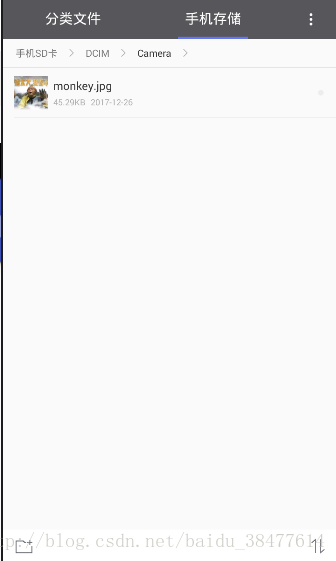
我要做的就是对这个猴子进行质量压缩 和尺寸压缩 。原图大小是 45.29kb质量压缩后的图片请看下面。
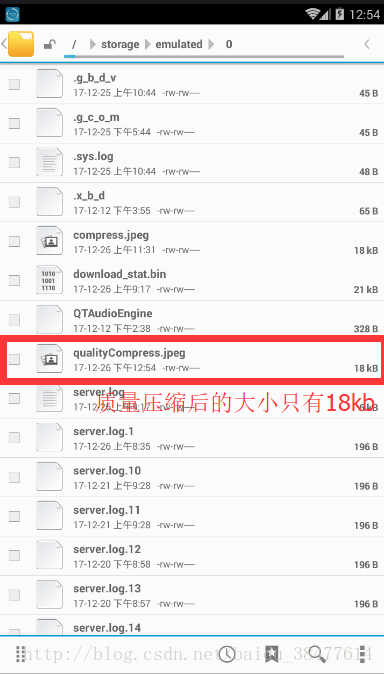
导出来 ,对比一下 压缩前后的 图片效果

效果没什么区别
代码
 Button btn_qulity = (Button) findViewById(R.id.btn_qulity);
  btn_qulity.setOnClickListener(new View.OnClickListener() {
            @Override
            public void onClick(View v) {
                //sd 卡路径
                fileDir = Environment.getExternalStorageDirectory();
                File imageFile = new File(fileDir +"/DCIM/Camera","monkey.jpg"); //图片的路径
                BitmapFactory.Options opts = new BitmapFactory.Options();
                Bitmap bitmap = BitmapFactory.decodeFile(imageFile.getAbsolutePath(), opts);// 文件路径
                compressImage2File(bitmap,new File(fileDir,"qualityCompress.jpeg"));  // 参数一: 输出的文件路径 参数二 : 输出的文件
            }
        });
compressImage2File()方法区
  /*
  * 图片的质量压缩 降低图片质量
  * 原理 :通过算法扣掉(同化)了 图片中的一些某个点附近相近的像素,达到降低质量 减少 文件大小的目的
  * 注意 : 他其实只能 实现对 file 的影响,对加载这个图片出来的bitmap 内存是无法节省的 ,还是那么大
  *  因为 bitmap 在内存中的大小是按照 像素 计算的 ,也就是width * height ,对于质量压缩,并不会改变图片的真实的像素(像素大小不会变)。
  *  使用场景 :
  *      将图片保存到本地 ,或者将图片上传 到服务器 ,根据实际需求来 。
  * */
    public void compressImage2File(Bitmap bmp , File file)
    {
        ByteArrayOutputStream bos = new ByteArrayOutputStream();
        bmp.compress(Bitmap.CompressFormat.JPEG,50,bos);
        try {
            FileOutputStream fos = new FileOutputStream(file) ;
            fos.write(bos.toByteArray());
            Toast.makeText(getApplicationContext(),"质量压缩成功",Toast.LENGTH_SHORT).show();
            fos.flush();
            fos.close();
        } catch (Exception e) {
            e.printStackTrace();
        }
    }
下面看看 尺寸压缩的效果
没尺寸压缩
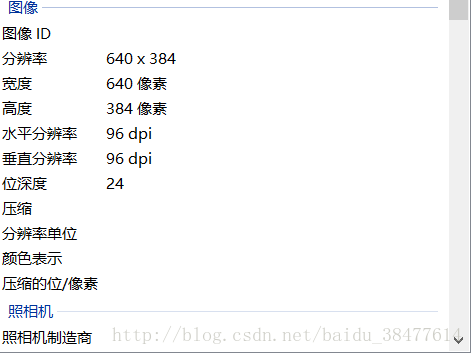
压缩过后的

把像素缩小了 4 倍
效果对比

代码 :
 Button btn_size = (Button) findViewById(R.id.btn_size);
 btn_size.setOnClickListener(new View.OnClickListener() {
            @Override
            public void onClick(View v) {
                //sd 卡路径
                fileDir = Environment.getExternalStorageDirectory();
                File imageFile = new File(fileDir +"/DCIM/Camera","monkey.jpg"); //图片的路径
                BitmapFactory.Options opts = new BitmapFactory.Options();
                Bitmap bitmap = BitmapFactory.decodeFile(imageFile.getAbsolutePath(), opts);// 文件路径
                compressImage2FileBySize(bitmap,new File(fileDir,"sizeCompress.jpeg"));  // 参数一: 输出的文件路径 参数二 : 输出的文件
            }
        });
compressImage2FileBySize()方法区
/**
     * 2.尺寸压缩
     * 原理 : 通过减少单位尺寸的像素值,真正意义上的降低像素值。
     * 使用场景 : 缓存缩略图 (头像的处理)
     * @param bmp  bitmap
     * @param file  文件
     */
    public void compressImage2FileBySize(Bitmap bmp , File file)
    {
        //压缩尺寸倍数 值越大 ,图片的尺寸就越小
        int ratio = 4 ;
        Bitmap result = Bitmap.createBitmap(bmp.getWidth() /ratio , bmp.getHeight() / ratio ,Bitmap.Config.ARGB_8888);
        Canvas canvas = new Canvas(result) ;
        Rect rect = new Rect(0,0,bmp.getWidth() / ratio ,bmp.getHeight() / ratio );
        canvas.drawBitmap(bmp,null,rect,null);

        ByteArrayOutputStream bos = new ByteArrayOutputStream() ;
        result.compress(Bitmap.CompressFormat.JPEG,100,bos);
        try {
            FileOutputStream fos = new FileOutputStream(file);
            fos.write(bos.toByteArray());
            Toast.makeText(getApplicationContext(),"尺寸压缩成功",Toast.LENGTH_SHORT).show();
            fos.flush();
            fos.close();
        } catch (Exception e) {
            e.printStackTrace();
        }
    }
这两个方法可以用到工具类中。很方便