一、Vue脚手架
1、安装脚手架
脚手架是基于node的环境。
- nodejs安装
- 脚手架全局安装:在cmd提示命令符中输入 npm i -g @vue/cli
- 检测是否安装成功:安装好后可输入vue -V 查看是否安装成功及版本号
2、创建项目
- 切换到根目录/项目需要所在目录:在cmd提示命令符中输入 cd /
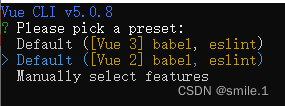
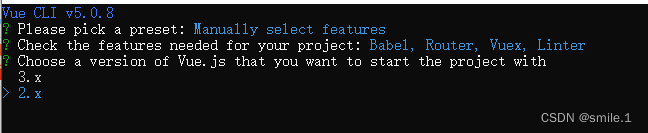
- 创建一个项目: vue create myvue(名字随意命名,我这里项目命名为 myvue)
这里选第二个,然后等一段时间即可完成
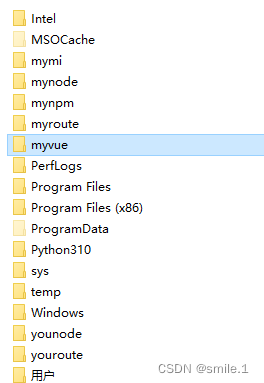
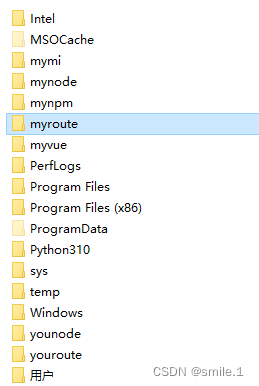
如果你安装在C盘根目录,打开C盘就可以找到myvue文件:
3、Vue文件
- node_modules 包下载地址
- public 模板和共用文件地址
- src 项目源文件目录
--assets 资源目录
--components 组件存放目录
--App.vue 项目根组件
--main.js 项目入口文件 - .gitignore 规定哪些文件不上传
- babel.confg.js ES6转ES5配置文件
- jscofig.json js语法检测配置
- package.json 项目包管理目录
- package-lock.json 包下载缓存地址
- README.md 项目说明目录
- vue.config.js vue的配置文件
4、运行项目
- 切换到项目目录:在提示命令符中输入 cd /myvue
- 运行项目:然后输入 npm run serve
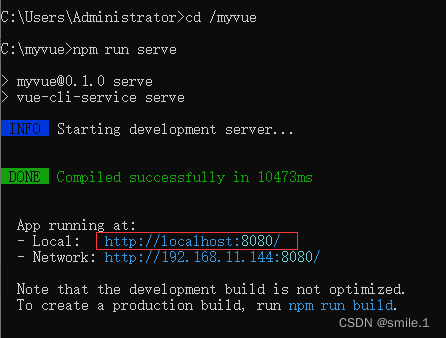
复制链接然后在浏览器打开即可(提示命令符不要关闭)
二、Vue路由
1、spa
<!DOCTYPE html>
<html lang="en">

<head>
    <meta charset="UTF-8">
    <meta http-equiv="X-UA-Compatible" content="IE=edge">
    <meta name="viewport" content="width=device-width, initial-scale=1.0">
    <title>Document</title>
    <style>
        .router-view>div {
            width: 600px;
            height: 600px;
            border: 1px solid #ccc;
        }

        a {
            text-decoration: none;
            color: #000;
        }

        .nav a:hover {
            color: red;
            transition: .5s;
        }
    </style>
</head>

<body>
    <!-- 导航 -->
    <div class="nav">
        <a href="#/home" class="router-link">首页</a> |
        <a href="#/about" class="router-link">关于</a> |
        <a href="#/user" class="router-link">用户</a> |
        <a href="#/produce" class="router-link">产品</a>
    </div>
    <!-- 视图页面 -->
    <div class="router-view">
        <div id="home">首页页面</div>
        <div id="about">关于页面</div>
        <div class="user">用户中心页面</div>
        <div class="produce">产品页面</div>
    </div>
</body>
<script>
    // 配置让 地址栏与组件一一对应起来
    var routes = [
        { path: "/home", component: document.getElementById("home") },
        { path: "/about", component: document.getElementById("about") },
        { path: "/user", component: document.querySelector(".user") },
        { path: "/produce", component: document.querySelector(".produce") }
    ]
    // 监听hash变化
    window.onhashchange = handler;
    function handler() {
        // 拿到hash值
        var hash = location.hash.slice(1); //移除#号
        // 遍历routes配置,如果hash值等于遍历item的path值我们就让对应的component显示,否则隐藏
        routes.forEach(item => {
            if (item.path === hash) {
                // 如果path值与hash值相等显示对应component
                item.component.style.display = "block";
            } else {
                // 否则隐藏对应的component
                item.component.style.display = "none";
            }
        })
    }
    window.onload = function () {
        // 获取hash值
        var hash = location.hash || "#" + routes[0].path;
        // 设置hash值
        location.hash = hash;
        handler(); // 默认执行一次检查hash
    }
</script>

</html>- singlePageApplication:一个网站的所有页面都集成在一个html文件里面通过切换div模拟页面的切换
- 优点:资源公用;前后端分离;页面切换流畅
- 缺点:对SEO搜索引擎不友好
- 原理:地址改变,不刷新页面,监听地址栏变化实现页面局部更新
- Hash路由:锚点(hash)变化不会刷新页面;window.onhashchange
- 历史记录路由:H5新增特性;history.onpopstate
2、创建Vue路由项目
- 切换到根目录/项目需要所在目录:在cmd提示命令符中输入 cd /
- 创建一个项目: vue create myroute(名字随意命名,我这里项目命名为 myroute)
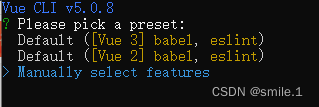
1.这里选择第三个
2.找到对应选项按空格选中,然后按回车

3.选择第二个
4.这里输入n,然后按回车

5.选第一个按回车

6.选第一个按回车

7.选第一个按回车

8.输入N,按回车,然后等待一段时间即可完成

如果你安装在C盘根目录,打开C盘就可以找到myvue文件:
3、运行项目
- 切换到项目目录:在提示命令符中输入 cd /myvue
- 运行项目:然后输入 npm run serve
复制链接然后在浏览器打开即可(提示命令符不要关闭)
4、Vue路由文件
- router/index.js 路由配置
- store/index.js 全局数据配置
- views 页面存储地址
---AboutView.vue 关于页面
---HomeView.vue 首页页面 - App.vue 根节点
5、添加路由
1.在views文件夹中创建一个页面,如:UserView.vue (名字必须用驼峰式写法)
2.在router/index.js 配置路由
普通路由:
{
path:"/user", //匹配的地址
name:"user", //名称
component:()=>improt(xxx) //配置对应的页面,xxx是文件路径
}传参路由:
{
path:"/product/:id",
name:"product",
component:()=>import(xxx)
}
//在ProduceView.vue获取
//{
{$route.params.id}}<template>
<div class="product">
<h1>这里是产品页面 {
{ $route.params.id }}</h1>
</div>
</template>子路由:
{
path:"/admin",name:"admin",component:AdminView,
children:[
{path:"dash",name:"dash",component:DashView},
{path:"even",name:"even",component:EvenView},
{path:"",redirect:"dash"}
]
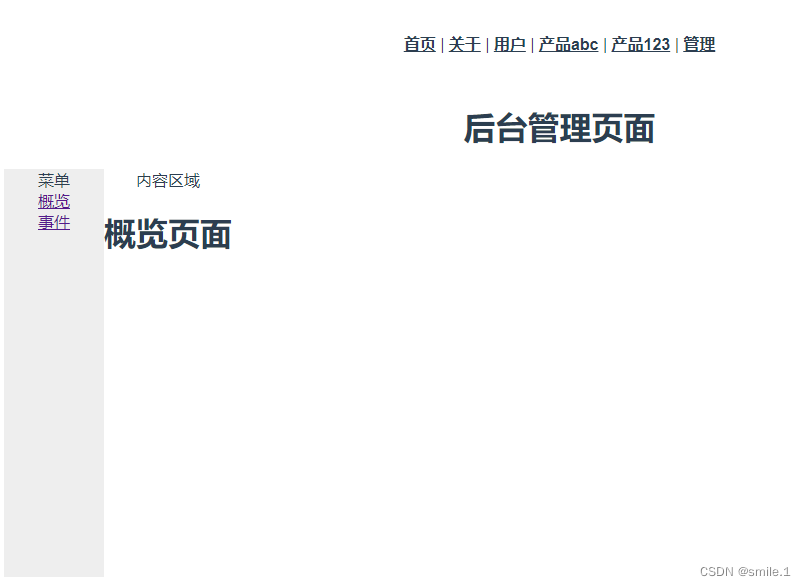
}子路由页面嵌套(AdminView.vue):
<template>
  <div>
    <h1>后台管理页面</h1>
    <div class="container">
      <div class="left">
        菜单<br />
        <router-link to="/admin/dash">概览</router-link><br />
        <router-link to="/admin/event">事件</router-link>
      </div>
      <div class="content">
        内容区域
        <!-- 存放子路由页面 -->
        <router-view></router-view>
      </div>
    </div>
  </div>
</template>
子路由+子路由页面嵌套 效果:
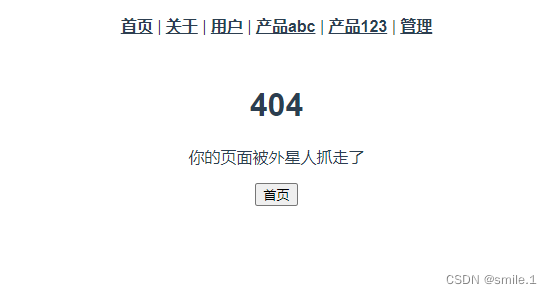
404页面:
// 在最后面配置
{
path: "*",
name: "nomatch",
component: () => import('../views/NoMatch.vue')
}
效果:
3.在App.vue中添加链接(导航)
<template>
  <div id="app">
    <nav class="p">
      <router-link to="/">首页</router-link> |
      <router-link to="/about">关于</router-link> |
      <router-link to="/user">用户</router-link> |
      <router-link to="/product/abc">产品abc</router-link> |
      <router-link to="/product/123">产品123</router-link> |
    </nav>
    <router-view></router-view>
    <!-- router-view 用来存放页面
    router-link 改变地址栏,改变hash值 -->
  </div>
</template>

<script>
</script>

<style>
#app {
  font-family: Avenir, Helvetica, Arial, sans-serif;
  -webkit-font-smoothing: antialiased;
  -moz-osx-font-smoothing: grayscale;
  text-align: center;
  color: #2c3e50;
}

nav {
  padding: 30px;
}

nav a {
  font-weight: bold;
  color: #2c3e50;
}

nav a.router-link-exact-active {
  color: #42b983;
}
</style>
效果:

首页的内容可在views文件夹中的HomeView.vue中修改。
6、当前路由信息($route)
- name名称
- params:路由的参数
- path:地址信息
- fullPath:全地址信息
- hash:哈希值
- query:查询参数
- meta:元信息
7、编程跳转
<template>
  <div class="user">
    <h1>这里是用户页面</h1>
    <button @click="$router.back()">返回</button>
    <button @click="$router.forward()">前进</button>
    <button @click="$router.go(-1)">返回</button>
    <button @click="$router.go(1)">前进</button><br />
    <button @click="$router.push('/about')">关于</button>
    <button @click="$router.replace('/about')">关于(替换)</button>
    <!-- replace 替换历史记录
    跳转到about页面,当前user页面不留历史记录 -->
  </div>
</template>