第一部分:前言
本文是介绍在《Ray Tracing from the Ground Up》的那套代码的基础上怎么做出和BART官网上提供的视频差不多的动画。
大概一年前,小编写过一篇汇总性质的博文:
总结《Ray Tracing from the Ground Up》
(https://blog.csdn.net/libing_zeng/article/details/72625390),算是读完了这本书。当时就想用光线追踪来做个动画试试看,但是这本书并没有尝试教我们怎么做。
后来决定读读《PBRT-V3》,因为感觉pbrt更为“高级”,读完之后应该会做动画了。读pbrt的过程可谓是充满心酸。pbrt讲的物理模拟,是教我们怎么更为真实地生成图形。pbrt的源代码算是商业级别的,不冗余,很抽象。代码和书都读得很辛苦,读完之后才发现pbrt“只是”其他光线追踪介绍书籍的“深入”,好像也没有教我们怎么做动画。
最近,决定回到刚读完《Ray Tracing from the Ground Up》的状态再次尝试用光线追踪来做个动画。为什么要回到一年前的状态呢?虽然花了不少时间分析pbrt的代码,但是自己还是觉得对《Ray Tracing from the Ground Up》的那套代码更为熟悉。另外,也是考虑到咱并不要求动画有pbrt涉及的那种真实程度。
也是在一年多前,知道了有BART这么个东东。关于BART,全称是“BART: A Benchmark for Animated Ray Tracing”,是对光线追踪动画算法的测试基准。也就是测试光线追踪的动画算法用的。那么用什么测试算法呢?作者提供了三个测试视频,这个些视频中覆盖了很多动画算法需要考虑的测试场景。用这些视频测试算法,然后根据测试结果给算法打个分。官网链接:(http://www.cse.chalmers.se/~uffe/BART/)。官网上提供了原论文、测试视频、源代码、动画描述文件(或者叫“脚本文件”吧)和原论文的一些其他论文。
小编铁定心一定要用光线追踪做出个动画,将BART官网上所有的内容看了好几遍,但总感觉是云里雾里。一方面,那些论文不是很好懂;另一方面,既然都有了源代码,我还有什么事情可以做呢?
后面发现:那些论文和我要做的事情压根没有关系;动画描述文件是对图形场景的描述(图形的几何信息、材质、纹理、运动等信息);源代码包含对描述文件的解析和动画算法(注意:其中不包含渲染部分)。
所以,为了做出和BART那三个测试视频差不多的的动画,我们需要关注的是:
1、描述文件;
2、源代码;
3、测试视频(主要是对比自己生成的动画)。
什么是动画?顾名思义,会动的画面。特点:1,有多张画面;2,这些画面中的某个部分是运动的(包含场景中所有物体静止,观看角度(相机)是运动的)。我们知道了怎么生成单张画面,所以接下来的就是搞清楚“怎么动”的问题了。这里针对接触过视频压缩的童鞋多说一句:视频压缩告诉我们去掉画面中的冗余信息,只保留运动信息;但是要注意“视频压缩”是“原始视频”的后期工作,而我们在这里要做的是压缩前的“原始视频”。
关于“怎么动”,这就涉及到“关键帧”。物体从A位置运动到B位置(这里的“位置”包含大小、角度、位置),物体在A、B位置处对应的两个画面是关键帧。aff文件中只会给出这两个位置的信息,那么物体从A位置到B位置的过程中的这些画面(称为“普通帧”吧)的位置信息怎么得到呢?这个过程一般是曲线的,所以可以通过对两个关键帧中物体的位置信息进行“曲线插值”得到普通帧中物体的位置信息。动画算法研究的主要关注点应该就是“插值算法”吧,anyway,这个不是我们这里要关心的,我们有这个概念就可以了。
总结一下做动画的思路:
一张一张地生成单个画面;考虑到画面中有些物体是运动的(也就是参数是变化的),所以在生成每一张画面前重新设置物体的参数(动画算法做的事情就是计算每个时间点运动物体的参数)。
到这里,我们默认:已经对《Ray Tracing from the Ground Up》比较熟悉;已经对aff文件比较熟悉;对“动画”的概念有简单的认识。如果不是,回头再看看:《Ray Tracing from the Ground Up》或者小编之前关于这本书所写的一些博文;按照BART官网上介绍地aff文件格式对比看看kitchen.aff及其所include的一些.aff文件;还有前面提到的“动画”内容。
先贴出自己做出的这三个动画视频。
kitchen:
https://v.youku.com/v_show/id_XMzY1NDI0MTQ5Mg==.html?spm=a2h3j.8428770.3416059.1
robots:
https://v.youku.com/v_show/id_XMzY1NDI0NDY1Mg==.html?spm=a2h3j.8428770.3416059.1
museum:(20180609,此刻优酷还在审核中。如果审核通过,应该和前面两个视频在一块)
第二部分:我们要做的事情
前面吧啦吧啦了这么多,终于说到重点了:我们要做的有哪些事情?
1、解析动画描述文件(.aff)。BART的源代码虽然提供了aff文件的解析程序,但它真的只是将aff文件信息单独地读入系统,得到的知识孤立的数据,完全忽略了aff文件中原有的数据结构关系。几何体几何体,材质是材质,纹理是纹理,运动是运动。几何体对应的是哪个材质哪个纹理怎么运动?这些在aff文件中是描述得很清楚的,但是在解析程序中完全没有体现。就像把一辆汽车拆成了一个一个零件堆在仓库里。所以,我们要做的是将这些零件组装起来,即,建立数据之间的关系。后面发现,这个是我们要做的主要事情(之一吧)。
2、建立和《Ray Tracing from the Ground Up》(RTGU)代码之间的联系。
几何部分:aff中给出的mesh信息并不是常见的ply文件格式,所以我们要将mesh信息转换成常见的ply文件格式(小编是直接转换之后信息以ply文件输出保存在硬盘上);
材质部分:aff文件中的fm信息是(amb_r amb_g amb_b diff_r diff_g diff_b spec_r spec_g spec_b Shine T index_of_refraction),而RTGU的程序中是ka、kd、ks,所以我们要增加对应的使用(amb_r amb_g amb_b) (diff_r diff_g diff_b) (spec_r spec_g spec_b)的材质(顺便提一下,RTGU原有的程序是不能改变纹理图片颜色的,使用新增的这些材质之后就可以改变纹理图片的颜色了。)
纹理部分:RTGU中的纹理坐标范围是[0,1],而aff文件的的有些纹理坐标的绝对值有大于1而且有正有负。纹理坐标的绝对值大于1,表示纹理图片被重复的次数(这个“次数”不一定是整数);纹理坐标为负数,表示反方向映射(若正数情况下,表示将图片“从左至右,从下至上”映射到物体上;那么,在负数情况下,表示将图片“从右至左,从上至下”映射到物体上。所以,RTGU中纹理映射这部分的代码是需要更改的。
运动部分:RTGU是通过Instance类是实现物体的缩放、旋转和平移的。但是其中的旋转部分只是沿着坐标轴旋转,而aff文件包含各种沿任意轴旋转的情况,所以我们要增加“沿任意轴旋转”的代码。
3、获取运动物体位置参数:解析完.aff文件之后,我们会将运动信息保留到全局变量中;设置物体参数前计算时间信息,然后根据时间信息和运动物体的名字,调用BART的源代码中提供动画算法的接口,从而获得当前时间点运动物体的位置参数。
4、生成动画:先是一张一张地生成画面(比如:kitchen是800张;robots是300张;museum是300张);将单张(单帧)画面合成动画(视频),我们用到是iMovie剪辑软件(其他视频剪辑软件应该也是可以的);压缩合成后的原始视频,我们是用HandBrake将原始视频转换成mp4的格式(可以将几百兆的原始视频压缩到几十兆)
第三部分:具体实现(以kitchen为例)
这里以生成kitchen动画为例,在RTGU代码的基础上完成具体代码的实现。robots动画的情况基本同kitchen;museum动画需要的一些其他东东后面再补充。
3.1 aff文件的结构
kitchen场景中运动的是toycar和camera。camera的行为比较单一,所以,此处我们以toycar为例看看aff文件的结构,看看aff文件是怎么将toycar的各个部件组装起来的和怎么设置各个部件的运动的。
首先说明一下:toycar的各个微小部件最初的中心都是在原点,而且尺寸可能很小。所以,需要进行缩放、旋转,然后平移到合适的位置,最终组装成toycar。
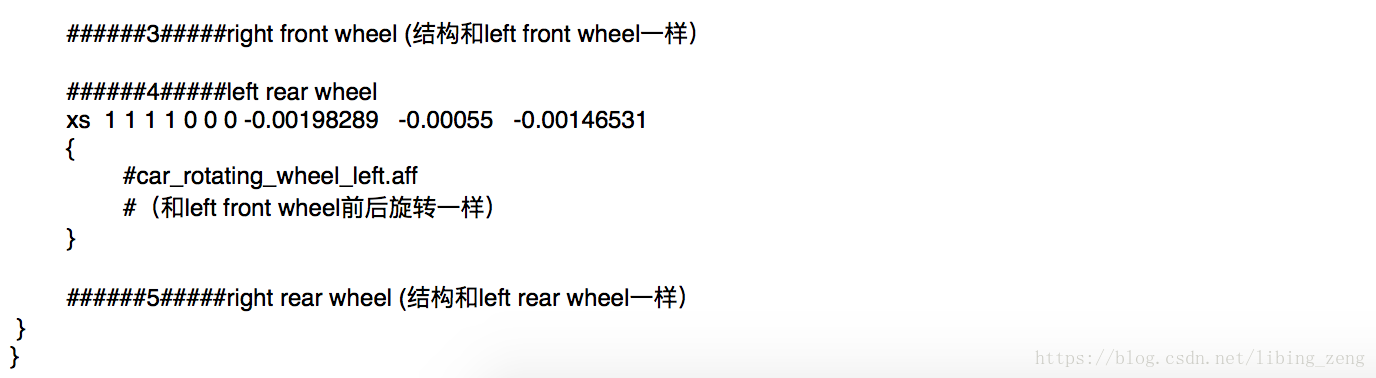
toycar由如下几个大的部件组成:车体car_body;四个轮子car_wheel。
车体中各个部件是统一运动的,所以,在组装完车体后,可以将车体看做一个整体。四个轮子则不一样。静态方面,左右轮子是关于整车的中轴对称的。动态方面,前后轮子的运动是不同的:整车运动时,前面两个轮子一方面要前后转动伴随整车的前进,另一方面要左右转动伴随整车前进方向的改变;后面两个轮子则只需要前后转动,无需左右转动。考虑到这两方面,四个轮子需要分开处理。
接下来,我们看看aff文件中是怎么描述toycar的这些关系的。
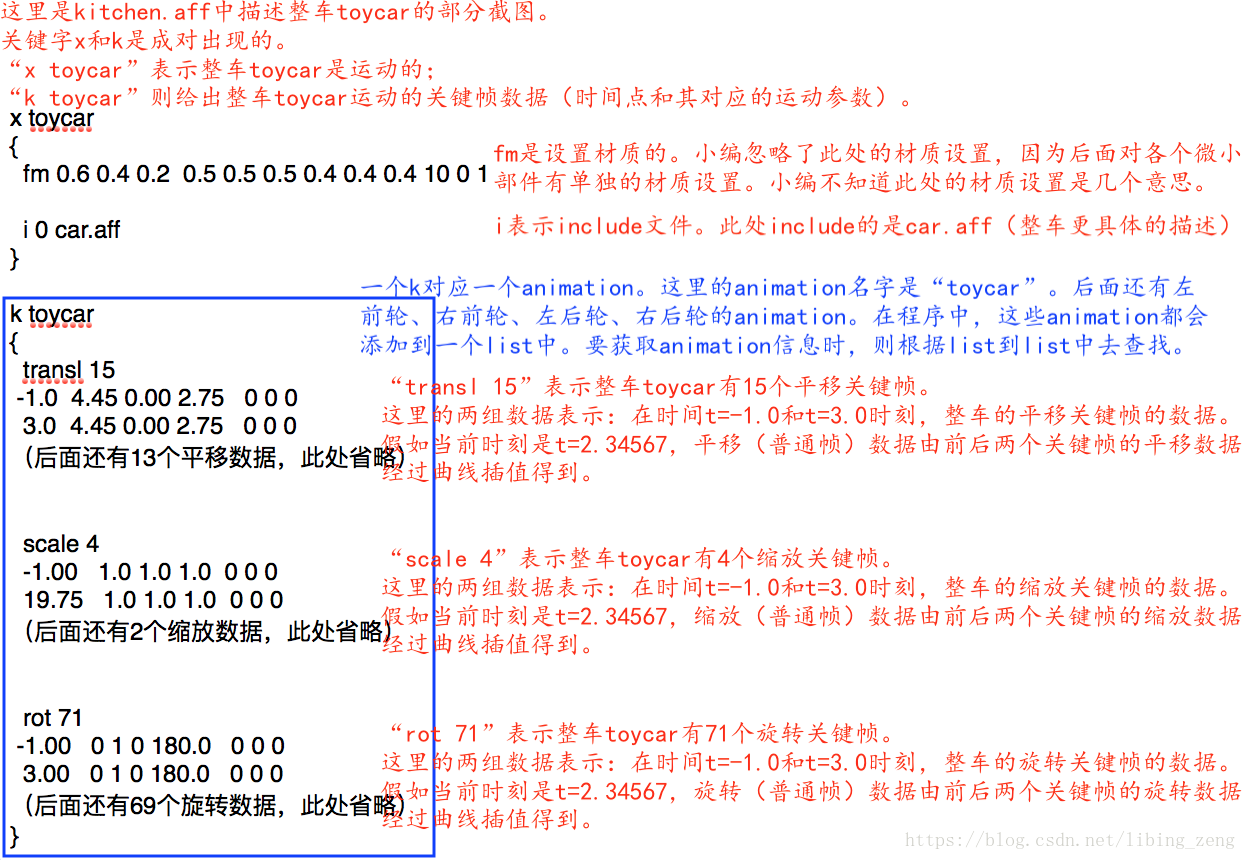
考虑到前轮是运动最为复杂部分,下面我们以前(左)轮为例看看aff的具体描述。
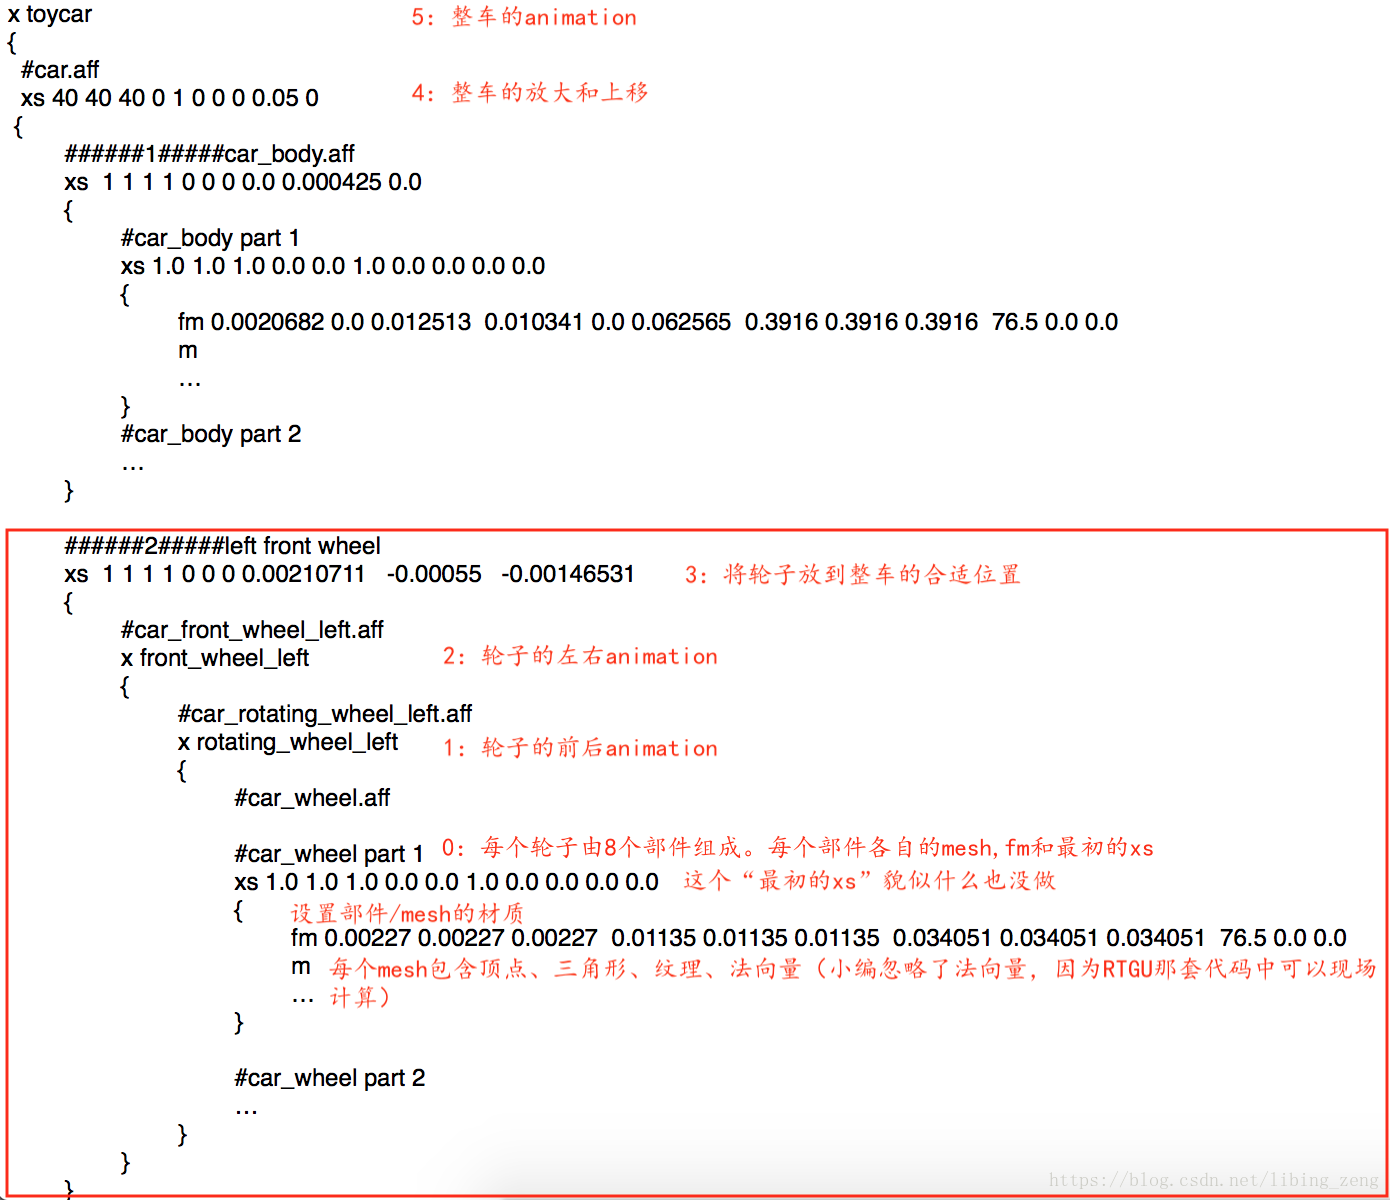
从截图中,我们可以看到,一个前(左)轮的某个mesh(部件)从开始到最终呈现在图形中经过了如下阶段:
由mesh数据生成部件的几何图形(m:mesh);
设置部件的材质(含纹理)(fm,texture);
前后(旋转)的animation(x);
左右旋转的animation(x);
将部件平移到整车的合适位置(xs);
随着整车一起放大和上移(xs);
随着整车一起运动(x)。
3.2 组装数据
由于解析aff文件的过程是从上往下的,所以,在解析到x/xs/fm/texture数据时,我们并不知道这些数据是给那些部件(mesh)用的。而在解析到mesh时,由于独立解析x/xs/fm/texture数据已经完成,所以,我们怎么才能知道当前解析的mesh对应的x/xs/fm/texture数据是什么呢?
小编的做法是对每一个几何部件进行命名,然后生成对应的.ply、.fm、.xs(含x)、.tn(texture name)文件。
在创建每一个mesh时都去读取同名的.fm、.xs、.tn文件。(由于涉及到的mesh数目众多,按照RTGU那套代码在world::build()中逐一创建mesh,写build()的工作量有点大,所以,小编写了个函数来读取.ply、.fm、.xs、tn自动生成build()函数中的相应代码。
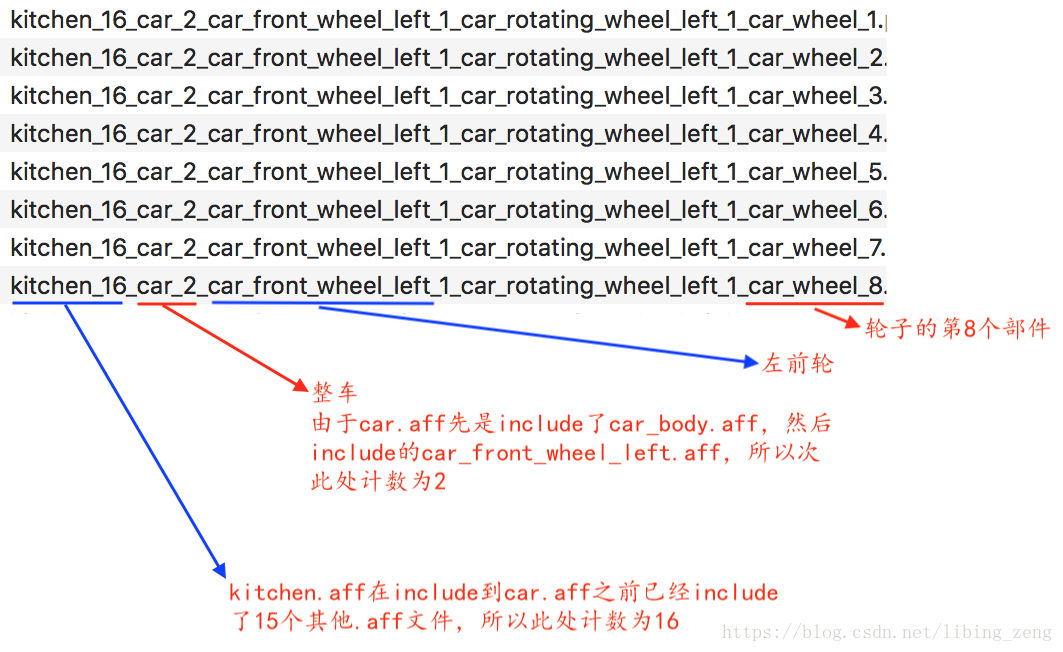
3.2.1 对几何部件进行命名
还是以左前轮为例。从开始解析kitchen.aff到解析到某个具体部件(mesh)依次打开了这些.aff文件:kitchen.aff、car.aff、car_front_wheel_left.aff、car_rotating_wheel_left.aff、car_wheel.aff。我们依次将这些文件的文件名依次包含到部件的命名中。另外在一个文件内部读到一个mesh或者include一个.aff(可能包含mesh)时进行计数。
最终得到左前轮的各个部件的命名是这样的:
下面看看在程序中的实现。
第〇步:
在parse.h中定义这样一个结构体FN:
    typedef struct File_name {
        char file_name[100];
        int sub_num;//number of meshes and inlude_files in this active file
    } FN;
在main.cpp中定义FN数组保存所有当前打开的文件的文件名和内部计数:
FN g_fn[20];//global variable for active file names
在main.cpp中定义当前打开的文件的总数:
int g_fn_num = 0;//number of active fn
第一步:
在main()函数中调用viParseFile()前将总的aff文件kitchen.aff的文件名数据到g_fn数组中(由于给定的文件名可能包含绝对路径,所以需要从包含绝对路径的文件名中分理出文件名);g_fn_num++。
在main()函数中解析完kitchen.aff(关闭文件)时,g_fn_num–。
第二步:
在viParseFile()中解析include、mesh、polygon(如果aff文件包含polygon而且你也有意对其进行命名)指令时,调用parseInclude()/parseMesh()/ parsePoly()函数前g_fn[g_fn_num].sub_num++;
第三步:
在parseInclude()函数中调用viParseFile()前将include的文件名数据到g_fn数组中;g_fn_num++。
在parseInclude()函数中解析完include的文件时,g_fn_num–。
在添加如上三处代码后,在解析mesh或者polygon(kitchen中没有polygon,暂不考虑)时g_fn[]数组中就已经写好了当前打开的所有文件的文件名及其内部计数的数据了。
第四步:
在parseMesh()函数中增加如下代码就可得到当前mesh部件的名字了。
    /*get current mesh name----begin----*/
    char str_mesh_name[100], str_sub_num[100];
    memset(str_mesh_name, 0x00, sizeof (str_mesh_name)); //clear string str_mesh_name
    for(int i=1; i<=g_fn_num; i++){
        if(i>1){
            strcat(str_mesh_name, "_");
        }
        strcat(str_mesh_name, g_fn[i].file_name);//connect strings
        strcat(str_mesh_name, "_");
        sprintf(str_sub_num, "%d", g_fn[i].sub_num);//transform int to string
        strcat(str_mesh_name, str_sub_num);
    }
    printf("current mesh: %s\n", str_mesh_name);
    /*get current mesh name----end----*/
3.2.2 将mesh数据输出为常见的ply文件
之所以做这个转换,还是为了用RTGU那套代码,另外确实看它不顺眼。童鞋不做这个转换,直接根据其给定的mesh数据创建三角形,然后进行加速肯定是可以的。但是,RTGU中现成的创建三角形、加速代码,为什么不用呢?
3.2.2.1 aff文件中的mesh和常见ply文件格式的区别
咱先对比一下aff文件中的mesh和常见ply文件格式有什么区别吧。
关于常见的ply文件,小编之前写过一篇博文:
Q81:“三角形网格”之“PLY文件”
(https://blog.csdn.net/libing_zeng/article/details/61195502)
关于aff文件中的mesh
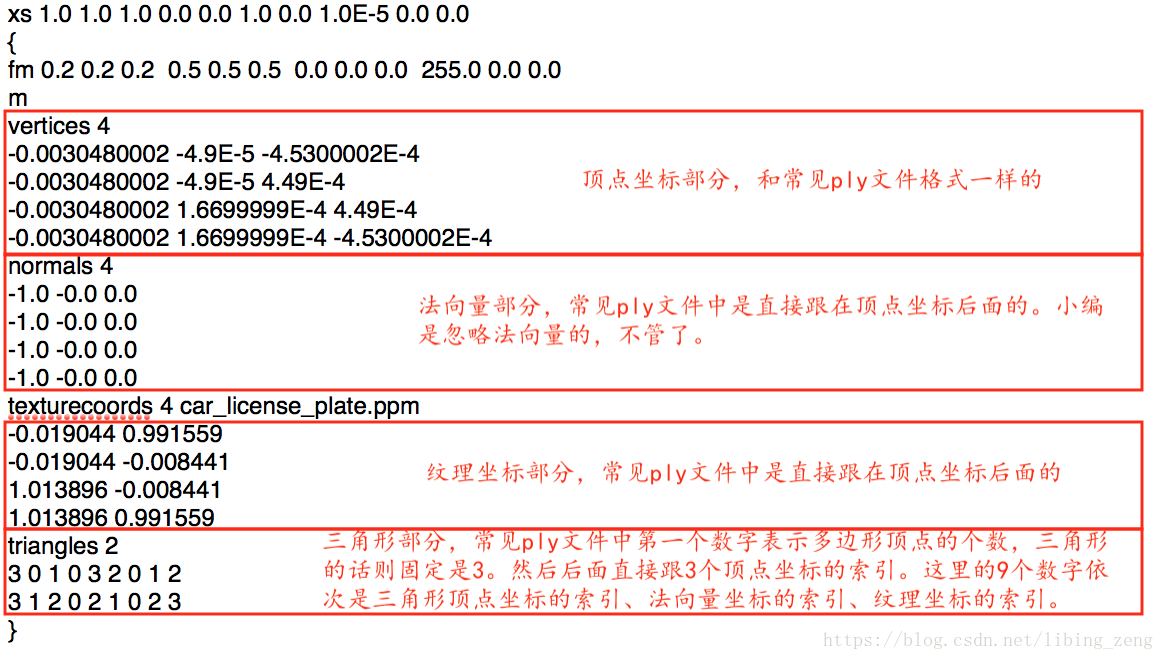
为了将mesh数据转换成常见的ply文件,我们需要做三件事:
1,在三角形数据前添加数字“3”;
2,去掉三角形数据中的法向量坐标的索引和纹理坐标的索引;
3,将顶点坐标和纹理坐标对应起来。
3.2.2.2 填充vertices[][]和triangles[][]
前两件事so easy,而将顶点坐标和纹理坐标对应起来则需要特别处理了。
小编的做法是:在parseMesh()函数解析完所有数据之后,创建两个二维数组用于分别保存常见ply文件格式的顶点和三角形数据。
float vertices[num_verts][5];//顶点坐标+纹理坐标
int triangles[num_tris][4];//固定数字“3”+三个顶点坐标的索引
所以,接下来要做的事情就是将parseMesh()解析的顶点和三角形数据填到这两个数组中,然后将这两个数组输出生成ply文件。
小编是按照原三角形数据中顶点坐标索引的顺序来填vertices[][]和triangles[][]的。以上方截图中的三角形数据为例:
triangles 2
3 0 1 0 3 2 0 1 2//第一个三角形的三个顶点的索引分别是3 0 1
3 1 2 0 2 1 0 2 3//第二个三角形的三个顶点的索引分别是3 1 2
所以,小编填充vertices[][]的顺序是:
根据第一个三角形,依次填充vertices[3][]、vertices[0][]、vertices[1][];
根据第二个三角形,依次填充vertices[3][]、vertices[1][]、vertices[2][]。
发现其中vertices[3][]、vertices[1][]被填充了两次,是的,没有找到更好的办法。为了完整地填充vertices[][]数据,由于三角形共顶点的缘故,有的vertices[][]元素会被不止一次填充相同的数据。
而对于triangles[][]数据的填充,直接写固定数字“3”和原三角形数据中的顶点索引即可。
我们既然是依据原三角形数据来填充这两个数组的,那么就有必要看看parseMesh()是怎么解析和保存原三角形数据的。
parseMesh()是调用getTriangles()函数来解析原三角形数据的。在getTriangles()函数中的做法是:
其一,开辟了一坨空间来保存三角形数据的,然后用指针idx指向这坨空间:
    unsigned short *idx;
    int i,v[3],n[3],t[3];

    allocsize=3;//为单个三角形的顶点数据分配的空间数为3份
    if(norms) allocsize+=3;//如果有法向量,单个三角形的数据分配的空间数加3份
    if(txts) allocsize+=3; //如果有纹理坐标,单个三角形的数据分配的空间数加3份


    idx=(unsigned short *)malloc(num*allocsize*sizeof(unsigned short));
    //为num个三角形申请num个allocsize份空间
其二,依次解析三角形数据。将单个三角形的数据临时保存到v[3]、t[3]、n[3]中。
其三,将v[3]、t[3]、n[3]中的数据复制到指针idx指向的空间中:
        /* indices appear in this order: [texture] [normals] vertices. []=optional */
        for(w=0;w<3;w++)
        {
            if(txts) idx[i++]=t[w];
            if(norms) idx[i++]=n[w];
            idx[i++]=v[w];
        }
其四,“其二、其三”循环num次。
还是前面的三角形为例,看一下三角形数据是怎么保存的。
triangles 2
3 0 1 0 3 2 0 1 2
3 1 2 0 2 1 0 2 3//第二个三角形的三个顶点的索引分别是3 1 2
//第一个三角形的三个顶点的索引分别是3 0 1
//第一个三角形的三个顶点的法向量坐标的索引分别是0 3 2
//第一个三角形的三个顶点的纹理坐标的索引分别是0 1 2
idx[]中保存数据的顺序是纹理、法向量、顶点,所以第一个三角形的数据保存在idx[]中的位置是:
纹理部分(idx[0]=0、idx[1]=1、idx[2]=2)、法向量部分(idx[3]=0、idx[4]=3、idx[5]=2)、顶点部分(idx[6]=3、idx[7]=0、idx[8]=1)
第二个三角形的数据保存在idx[]中的位置是:
纹理部分(idx[9]=0、idx[10]=2、idx[11]=3)、法向量部分(idx[12]=0、idx[13]=2、idx[14]=1)、顶点部分(idx[15]=3、idx[16]=1、idx[17]=2)
知道解析后三角形数据在idx[]中的样子,接下来我们可以将idx[]中的数据填充到vertices[][]和triangles[][]了。
首先定义几个变量:
    int has_norms = 0;//标示idx[]数据中是否有法向量坐标的索引
    int has_txts = 0; //标示idx[]数据中是否有纹理坐标的索引
int idx_t_pos[3], idx_n_pos[3], idx_v_pos[3];
//这三个变量分别表示纹理坐标索引(3个)、法向量坐标索引(3个)、顶点索引(3个)在idx[]中的单个三角形数据中的位置

    if(norms){has_norms = 1; }
    if(txts){ has_txts = 1; }

    int idx_d = (has_txts + has_norms + 1) * 3;//indices dimension for each vertex
//idx[]中的单个三角形数据的个数

    //indices is obtained by "getTriangles(fp,&num_tris,&indices,verts,norms,txts)"
    int i = 0;
    for(int w=0; w<3; w++){
    //根据getTriangles()中保存数据的顺序:纹理、法向量、顶点,计算各类数据在单个三角形数据中的位置
        if(txts){ idx_t_pos[w] = i++;}
        if(norms){ idx_n_pos[w] = i++;}
        idx_v_pos[w] = i++;
    }
下面正式填充vertices[][]和triangles[][]:
    for(int i=0; i< num_tris; i++){
        triangles[i][0] = 3;
        triangles[i][1] = indices[i*idx_d+idx_v_pos[0]];
        triangles[i][2] = indices[i*idx_d+idx_v_pos[1]];
        triangles[i][3] = indices[i*idx_d+idx_v_pos[2]];

        vertices[indices[i*idx_d+idx_v_pos[0]]][0] = verts[indices[i*idx_d+idx_v_pos[0]]][0];
        vertices[indices[i*idx_d+idx_v_pos[0]]][1] = verts[indices[i*idx_d+idx_v_pos[0]]][1];
        vertices[indices[i*idx_d+idx_v_pos[0]]][2] = verts[indices[i*idx_d+idx_v_pos[0]]][2];

        vertices[indices[i*idx_d+idx_v_pos[1]]][0] = verts[indices[i*idx_d+idx_v_pos[1]]][0];
        vertices[indices[i*idx_d+idx_v_pos[1]]][1] = verts[indices[i*idx_d+idx_v_pos[1]]][1];
        vertices[indices[i*idx_d+idx_v_pos[1]]][2] = verts[indices[i*idx_d+idx_v_pos[1]]][2];

        vertices[indices[i*idx_d+idx_v_pos[2]]][0] = verts[indices[i*idx_d+idx_v_pos[2]]][0];
        vertices[indices[i*idx_d+idx_v_pos[2]]][1] = verts[indices[i*idx_d+idx_v_pos[2]]][1];
        vertices[indices[i*idx_d+idx_v_pos[2]]][2] = verts[indices[i*idx_d+idx_v_pos[2]]][2];

        if(txts){
            vertices[indices[i*idx_d+idx_v_pos[0]]][3] = txts[indices[i*idx_d+idx_t_pos[0]]][0];
            vertices[indices[i*idx_d+idx_v_pos[0]]][4] = txts[indices[i*idx_d+idx_t_pos[0]]][1];
            vertices[indices[i*idx_d+idx_v_pos[1]]][3] = txts[indices[i*idx_d+idx_t_pos[1]]][0];
            vertices[indices[i*idx_d+idx_v_pos[1]]][4] = txts[indices[i*idx_d+idx_t_pos[1]]][1];
            vertices[indices[i*idx_d+idx_v_pos[2]]][3] = txts[indices[i*idx_d+idx_t_pos[2]]][0];
            vertices[indices[i*idx_d+idx_v_pos[2]]][4] = txts[indices[i*idx_d+idx_t_pos[2]]][1];
        }
    }
3.2.2.3 输出常见的ply文件
ply文件的名字即是“3.2.1”中得到的名字,此处的变量是ply_file_name。
先写ply文件的header;再写vertices(直接输出前面填充的vertices[][]);最后写triangle(直接输出前面填充的triangles[][])
    /*creat ply files---------begin-------*/
    char new_file[200] = "/Users/libingzeng/CG/kitchen/ply/";
    strcat(ply_file_name, ".ply");  // connect strings
    strcat(new_file, ply_file_name);// new_file will be a whole path including file name for the file created.


    FILE *fp_new =fopen(new_file,"at");
    if(!fp_new)
    {
        printf("Error: could not open file: <%s>.\n",new_file);
        exit(1);
    }

    //write header for ply file.
    fprintf(fp_new, "ply\n");
    fprintf(fp_new, "format ascii 1.0\n");
    fprintf(fp_new, "comment author: Libing Zeng transforms this from .aff of bart\n");
    fprintf(fp_new, "element vertex %d\n", num_verts);
    fprintf(fp_new, "property float x\n");
    fprintf(fp_new, "property float y\n");
    fprintf(fp_new, "property float z\n");
    if(txts){
        fprintf(fp_new, "property float u\n");
        fprintf(fp_new, "property float v\n");
    }
    fprintf(fp_new, "element face %d\n", num_tris);
    fprintf(fp_new, "property list int int vertex_indices\n");
    fprintf(fp_new, "end_header\n");

    //write vertices data for the new file
    for(int j=0; j<num_verts; j++)
    {
        if(txts){
            fprintf(fp_new, "%f %f %f %f %f\n", vertices[j][0], vertices[j][1], vertices[j][2], vertices[j][3], vertices[j][4]);
        }
        else{
            fprintf(fp_new, "%f %f %f\n", vertices[j][0], vertices[j][1], vertices[j][2]);
        }
    }

    //write triangles data for the new file
    for(int k=0; k<num_tris; k++)
    {
        fprintf(fp_new, "%d %d %d %d\n", triangles[k][0], triangles[k][1], triangles[k][2], triangles[k][3]);
    }

    fclose(fp_new);
    /*creat ply files---------end-------*/
3.2.3 输出mesh的纹理图片名(texture name)文件.tn
单个mesh的纹理图片只有一个,所以直接将parseMesh()中读到的texturename输出即可。
    /*creat texture_name files---------begin-------*/
    char new_tn_file[200] = "/Users/libingzeng/CG/kitchen/tn/";
    strcat(tn_file_name, ".tn");  // connect strings
    strcat(new_tn_file, tn_file_name);// new_file will be a whole path including file name for the file created.
    FILE *fp_tn_new =fopen(new_tn_file,"at");
    if(!fp_tn_new)
    {
        printf("Error: could not open file: <%s>.\n",new_tn_file);
        exit(1);
    }

    fprintf(fp_tn_new, "%s ", texturename);

    fclose(fp_tn_new);
    /*creat fm files---------end-------*/
另外,在parseMesh()定义“texturename”处,最好将其初始化为空字符串,因为如果不初始化(系统给它一个随机值)
strcpy(texturename, “”);//initiate texturename for avoiding random initial value. 20180602
3.2.4 输出mesh的材质文件.fm
考虑到只有离mesh最近的那个fm数据会对mesh产生作用,所以只需用一个全局变量保存最近解析的fm数据,然后将这个数据输出到与mesh同名的.fm文件中即可。这里需要提出的是,在aff文件中“离mesh最近的那个fm”并不一定在m指令上面一行或者几行。因为要考虑“很多个mesh共一个fm”的情况,所以fm数据和当前mesh之间可能隔着很多个同fm的其他mesh的数据。
小编的做法是:
1,在parse.h中定义fm的结构体
    typedef struct Fm {
        float fm[12];
    } FM;
2,在main.cpp中定义全局变量
FM g_fm;//global variable for active material
3,在parseFill()函数解析完fm数据后,将数据保存到全局变量g_fm中
        g_fm.fm[0] = amb[X]; g_fm.fm[1] = amb[Y]; g_fm.fm[2] = amb[Z];
        g_fm.fm[3] = dif[X]; g_fm.fm[4] = dif[Y]; g_fm.fm[5] = dif[Z];
        g_fm.fm[6] = spc[X]; g_fm.fm[7] = spc[Y]; g_fm.fm[8] = spc[Z];
        g_fm.fm[9] = phong_pow; g_fm.fm[10] = t; g_fm.fm[11] = ior;
4,在parseMesh()中全局变量g_fm的内容直接输出到和mesh同名的.fm文件中
3.2.5 输出mesh的变形(静态变换xs和animation的名字)文件.xs
由“3.1 aff文件的结构”中的内容,我们知道mesh的变换(xs和x)有严格的顺序限制,所以我们必须保证输出到文件的xs、x数据的顺序和aff文件中描述的顺序是一致的。
小编的做法是:
1,在parse.h中定义结构体XS
    typedef struct Xs {
        int type;//1: for x; 2:for xs
        float xs[10];//for xs
        char name[100];//for x
} XS;
(对于x数据,只需要保存对应的animation name,具体设置animation参数时,根据name在animation list中查找对应的animation。关于animation信息的保存,后面再补充)
2,在main.cpp中定义全局变量
XS g_xs[20];//global variable for active transform (including x and xs)
int g_xs_num = 0;//number of active xs (including x)
3,分别在parseXform()函数解析完xs数据和x数据后,将解析后的数据保存到g_xs[]中;g_xs_num++
4,在viParseFile()函数读到“}”时,g_xs_num–。
这个地方设置“g_xs_num–”,感觉有点草率。但是,小编发现好像只有x和xs对应的“}”需要留到viParseFile()函数来解析。在kitchen、robots、museum三个场景中,只发现有“}”的只有x、xs和k三种描述指令。x、xs的数据是直接跟在指令之后的(x的数据只是animation name),后面的{}只是表示x、xs的作用范围(对象),当碰到“}”时,说明作用范围结束。而k指令不一样:
其一,它对应的数据是用{}包起来的;
其二,它的数据格式不确定。
这里的“格式不确定”指的是“并不是所有的animation都包含所有四种animation类型(scale、rot、transl、visibility)”(很多时候都只有其中的一种、两种、三种)。所以,parseKeyFrames()中只有通过是否读到“}”来判断当前animation的数据是否结束。这样一来k指令的“}”在parseKeyFrames()中完成了解析。这样一来,解析文件中剩余的需要viParseFile()函数来解析的“}”只能是属于x、xs的了。
5,在parseMesh()中输出mesh的变形文件.xs
经过上面的1、2、3、4,在解析mesh数据时,g_xs[]中保存的就是当前mesh的完整的x、xs参数了。所以,在parseMesh()中输出g_xs[]的内容即是当前mesh的变形文件了。这里需要提一下的是,由于g_xs[]保存的数据包含x和xs数据,所以在按格式输出时,需要根据type来判断是x还是xs,以便确定对应的输出格式。
    /*creat xs files---------begin-------*/
    char new_xs_file[200] = "/Users/libingzeng/CG/kitchen_backup/xs/";
    strcat(xs_file_name, ".xs");  // connect strings
    strcat(new_xs_file, xs_file_name);// new_file will be a whole path including file name for the file created.
    FILE *fp_xs_new =fopen(new_xs_file,"at");
    if(!fp_xs_new)
    {
        printf("Error: could not open file: <%s>.\n",new_xs_file);
        exit(1);
    }

    for(int j=g_xs_num; j>=1; j--){
        if(g_xs[j].type == 1){
            fprintf(fp_xs_new, "%s\n", g_xs[j].name);
        }
        if(g_xs[j].type == 2){
            for(int k=0; k<10; k++){
                fprintf(fp_xs_new, "%f ", g_xs[j].xs[k]);

            }
            fprintf(fp_xs_new, "\n");
        }
    }
    /*creat xs files---------end-------*/
3.2.6 将所有的animation数据保存到animation list中
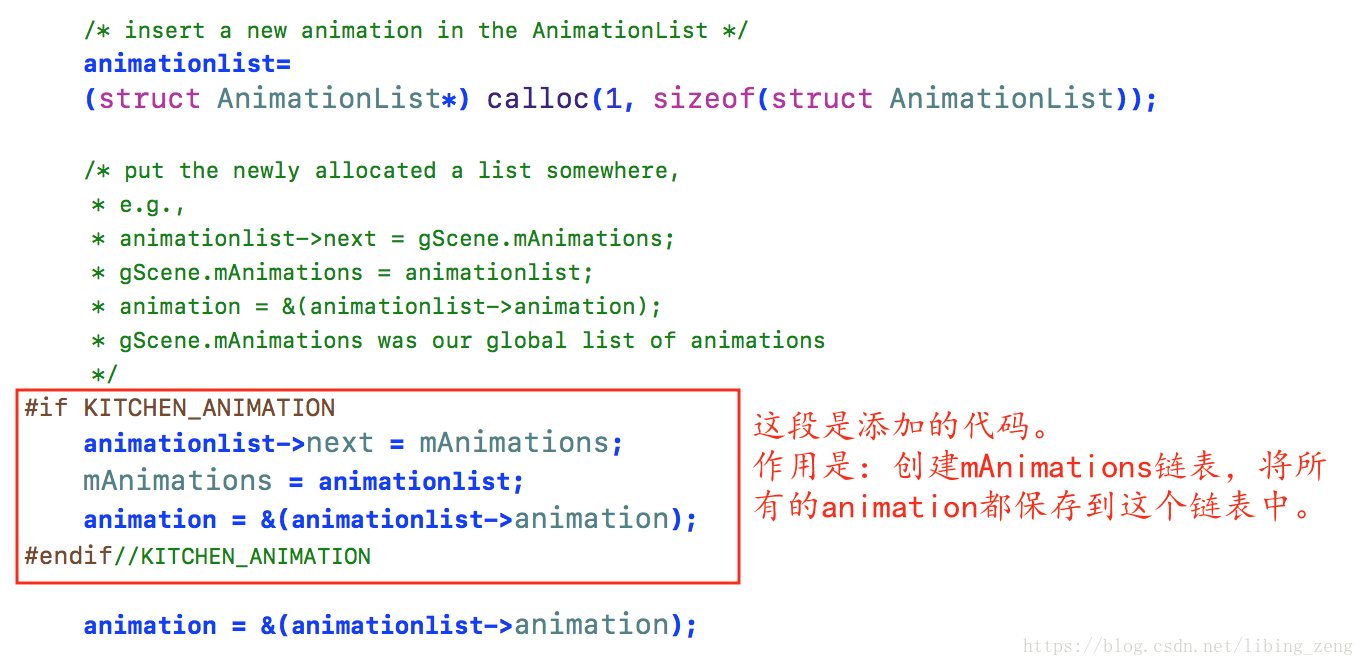
这里先说明一下,前面生成.ply、.tn、.fm、.xs文件的程序可以独立渲染的主函数main()运行,不管在哪里运行都可以,只要能够生成这四类文件即可。但是,animation数据的保存就必须在渲染的主函数中运行,因为animation list是在渲染函数中需要用到的。这里会引出一个问题,即:渲染主函数main()会再次调用viParseFile()解析所有的aff,那么那些.ply、.tn、.fm、.xs岂不是会再生成一次。而写之间又是以“at”的方式写这些文件的,这样,.ply、.tn、.fm、.xs文件中前后就有重复的两份数据了。那么是不是可以将之前写文件的方式改为“w”(覆盖的方式)呢?貌似不能,因为x、xs数据是多次打开文件先后写入的。所以,小编的做法是将前面添加的所有代码都用一个叫做“CREATE_PLY_FM_XS_TN_FILES”的宏包起来的,而渲染主函数要用到的animation数据的全局变量相关的代码是用一个叫做“KITCHEN_ANIMATION”的宏包起来。为了是这些宏能够在多个文件中使用,小编添加了个叫做Macro.h中的头文件,然后在这个头文件中定义所有的宏。需要用到这些宏的文件只需要include这个头文件即可。
关于animation数据的解析和animation list的生成,BART作者推荐的做法(这里不能再说“小编的做法”了)在parseKeyFrames()函数中有提示。
小编是先在main.cpp中定义了全局变量:
struct AnimationList* mAnimations;
然后按照BART作者在parseKeyFrames()函数中的提示,在parseKeyFrames()函数中的如下添加了几行代码:
关于“怎么从mAnimations链表中获取某个时刻的animation数据”:
1,定义一个Animation变量
Animation *anim;
2,通过调用BART提供的动画算法接口FindAnimation()
anim = FindAnimation(name, mAnimations);
将前面的链表mAnimations和需要查找的animation名字name通过FindAnimation()函数传给动画算法就可以得到对应的animation。
3,根据animation获取当前t时刻的运动数据。
_GetTranslation(anim, t, trans);
_GetRotation(anim, t, rot);
_GetScale(anim, t, scale);
通过调用动画算法的如上三个接口可以得到t时刻的运动数据(具体是:根据t时刻前后两个关键帧的数据进行曲线插值得到t时刻的数据)。此刻,这些数据就可以如同xs数据一样设置到name对应的所有mesh了。注意,一个name可能对应着多个mesh的。比如:前面提到的“toycar”对应着整车的所有部件(mesh)。
3.3建立和RTGU代码之间的联系
如“第二部分”中提到,RTGU当前的那套代码是不能直接满足需求的,所以我们需要增加和改动一些代码。其中“几何部分”,我们已经在“3.2.2”中完成。
3.3.1 RTGU中“材质部分”代码的增改
aff文件中的fm信息是(amb_r amb_g amb_b diff_r diff_g diff_b spec_r spec_g spec_b Shine T index_of_refraction),而RTGU的程序中是ka、kd、ks,所以我们要增加对应的使用(amb_r amb_g amb_b) (diff_r diff_g diff_b) (spec_r spec_g spec_b)的材质。
3.3.1.1 增加两个BRDF:SV_Lambertian_FM、SV_GlossySpecular_FM
仿照原有的SV_Lambertian、SV_GlossySpecular,增加两个新的BRDF:
SV_Lambertian_FM、SV_GlossySpecular_FM。
SV_Lambertian_FM类中的修改:
0,将SV_Lambertian类复制过来之后,将原来的“SV_Lambertian”全部替换成“SV_Lambertian_FM”。
1,SV_Lambertian中的成员变量float kd,在SV_Lambertian_FM中对应改成Texture* kd。
2,kd的赋值方法改成这样:
inline void SV_Lambertian_FM::set_kd(Texture* t_ptr) {kd = t_ptr; }
3,f()、sample_f()、rho()中的“kd * (cd->get_color(sr))”改成这样:
RGBColor c_kd = kd->get_color(sr);
RGBColor c_cd = cd->get_color(sr);
RGBColor(c_kd.r*c_cd.r, c_kd.g*c_cd.g, c_kd.b*c_cd.b)
4,如果编译fail,简单修一下
SV_GlossySpecular _FM类中的修改:
0,将SV_GlossySpecular类复制过来之后,将原来的“SV_GlossySpecular”全部替换成“SV_GlossySpecular _FM”。
1,SV_GlossySpecular中的成员变量float ks,在SV_GlossySpecular_FM中对应改成Texture* ks。
2,ks的赋值方法改成这样:
inline void SV_GlossySpecular_FM::set_ks(Texture* t_ptr) {ks = t_ptr; }
3,f()、sample_f()、rho()中的“ks * (cs->get_color(sr))”改成这样:
RGBColor c_ks = ks->get_color(sr);
RGBColor c_cs = cs->get_color(sr);
RGBColor(c_ks.r*c_cs.r, c_ks.g*c_cs.g, c_ks.b*c_cs.b)
4,如果编译fail,简单修一下
3.3.1.2 增加两个Material:SV_Phong_FM、SV_GlossyReflector_FM
仿照原有的SV_Phong、SV_GlossyReflector,增加两个新的Material:
SV_Phong_FM、SV_GlossyReflector_FM。
SV_Phong_FM类中的修改:
0,将SV_Phong类复制过来之后;将原来的“SV_Phong”全部替换成“SV_Phong_FM”;
1,将原来的“SV_Lambertian”全部替换成“SV_Lambertian_FM”,将原来的“SV_GlossySpecular”全部替换成“SV_GlossySpecular_FM”
2,赋值方法改成这样:
inline void SV_Phong_FM::set_ka(Texture* t_ptr) {ambient_brdf->set_kd(t_ptr);}
inline void SV_Phong_FM::set_kd (Texture* t_ptr) {diffuse_brdf->set_kd(t_ptr);}
inline void SV_Phong_FM::set_ks (Texture* t_ptr) {specular_brdf->set_ks(t_ptr);}
3,如果编译fail,简单修一下
SV_GlossyReflector_FM类中的修改:
0,将SV_ GlossyReflector类复制过来之后;将原来的“SV_ GlossyReflector”全部替换成“SV_ GlossyReflector _FM”;
1,将原来的“SV_GlossySpecular”全部改成“SV_GlossySpecular_FM”,将原来的“SV_Phong”全部改成“SV_Phong_FM”
2,赋值方法改成这样:
inline void SV_GlossyReflector_FM::set_kr(Texture* t_ptr) {
glossy_specular_brdf->set_ks(t_ptr);}
3,如果编译fail,简单修一下
3.3.2 RTGU代码中“纹理部分”代码的增改
RTGU中的纹理坐标范围是[0,1],而aff文件的的有些纹理坐标的绝对值有大于1而且有正有负。纹理坐标的绝对值大于1,表示纹理图片被重复的次数(这个“次数”不一定是整数);纹理坐标为负数,表示反方向映射(若正数情况下,表示将图片“从左至右,从下至上”映射到物体上;那么,在负数情况下,表示将图片“从右至左,从上至下”映射到物体上。前面的这些理解,小编是借鉴OpenGL的做法。
ImageTexture.cpp中的get_color()方法改成这样:
RGBColor ImageTexture::get_color(const ShadeRec& sr) const {
    int row;
    int column;
    double vv = - sr.v;//这里是因为aff中的纹理坐标和RTGU中的貌似是反向的
    double uu = sr.u;
    double tv, tu;

    if (mapping_ptr)
        mapping_ptr->get_texel_coordinates(sr.local_hit_point, hres, vres, row, column);
    else
    {
        if(abs(vv) > 100 || abs(uu) > 100)//只考虑绝对值小于100的纹理坐标
        {vv = 0.0; uu = 0.0; }

        tv = abs(vv - floor(vv));//这两句实现重复贴图,同时考虑反向贴图
        tu = abs(uu - floor(uu));

        row     = (int)(tv * (vres - 1));
        column  = (int)(tu * (hres - 1));
#if 1
        if(row < 0) {row = 0;}
        if(column < 0) {column = 0; }
#endif
    }
    return (image_ptr->get_color(row, column));
}
另外,有个奇葩的问题:aff文件提供的mesh数据中有些三角形的三个顶点压根不能组成三角形。这种情况导致RTGU中无法计算法向量(即:得到法向量是(NaN, NaN, NaN))。为了避免这个问题,在MeshTriangle::compute_normal()函数计算完normal之后,添加这段代码:
if(isnan(normal.x)){normal = Vector3D(1.0, 0.0, 0.0); }3.3.3 RTGU代码中“运动/变换部分”代码的增改
RTGU是通过Instance类是实现物体的缩放、旋转和平移的。但是其中的旋转部分只是沿着坐标轴旋转,而aff文件包含各种沿任意轴旋转的情况,所以我们要增加“沿任意轴旋转”的代码。
“沿任意轴旋转”的原理参考PBRT-V3的“2.7.6 ROTATION AROUND AN ARBITRARY AXIS”章节。
在Instance类中添加rotate_axis()方法:
void
Instance::rotate_axis(const double theta, const Vector3D& axis) {
    double sin_theta = sin(theta * PI / 180.0);
    double cos_theta = cos(theta * PI / 180.0);
    Vector3D a(axis);
    a.normalize();

    Matrix axis_rotation_matrix; // temporary rotation matrix about z axis

    // Compute rotation of first basis vector
    axis_rotation_matrix.m[0][0] = a.x * a.x + (1 - a.x * a.x) * cos_theta;
    axis_rotation_matrix.m[0][1] = a.x * a.y * (1 - cos_theta) - a.z * sin_theta;
    axis_rotation_matrix.m[0][2] = a.x * a.z * (1 - cos_theta) + a.y * sin_theta;
    axis_rotation_matrix.m[0][3] = 0;

    // Compute rotations of second and third basis vectors
    axis_rotation_matrix.m[1][0] = a.x * a.y * (1 - cos_theta) + a.z * sin_theta;
    axis_rotation_matrix.m[1][1] = a.y * a.y + (1 - a.y * a.y) * cos_theta;
    axis_rotation_matrix.m[1][2] = a.y * a.z * (1 - cos_theta) - a.x * sin_theta;
    axis_rotation_matrix.m[1][3] = 0;

    axis_rotation_matrix.m[2][0] = a.x * a.z * (1 - cos_theta) - a.y * sin_theta;
    axis_rotation_matrix.m[2][1] = a.y * a.z * (1 - cos_theta) + a.x * sin_theta;
    axis_rotation_matrix.m[2][2] = a.z * a.z + (1 - a.z * a.z) * cos_theta;
    axis_rotation_matrix.m[2][3] = 0;

    forward_matrix = axis_rotation_matrix * forward_matrix;


    Matrix inv_axis_rotation_matrix; // temporary inverse rotation matrix about axis
    sin_theta = sin_theta * (-1);     // rotate in the opposite direction.
    cos_theta = cos_theta * (1);

    // Compute rotation of first basis vector
    inv_axis_rotation_matrix.m[0][0] = a.x * a.x + (1 - a.x * a.x) * cos_theta;
    inv_axis_rotation_matrix.m[0][1] = a.x * a.y * (1 - cos_theta) - a.z * sin_theta;
    inv_axis_rotation_matrix.m[0][2] = a.x * a.z * (1 - cos_theta) + a.y * sin_theta;
    inv_axis_rotation_matrix.m[0][3] = 0;

    // Compute rotations of second and third basis vectors
    inv_axis_rotation_matrix.m[1][0] = a.x * a.y * (1 - cos_theta) + a.z * sin_theta;
    inv_axis_rotation_matrix.m[1][1] = a.y * a.y + (1 - a.y * a.y) * cos_theta;
    inv_axis_rotation_matrix.m[1][2] = a.y * a.z * (1 - cos_theta) - a.x * sin_theta;
    inv_axis_rotation_matrix.m[1][3] = 0;

    inv_axis_rotation_matrix.m[2][0] = a.x * a.z * (1 - cos_theta) - a.y * sin_theta;
    inv_axis_rotation_matrix.m[2][1] = a.y * a.z * (1 - cos_theta) + a.x * sin_theta;
    inv_axis_rotation_matrix.m[2][2] = a.z * a.z + (1 - a.z * a.z) * cos_theta;
    inv_axis_rotation_matrix.m[2][3] = 0;

    inv_matrix = inv_matrix * inv_axis_rotation_matrix;
}
3.4 设置animation的参数
这里算是承接“3.2.6”。
3.4.1 普通物体animation参数的设置
3.4.1.1 获取物体animation参数
小编定义了get_animation()函数。在该函数中调用动画算法一些接口,从而获取某个时刻t某个运动物体name的运动参数trans、rot、scale。
前面我们提到并不是所有的动画都包含trans、rot、scale,所以我们用trans_flag、rot_flag、scale_flag来分别标记是否有对应的数据。即:trans_flag=1时,trans中才有数据;rot_flag=1时,rot中才有数据;scale_flag=1时,scale中才有数据。
函数中用到的animation链表“mAnimations”是全局变量。
bool get_animation(char* name, double time,
                   double trans[3], double rot[4], double scale[3],
                   int& trans_flag, int& rot_flag, int& scale_flag){
    double t = time;
    Animation *anim;
    int vis=1;
    trans_flag = rot_flag= scale_flag = 0;
    trans[0] = trans[1] = trans[2] = 0;
    rot[0] = 1; rot[1] = rot[2] = rot[3] = 0;
    scale[0] = scale[1] = scale[2] = 1;

    /* first, find the actual animation list */
    anim = FindAnimation(name, mAnimations);

    if(anim)
    {
        vis=_GetVisibility(anim, t);
        if(vis) /* is the object visible? */
        {
            /* two ways to implement the transform */
            if(anim->translations)
            {
                _GetTranslation(anim, t, trans);
                trans_flag = 1;
            }

            if(anim->rotations)
            {
                _GetRotation(anim, t, rot);
                rot_flag = 1;
            }

            if(anim->scales)
            {
                _GetScale(anim, t, scale);
                scale_flag = 1;
            }
        }
        else{
            return false;
        }
    }
    else{
        return false;
    }
    return true;
}
3.4.1.2 使用物体animation参数
获取到的animation参数可以当做静态变换xs来设置给对应的mesh。
我们以“toycar”为例,来看看具体怎么设置。我们知道“toycar”是设置给整车的(或者说整车上的所有部件:车体+四个轮子)。参数“car”表示的“整车”。
通过get_animation(name, g_time, trans, rot, scale, trans_flag, rot_flag, scale_flag)先获取到g_time(全局变量)时刻“toycar”的运动数据trans、rot、scale;然后,分别调用Instance类的translate()、rotate_axis()、scale()方法设置这些参数。
    Instance* car_instance4_ptr = new Instance(car);
    strcpy(name, "toycar");
    if(get_animation(name, g_time, trans, rot, scale, trans_flag, rot_flag, scale_flag)){
        if(scale_flag == 1){
            car_instance4_ptr->scale(scale[0], scale[1], scale[2]);
        }
        if(rot_flag == 1){
            car_instance4_ptr->rotate_axis(rot[3]*180/PI, Vector3D(rot[0], rot[1], rot[2]));
        }
        if(trans_flag == 1){
            car_instance4_ptr->translate(trans[0], trans[1], trans[2]);
        }
    }
    car_instance4_ptr->compute_bounding_box();

    add_object(car_instance4_ptr);
3.4.2 相机animation参数的设置
特别指出:
普通物体的animation参数是叠加在物体当前的运动/变换参数之上的,比如:通过静态仿射变换组装好整车,“toycar”提供的animation参数是使整车运动的。
而,相机的animation参数则是覆盖(或者说“替换”)原来的参数所以,相机animation参数的设置不需要仿射变换,而是直接设置给相机。
3.4.2.1 获取相机的animation参数
小编定义了get_camera()函数,获取相机当前的位置pos、方向dir和“up vector” up。pos_flag、dir_flag分别表示是否有对应的数据;GetCamera()是动画算法的接口;mAnimations是全局变量(动画链表)
void get_camera(double time, int& pos_flag, int& dir_flag,
                double pos[3], double dir[3], double up[3]){
    GetCamera(mAnimations, time, &pos_flag, pos, &dir_flag, dir, up);
}
3.4.2.2 使用相机的animation参数
    int pos_flag = 0, dir_flag = 0;
    double pos[3], dir[3], up[3];

    get_camera(g_time, pos_flag, dir_flag, pos, dir, up);
    if(pos_flag == 1){
        r_eye = Vector3D(pos[0], pos[1], pos[2]);
    }
    if(dir_flag == 1){
        r_lookat = Vector3D(r_eye.x+dir[0], r_eye.y+dir[1], r_eye.z+dir[2]);
        pinhole_ptr->set_up_vector(Vector3D(up[0], up[1], up[2]));
    }
3.5 自动生成world::build()代码
3.5.0 自动生成world::build()代码的需求
通过“3.2.2”生成的.ply文件数目众多,比如:kitchen场景是393个;robots场景是1849个。其实,小编觉得BART提供的这些aff文件最呕心的地方也正是:将一个大的几何体切成了琐碎的mesh。当然,这样做的目的,一定程度上是为了为了给不同的部件设置不同的材质、纹理或者是为了使其能够独立运动。但是,其中很多相同材质、纹理又是一起运动的“一大块”也是被切成很多个mesh。你就说呕心不呕心吧。
Anyway,事实情况已经这样。而咱又是按照RTGU那套方法一个一个创建mesh,所以,自动生成“创建mesh对象的代码”是非常有必要的。不然,逐一手动创建几百上千个mesh,然后分别给它们设置材质、纹理和运动/变换参数,是不是很心伤啊。
机智的童鞋可能会提出,用个for或者while循环不就改定了么?是的,这个在一定程度上是可行的。但是,正如前面我们提到,有很多mesh的材质、纹理相同、空间上在一起而又不会独立运动。这种情况下的所有mesh,我们希望将它们加到同一个Grid中,以便提高渲染速度。(OK,这里是小编的狡辩之词,应该确实是可以用循环来实现的。但是,小编的做法还是:自动生成创建mesh的代码)
3.5.1 普通mesh的代码格式
我们先看看RTGU中创建一个普通mesh的大概代码格式(包含animation参数的设置)。由于kitchen中自动生成的代码被手动整理过,所以这里用Robots中一段代码来举例。代码格式中包含如下几个部分:
1,纹理的创建(此处是ImageTexture)。纹理图片名是从.tn文件中读取的。
Image* Robot_10_Robot10_11_l_heel_1_image_ptr = new Image;
Robot_10_Robot10_11_l_heel_1_image_ptr->read_ppm_file("/Users/libingzeng/CG/kitchen_backup/TextureFiles/texturer74.ppm");

ImageTexture* Robot_10_Robot10_11_l_heel_1_texture_ptr = new ImageTexture;
Robot_10_Robot10_11_l_heel_1_texture_ptr->set_image(Robot_10_Robot10_11_l_heel_1_image_ptr);
2,材质的创建(此处是SV_Phong_FM)。材质参数是从.fm文件中读取的。
SV_Phong_FM* Robot_10_Robot10_11_l_heel_1_sv_phong_fm_ptr = new SV_Phong_FM;
Robot_10_Robot10_11_l_heel_1_sv_phong_fm_ptr->set_ka(new ConstantColor(RGBColor(0.300000, 0.300000, 0.700000)));
Robot_10_Robot10_11_l_heel_1_sv_phong_fm_ptr->set_kd(new ConstantColor(RGBColor(0.200000, 0.200000, 0.574118)));
Robot_10_Robot10_11_l_heel_1_sv_phong_fm_ptr->set_cd(Robot_10_Robot10_11_l_heel_1_texture_ptr);
Robot_10_Robot10_11_l_heel_1_sv_phong_fm_ptr->set_ks(new ConstantColor(RGBColor(0.252040, 0.252040, 0.252040)));
Robot_10_Robot10_11_l_heel_1_sv_phong_fm_ptr->set_exp(15.382930);
3,Grid的创建。ply文件名是从遍历文件夹
“/Users/libingzeng/CG/kitchen_backup/ply/”获取的。
Grid* Robot_10_Robot10_11_l_heel_1_grid_ptr = new Grid(new Mesh);
Robot_10_Robot10_11_l_heel_1_grid_ptr->read_smooth_uv_triangles("/Users/libingzeng/CG/kitchen_backup/ply/Robot_10_Robot10_11_l_heel_1.ply");
Robot_10_Robot10_11_l_heel_1_grid_ptr->set_material(Robot_10_Robot10_11_l_heel_1_sv_phong_fm_ptr);
Robot_10_Robot10_11_l_heel_1_grid_ptr->setup_cells();
4,Instance的创建。数据是从.xs文件中读取的。从“3.2.5”章节我们已经知道.xs文件中依次包含若干xs数据和若干x数据(animation name)。此处就是将这些数据依次设置给Instance:其中一组scale()、rotate_axis()、translate()函数的调用对应着一个xs数据或者x数据。如下依次完成的参数设置是:xs、x、xs、x、xs、x、xs、x、x、xs、x,共11个数据(robot的运动相比toycar要复杂些,因为robot走动时涉及脚趾、脚后跟、脚、小腿、大腿、整个身体等等的运动)。
Instance* Robot_10_Robot10_11_l_heel_1_instance_ptr = new Instance(Robot_10_Robot10_11_l_heel_1_grid_ptr);
Robot_10_Robot10_11_l_heel_1_instance_ptr->scale(1.000000, 1.000000, 1.000000);
Robot_10_Robot10_11_l_heel_1_instance_ptr->rotate_axis(0.000000, Vector3D(0.000000, 0.000000, 1.000000));
Robot_10_Robot10_11_l_heel_1_instance_ptr->translate(0.000000, 0.000000, 0.000000);
if(get_animation("l_heel_rot10", g_time, trans, rot, scale, trans_flag, rot_flag, scale_flag)){
    if(scale_flag == 1){
        Robot_10_Robot10_11_l_heel_1_instance_ptr->scale(scale[0], scale[1], scale[2]);
    }
    if(rot_flag == 1){
        Robot_10_Robot10_11_l_heel_1_instance_ptr->rotate_axis(rot[3]*180/PI, Vector3D(rot[0], rot[1], rot[2]));
    }
    if(trans_flag == 1){
        Robot_10_Robot10_11_l_heel_1_instance_ptr->translate(trans[0], trans[1], trans[2]);
    }
}
Robot_10_Robot10_11_l_heel_1_instance_ptr->scale(1.000000, 1.000000, 1.000000);
Robot_10_Robot10_11_l_heel_1_instance_ptr->rotate_axis(0.000000, Vector3D(0.000000, 0.000000, 1.000000));
Robot_10_Robot10_11_l_heel_1_instance_ptr->translate(-0.277000, -0.840000, -0.153000);
if(get_animation("lu_leg_rot10", g_time, trans, rot, scale, trans_flag, rot_flag, scale_flag)){
    if(scale_flag == 1){
        Robot_10_Robot10_11_l_heel_1_instance_ptr->scale(scale[0], scale[1], scale[2]);
    }
    if(rot_flag == 1){
        Robot_10_Robot10_11_l_heel_1_instance_ptr->rotate_axis(rot[3]*180/PI, Vector3D(rot[0], rot[1], rot[2]));
    }
    if(trans_flag == 1){
        Robot_10_Robot10_11_l_heel_1_instance_ptr->translate(trans[0], trans[1], trans[2]);
    }
}
Robot_10_Robot10_11_l_heel_1_instance_ptr->scale(1.000000, 1.000000, 1.000000);
Robot_10_Robot10_11_l_heel_1_instance_ptr->rotate_axis(0.000000, Vector3D(0.000000, 0.000000, 1.000000));
Robot_10_Robot10_11_l_heel_1_instance_ptr->translate(-0.286000, -0.893000, -0.160000);
if(get_animation("lo_leg_rot10", g_time, trans, rot, scale, trans_flag, rot_flag, scale_flag)){
    if(scale_flag == 1){
        Robot_10_Robot10_11_l_heel_1_instance_ptr->scale(scale[0], scale[1], scale[2]);
    }
    if(rot_flag == 1){
        Robot_10_Robot10_11_l_heel_1_instance_ptr->rotate_axis(rot[3]*180/PI, Vector3D(rot[0], rot[1], rot[2]));
    }
    if(trans_flag == 1){
        Robot_10_Robot10_11_l_heel_1_instance_ptr->translate(trans[0], trans[1], trans[2]);
    }
}
Robot_10_Robot10_11_l_heel_1_instance_ptr->scale(1.000000, 1.000000, 1.000000);
Robot_10_Robot10_11_l_heel_1_instance_ptr->rotate_axis(0.000000, Vector3D(0.000000, 0.000000, 1.000000));
Robot_10_Robot10_11_l_heel_1_instance_ptr->translate(-0.616000, 1.867000, 0.369000);
if(get_animation("robot_rot10", g_time, trans, rot, scale, trans_flag, rot_flag, scale_flag)){
    if(scale_flag == 1){
        Robot_10_Robot10_11_l_heel_1_instance_ptr->scale(scale[0], scale[1], scale[2]);
    }
    if(rot_flag == 1){
        Robot_10_Robot10_11_l_heel_1_instance_ptr->rotate_axis(rot[3]*180/PI, Vector3D(rot[0], rot[1], rot[2]));
    }
    if(trans_flag == 1){
        Robot_10_Robot10_11_l_heel_1_instance_ptr->translate(trans[0], trans[1], trans[2]);
    }
}
if(get_animation("step_transl10", g_time, trans, rot, scale, trans_flag, rot_flag, scale_flag)){
    if(scale_flag == 1){
        Robot_10_Robot10_11_l_heel_1_instance_ptr->scale(scale[0], scale[1], scale[2]);
    }
    if(rot_flag == 1){
        Robot_10_Robot10_11_l_heel_1_instance_ptr->rotate_axis(rot[3]*180/PI, Vector3D(rot[0], rot[1], rot[2]));
    }
    if(trans_flag == 1){
        Robot_10_Robot10_11_l_heel_1_instance_ptr->translate(trans[0], trans[1], trans[2]);
    }
}
Robot_10_Robot10_11_l_heel_1_instance_ptr->scale(2.000000, 2.000000, 2.000000);
Robot_10_Robot10_11_l_heel_1_instance_ptr->rotate_axis(0.000000, Vector3D(0.000000, 0.000000, 1.000000));
Robot_10_Robot10_11_l_heel_1_instance_ptr->translate(0.000000, 0.000000, 0.000000);
if(get_animation("robot_transl10", g_time, trans, rot, scale, trans_flag, rot_flag, scale_flag)){
    if(scale_flag == 1){
        Robot_10_Robot10_11_l_heel_1_instance_ptr->scale(scale[0], scale[1], scale[2]);
    }
    if(rot_flag == 1){
        Robot_10_Robot10_11_l_heel_1_instance_ptr->rotate_axis(rot[3]*180/PI, Vector3D(rot[0], rot[1], rot[2]));
    }
    if(trans_flag == 1){
        Robot_10_Robot10_11_l_heel_1_instance_ptr->translate(trans[0], trans[1], trans[2]);
    }
}
Robot_10_Robot10_11_l_heel_1_instance_ptr->compute_bounding_box();

Robot_10_Robot10->add_object(Robot_10_Robot10_11_l_heel_1_instance_ptr);
3.5.2 代码实现
小编的做法是:
1,根据包含所有.ply文件的文件夹中内容获取所有mesh的名字;
2,打开一个用于保存代码的文件;
3,根据mesh的名字自动生成“读取对应的.tn创建纹理;读取对应的.fm创建材质;读取.ply创建Grid;读取.xs设置运动/变换参数”的代码。
4,添加BuildShadedObjects.cpp中的其他代码(主要是#include文件,和相机、灯光之类的创建)
3.5.2.1 “自动生成创建mesh代码”的代码实现
(编写这部分代码时,小编在Macros.h中定义了一个叫“CREATE_BUILD_CODE”的宏,然后将所有这部分代码用这个宏包起来)
下方是以robots场景为例。
“自动生成创建mesh代码”的代码实现如下:
#include "Macros.h"

#if CREATE_BUILD_CODE

#include <iostream>
#include <fstream>
#include <stdlib.h>
#include <vector>
using std::vector;
#include <string>
using std::string;

vector<string> object_name;//for storing file names

/**for reading files in a folder**/
#include <stdio.h>
#include <dirent.h>
/**for reading files in a folder**/


void create_build_code(){

    char create_code[200] = "/Users/libingzeng/CG/kitchen_backup/create_code.txt";
    FILE *fp_cc =fopen(create_code,"at");
    if(!fp_cc)
    {
        printf("Error: main() could not open file: <%s>.\n",create_code);
        exit(1);
    }

#define big_grid_name_num 10
    int find_big_grid_flag = 0;
    char grid_names[big_grid_name_num][100] = {
        "Robot_1_Robot1",
        "Robot_2_Robot2",
        "Robot_3_Robot3",
        "Robot_4_Robot4",
        "Robot_5_Robot5",
        "Robot_6_Robot6",
        "Robot_7_Robot7",
        "Robot_8_Robot8",
        "Robot_9_Robot9",
        "Robot_10_Robot10"
    };

    fprintf(fp_cc, "\n");
    for(int i=0; i<big_grid_name_num; i++){
        fprintf(fp_cc, "Grid* %s = new Grid(new Mesh);\n", grid_names[i]);
    }


    char tf_file[200] = "/Users/libingzeng/CG/kitchen_backup/TextureFiles/";
    char fm_file[200] = "/Users/libingzeng/CG/kitchen_backup/fm/";
    char ply_file[200] = "/Users/libingzeng/CG/kitchen_backup/ply/";
    char tn_file[200] = "/Users/libingzeng/CG/kitchen_backup/tn/";
    char xs_file[200] = "/Users/libingzeng/CG/kitchen_backup/xs/";
    char name[200];
    char name_i[200], name_it[200], name_ct[200], name_sp[200], name_svg[200], name_glass[200], name_g[200], name_ins[200], name_ins2[200], name_ins3[200];
    char tn_image_name[200], x_name[200];
    float exp, kr; //for glossy params
    float fm[12], xs[10];
    int sv_phong_flag = 0;
    int sv_glossy_flag = 0;
    int glass_flag = 0;
    int get_xs = 1, get_x = 1;

    for(int i=0; i<(int)object_name.size(); i++){
        /*creat texture----begin----*/
        strcpy(name, object_name[i].c_str());
        strcat(tn_file, name);
        strcat(tn_file, ".tn");
        FILE *fp_tn = fopen(tn_file,"r");
        strcpy(tn_file, "/Users/libingzeng/CG/kitchen_backup/tn/");// reset string

        strcpy(name_i, name);
        strcat(name_i, "_image_ptr");
        strcpy(name_it, name);
        strcat(name_it, "_texture_ptr");
        strcpy(name_ct, name);
        strcat(name_ct, "_c_texture_ptr");
        strcpy(name_sp, name);
        strcat(name_sp, "_sv_phong_fm_ptr");
        strcpy(name_svg, name);
        strcat(name_svg, "_sv_glossy_ptr");
        strcpy(name_glass, name);
        strcat(name_glass, "_glass_ptr");
        strcpy(name_g, name);
        strcat(name_g, "_grid_ptr");
        strcpy(name_ins, name);
        strcat(name_ins, "_instance_ptr");
        strcpy(name_ins2, name);
        strcat(name_ins2, "_instance2_ptr");
        strcpy(name_ins3, name);
        strcat(name_ins3, "_instance3_ptr");


        fprintf(fp_cc, "\n\n/*---------------------------------create %s--------begin---------------------------------*/\n", name);

        if(fp_tn)
        {
            if(fscanf(fp_tn,"%s", tn_image_name) == 1){

                strcat(tf_file, tn_image_name);

                fprintf(fp_cc, "Image* %s = new Image;\n", name_i);
                fprintf(fp_cc, "%s->read_ppm_file(\"%s\");\n\n", name_i, tf_file);

                fprintf(fp_cc, "ImageTexture* %s = new ImageTexture;\n", name_it);
                fprintf(fp_cc, "%s->set_image(%s);\n\n", name_it, name_i);

                /*creat material----begin----*/
                strcat(fm_file, name);
                strcat(fm_file, ".fm");
                FILE *fp_fm = fopen(fm_file,"r");
                if(fp_fm){
                    fscanf(fp_fm,"%f %f %f %f %f %f %f %f %f %f %f %f",
                           &fm[0], &fm[1], &fm[2], &fm[3], &fm[4], &fm[5],
                           &fm[6], &fm[7], &fm[8], &fm[9], &fm[10], &fm[11]);

#if 1
                    fprintf(fp_cc, "SV_Phong_FM* %s = new SV_Phong_FM;\n", name_sp);
                    fprintf(fp_cc, "%s->set_ka(new ConstantColor(RGBColor(%f, %f, %f)));\n", name_sp, fm[0], fm[1], fm[2]);
                    fprintf(fp_cc, "%s->set_kd(new ConstantColor(RGBColor(%f, %f, %f)));\n", name_sp, fm[3], fm[4], fm[5]);
                    fprintf(fp_cc, "%s->set_cd(%s);\n", name_sp, name_it);
                    fprintf(fp_cc, "%s->set_ks(new ConstantColor(RGBColor(%f, %f, %f)));\n", name_sp, fm[6], fm[7], fm[8]);
                    fprintf(fp_cc, "%s->set_exp(%f);\n\n", name_sp, fm[9]);

                    sv_phong_flag = 1;
#else
                    fprintf(fp_cc, "SV_GlossyReflector_FM* %s = new SV_GlossyReflector_FM;\n", name_svg);
                    fprintf(fp_cc, "%s->set_samples(num_samples, %f);\n", name_svg, fm[9]);
                    fprintf(fp_cc, "%s->set_ka(new ConstantColor(RGBColor(%f, %f, %f)));\n", name_svg, fm[0], fm[1], fm[2]);
                    fprintf(fp_cc, "%s->set_kd(new ConstantColor(RGBColor(%f, %f, %f)));\n", name_svg, fm[3], fm[4], fm[5]);
                    fprintf(fp_cc, "%s->set_ks(new ConstantColor(RGBColor(%f, %f, %f)));\n", name_svg, fm[6], fm[7], fm[8]);
                    fprintf(fp_cc, "%s->set_exp(%f);\n", name_svg, fm[9]);
                    fprintf(fp_cc, "%s->set_cd(%s);\n", name_svg, name_it);
//                    fprintf(fp_cc, "%s->set_cd(new ConstantColor(white));\n", name_svg);
                    fprintf(fp_cc, "%s->set_kr(new ConstantColor(white));\n", name_svg);
                    fprintf(fp_cc, "%s->set_exponent(%f);\n", name_svg, fm[9]);
                    fprintf(fp_cc, "%s->set_cr(new ConstantColor(white));\n\n", name_svg);
                    sv_glossy_flag = 1;
#endif
                }
                fclose(fp_fm);

                strcpy(fm_file, "/Users/libingzeng/CG/kitchen_backup/fm/");// reset string
                /*creat material----end----*/

                strcpy(tf_file, "/Users/libingzeng/CG/kitchen_backup/TextureFiles/");// reset string

            }
            else{
                /*creat material----begin----*/
                strcat(fm_file, name);
                strcat(fm_file, ".fm");
                FILE *fp_fm = fopen(fm_file,"r");
                if(fp_fm){
                    fscanf(fp_fm,"%f %f %f %f %f %f %f %f %f %f %f %f",
                           &fm[0], &fm[1], &fm[2], &fm[3], &fm[4], &fm[5],
                           &fm[6], &fm[7], &fm[8], &fm[9], &fm[10], &fm[11]);
                    if(fm[11] == 0.0){
                        fprintf(fp_cc, "ConstantColor* %s = new ConstantColor;\n", name_ct);
                        fprintf(fp_cc, "%s->set_color(%f, %f, %f);\n\n", name_ct, fm[3], fm[4], fm[5]);

#if 0
                        if(fm[3] == 0.0){
                            exp = 100000.0;
                            kr = 0.75;
                        }
                        else {
                            exp = fm[9];
                            kr = 0.15;
                        }
#endif
                        fprintf(fp_cc, "SV_GlossyReflector_FM* %s = new SV_GlossyReflector_FM;\n", name_svg);
                        fprintf(fp_cc, "%s->set_samples(num_samples, %f);\n", name_svg, fm[9]);
                        fprintf(fp_cc, "%s->set_ka(new ConstantColor(RGBColor(%f, %f, %f)));\n", name_svg, fm[0], fm[1], fm[2]);
                        fprintf(fp_cc, "%s->set_kd(new ConstantColor(RGBColor(%f, %f, %f)));\n", name_svg, fm[3], fm[4], fm[5]);
                        fprintf(fp_cc, "%s->set_ks(new ConstantColor(RGBColor(%f, %f, %f)));\n", name_svg, fm[6], fm[7], fm[8]);
                        fprintf(fp_cc, "%s->set_exp(%f);\n", name_svg, fm[9]);
//                        fprintf(fp_cc, "%s->set_cd(%s);\n", name_svg, name_ct);
                        fprintf(fp_cc, "%s->set_cd(new ConstantColor(white));\n", name_svg);
                        fprintf(fp_cc, "%s->set_kr(new ConstantColor(white));\n", name_svg);
                        fprintf(fp_cc, "%s->set_exponent(%f);\n", name_svg, fm[9]);
                        fprintf(fp_cc, "%s->set_cr(new ConstantColor(white));\n\n", name_svg);
                        sv_glossy_flag = 1;
                    }
                    else{
                        fprintf(fp_cc, "Dielectric*  %s = new Dielectric;\n", name_glass);
                        fprintf(fp_cc, "%s->set_ks(%f);\n", name_glass, fm[6]);
                        fprintf(fp_cc, "%s->set_exp(%f);\n", name_glass, fm[9]);
                        fprintf(fp_cc, "%s->set_eta_in(%f);\n", name_glass, fm[11]);
                        fprintf(fp_cc, "%s->set_eta_out(1.0);\n", name_glass);
                        fprintf(fp_cc, "%s->set_cf_in(RGBColor(0.8, 1.0, 0.8));\n", name_glass);
                        fprintf(fp_cc, "%s->set_cf_out(RGBColor(1.0, 1.0, 1.0));\n\n", name_glass);
                        glass_flag = 1;
                    }
                }
                fclose(fp_fm);

                strcpy(fm_file, "/Users/libingzeng/CG/kitchen_backup/fm/");// reset string
                /*creat material----end----*/
            }
        }
        else
        {
            /*creat material----begin----*/
            strcat(fm_file, name);
            strcat(fm_file, ".fm");
            FILE *fp_fm = fopen(fm_file,"r");
            if(fp_fm){
                fscanf(fp_fm,"%f %f %f %f %f %f %f %f %f %f %f %f",
                       &fm[0], &fm[1], &fm[2], &fm[3], &fm[4], &fm[5],
                       &fm[6], &fm[7], &fm[8], &fm[9], &fm[10], &fm[11]);
                if(fm[11] == 0.0){
                    fprintf(fp_cc, "ConstantColor* %s = new ConstantColor;\n", name_ct);
                    fprintf(fp_cc, "%s->set_color(%f, %f, %f);\n\n", name_ct, fm[3], fm[4], fm[5]);

#if 0
                    if(fm[3] == 0.0){
                        exp = 100000.0;
                        kr = 0.75;
                    }
                    else {
                        exp = fm[9];
                        kr = 0.15;
                    }
#endif
                    fprintf(fp_cc, "SV_GlossyReflector_FM* %s = new SV_GlossyReflector_FM;\n", name_svg);
                    fprintf(fp_cc, "%s->set_samples(num_samples, %f);\n", name_svg, fm[9]);
                    fprintf(fp_cc, "%s->set_ka(new ConstantColor(RGBColor(%f, %f, %f)));\n", name_svg, fm[0], fm[1], fm[2]);
                    fprintf(fp_cc, "%s->set_kd(new ConstantColor(RGBColor(%f, %f, %f)));\n", name_svg, fm[3], fm[4], fm[5]);
                    fprintf(fp_cc, "%s->set_ks(new ConstantColor(RGBColor(%f, %f, %f)));\n", name_svg, fm[6], fm[7], fm[8]);
                    fprintf(fp_cc, "%s->set_exp(%f);\n", name_svg, fm[9]);
                    //                        fprintf(fp_cc, "%s->set_cd(%s);\n", name_svg, name_ct);
                    fprintf(fp_cc, "%s->set_cd(new ConstantColor(white));\n", name_svg);
                    fprintf(fp_cc, "%s->set_kr(new ConstantColor(white));\n", name_svg);
                    fprintf(fp_cc, "%s->set_exponent(%f);\n", name_svg, fm[9]);
                    fprintf(fp_cc, "%s->set_cr(new ConstantColor(white));\n\n", name_svg);
                    sv_glossy_flag = 1;
                }
                else{
                    fprintf(fp_cc, "Dielectric*  %s = new Dielectric;\n", name_glass);
                    fprintf(fp_cc, "%s->set_ks(%f);\n", name_glass, fm[6]);
                    fprintf(fp_cc, "%s->set_exp(%f);\n", name_glass, fm[9]);
                    fprintf(fp_cc, "%s->set_eta_in(%f);\n", name_glass, fm[11]);
                    fprintf(fp_cc, "%s->set_eta_out(1.0);\n", name_glass);
                    fprintf(fp_cc, "%s->set_cf_in(RGBColor(0.8, 1.0, 0.8));\n", name_glass);
                    fprintf(fp_cc, "%s->set_cf_out(RGBColor(1.0, 1.0, 1.0));\n\n", name_glass);
                    glass_flag = 1;
                }
            }
            fclose(fp_fm);

            strcpy(fm_file, "/Users/libingzeng/CG/kitchen_backup/fm/");// reset string
            /*creat material----end----*/
        }
        fclose(fp_tn);
        /*creat texture----end----*/

        /*creat grid----begin----*/
        strcat(ply_file, name);
        strcat(ply_file, ".ply");

        fprintf(fp_cc, "Grid* %s = new Grid(new Mesh);\n", name_g);
        fprintf(fp_cc, "%s->read_smooth_uv_triangles(\"%s\");\n", name_g, ply_file);
        if(sv_phong_flag == 1){
            fprintf(fp_cc, "%s->set_material(%s);\n", name_g, name_sp);
            sv_phong_flag = 0;
        }
        if(sv_glossy_flag == 1){
            fprintf(fp_cc, "%s->set_material(%s);\n", name_g, name_svg);
            sv_glossy_flag = 0;
        }
        if(glass_flag == 1){
            fprintf(fp_cc, "%s->set_material(%s);\n", name_g, name_glass);
            glass_flag = 0;
        }
        fprintf(fp_cc, "%s->setup_cells();\n\n", name_g);

        strcpy(ply_file, "/Users/libingzeng/CG/kitchen_backup/ply/");// reset string
        /*creat grid----end----*/

        /*creat instance----begin----*/
        strcat(xs_file, name);
        strcat(xs_file, ".xs");
        int xs_num = 0;
        FILE *fp_xs = fopen(xs_file,"r");
        if(fp_xs){
            while(fscanf(fp_xs,"%f %f %f %f %f %f %f %f %f %f",
                         &xs[0], &xs[1], &xs[2], &xs[3], &xs[4], &xs[5],
                         &xs[6], &xs[7], &xs[8], &xs[9]) == 10){
                xs_num++;
            }
        }
        fclose(fp_xs);

        if(xs_num == 0){
            /*add object to scene or to a big grid-----begin-----*/
            for(int i=0; i<big_grid_name_num; i++){
                if(strstr(name_g, grid_names[i])){
                    fprintf(fp_cc, "%s->add_object(%s);\n", grid_names[i], name_g);
                    find_big_grid_flag = 1;
                    break;
                }
            }
            if(find_big_grid_flag == 1){
                find_big_grid_flag = 0;
            }
            else{
                fprintf(fp_cc, "add_object(%s);\n", name_g);
            }
            /*add object to scene or to a big grid-----end-----*/
        }
        else{
            fprintf(fp_cc, "Instance* %s = new Instance(%s);\n", name_ins, name_g);
            FILE *fp_xs = fopen(xs_file,"r");
            while((get_xs > 0) || (get_x > 0)){
                get_xs = fscanf(fp_xs,"%f %f %f %f %f %f %f %f %f %f",
                                &xs[0], &xs[1], &xs[2], &xs[3], &xs[4], &xs[5],
                                &xs[6], &xs[7], &xs[8], &xs[9]);
                if(get_xs > 0){
                    fprintf(fp_cc, "%s->scale(%f, %f, %f);\n", name_ins, xs[0], xs[1], xs[2]);
                    fprintf(fp_cc, "%s->rotate_axis(%f, Vector3D(%f, %f, %f));\n", name_ins, xs[6], xs[3], xs[4], xs[5]);
                    fprintf(fp_cc, "%s->translate(%f, %f, %f);\n", name_ins, xs[7], xs[8], xs[9]);
                }
                else{
                    get_x = fscanf(fp_xs,"%s", x_name);
                    if(get_x > 0){
                        fprintf(fp_cc, "if(get_animation(\"%s\", g_time, trans, rot, scale, trans_flag, rot_flag, scale_flag)){\n", x_name);
                        fprintf(fp_cc, "    if(scale_flag == 1){\n");
                        fprintf(fp_cc, "        %s->scale(scale[0], scale[1], scale[2]);\n", name_ins);
                        fprintf(fp_cc, "    }\n");
                        fprintf(fp_cc, "    if(rot_flag == 1){\n");
                        fprintf(fp_cc, "        %s->rotate_axis(rot[3]*180/PI, Vector3D(rot[0], rot[1], rot[2]));\n", name_ins);
                        fprintf(fp_cc, "    }\n");
                        fprintf(fp_cc, "    if(trans_flag == 1){\n");
                        fprintf(fp_cc, "        %s->translate(trans[0], trans[1], trans[2]);\n", name_ins);
                        fprintf(fp_cc, "    }\n");
                        fprintf(fp_cc, "}\n");
                    }
                }
            }
            get_xs = get_x = 1;
            fclose(fp_xs);

            fprintf(fp_cc, "%s->compute_bounding_box();\n", name_ins);
            /*add object to scene or to a big grid-----begin-----*/
            for(int i=0; i<big_grid_name_num; i++){
                if(strstr(name_ins, grid_names[i])){
                    fprintf(fp_cc, "%s->add_object(%s);\n", grid_names[i], name_ins);
                    find_big_grid_flag = 1;
                    break;
                }
            }
            if(find_big_grid_flag == 1){
                find_big_grid_flag = 0;
            }
            else{
                fprintf(fp_cc, "add_object(%s);\n", name_ins);
            }
            /*add object to scene or to a big grid-----end-----*/

        }

        fprintf(fp_cc, "/*---------------------------------create %s--------end---------------------------------*/\n", name);

        strcpy(xs_file, "/Users/libingzeng/CG/kitchen_backup/xs/");// reset string
        /*creat instance----end----*/
    }

    fprintf(fp_cc, "\n");
    for(int i=0; i<big_grid_name_num; i++){
        fprintf(fp_cc, "%s->setup_cells();\n", grid_names[i]);
        fprintf(fp_cc, "add_object(%s);\n\n", grid_names[i]);
    }

    fprintf(fp_cc, "\n}\n");
    fclose(fp_cc);

}


int main(int argc, const char * argv[]) {

/*read all object names-----begin----*/

    struct dirent *ptr;
    DIR *dir;
    dir=opendir("/Users/libingzeng/CG/kitchen_backup/ply");
    while((ptr=readdir(dir))!=NULL)
    {
        //跳过'.'和'..'两个目录
        if(ptr->d_name[0] == '.')
            continue;
        //        printf("%s\n",ptr->d_name);
        strtok(ptr->d_name, ".");
        object_name.push_back(ptr->d_name);
    }
    //    printf("\ntotal number of files: %d\n", (int)ply_name.size());
    closedir(dir);

    //sort
    string temp;
    for (int i=0; i<(int)object_name.size(); i++){
        for(int j=1; j<(int)object_name.size()-i; j++){
            if(object_name[j] < object_name[j-1]){
                temp = object_name[j];
                object_name[j] = object_name[j-1];
                object_name[j-1] = temp;
            }
        }
    }
/*read all object names-----end----*/

    create_build_code();

    return 0;

}
#endif//CREATE_BUILD_CODE
3.5.2.2添加BuildShadedObjects.cpp中的其他代码
考虑到前面是以robots场景为例自动生成的代码,这里贴出的也是robots场景对应的BuildShadedObjects.cpp中的其他代码。
#include "World.h"
#include "Pinhole.h"
#include "PointLight.h"
#include "Whitted.h"
#include "SV_Phong_FM.h"
#include "SV_GlossyReflector_FM.h"
#include "Dielectric.h"
#include "Image.h"
#include "ImageTexture.h"
#include "ConstantColor.h"
#include "Grid.h"
#include "Rectangle.h"
#include "Instance.h"


void
World::build(void) {
#if KITCHEN_ANIMATION
    char name[100];
    double trans[3], rot[4], scale[3];
    int trans_flag = 0, rot_flag = 0, scale_flag = 0;
#endif//KITCHEN_ANIMATION

    int num_samples = 8;

    int rate = 2;
    vp.set_hres(400 * rate);
    vp.set_vres(300 * rate);
    vp.set_samples(num_samples);
    vp.set_max_depth(2);

    tracer_ptr = new Whitted(this);
//    background_color = RGBColor(0.5, 0.5, 1.0);

    Ambient* ambient_ptr = new Ambient;
    ambient_ptr->scale_radiance(2);
    set_ambient_light(ambient_ptr);


    Pinhole* pinhole_ptr = new Pinhole;
    Vector3D eye = Vector3D(2000.0, 1500.0, 2000.0);
    Vector3D lookat = Vector3D(119.375305, 214.531477, 619.375307);
    Vector3D r_eye = Vector3D(eye.x, eye.y, eye.z);
    Vector3D r_lookat = Vector3D(lookat.x, lookat.y, lookat.z);

#if 1//KITCHEN_ANIMATION
    int pos_flag = 0, dir_flag = 0;
    double pos[3], dir[3], up[3];

    get_camera(g_time, pos_flag, dir_flag, pos, dir, up);
    if(pos_flag == 1){
        r_eye = Vector3D(pos[0], pos[1], pos[2]);
    }
    if(dir_flag == 1){
        r_lookat = Vector3D(r_eye.x+dir[0], r_eye.y+dir[1], r_eye.z+dir[2]);
        pinhole_ptr->set_up_vector(Vector3D(up[0], up[1], up[2]));
    }
#endif//KITCHEN_ANIMATION

    pinhole_ptr->set_eye(r_eye.x, r_eye.y, r_eye.z); //for car_body1_2 test
    pinhole_ptr->set_lookat(r_lookat.x, r_lookat.y, r_lookat.z);//for car_body1_2 test
    pinhole_ptr->set_view_distance(850.0);//normal
//    pinhole_ptr->set_view_distance(2000.0);//close
    pinhole_ptr->compute_uvw();
    set_camera(pinhole_ptr);

    bool cast_shadow = false;//true: cast shadow; fasle: don't cast shadow

    PointLight* point_light1_ptr = new PointLight;
    point_light1_ptr->set_location(1, 500, 1);
    point_light1_ptr->scale_radiance(4);
    point_light1_ptr->set_cast_shadow(cast_shadow);
    add_light(point_light1_ptr);
3.6 循环渲染动画图片
为了循环渲染动画中的图片,需要在RTGU中做如下增改:
1,将“3.4”定义的get_animation()和get_camera()写在main()前面;
2,将渲染单张图片的那几行代码封装成normal_render(),写在main()前面;
void normal_render(){
    World w;
    w.build();
    w.camera_ptr->render_scene(w);
}
3,定义两个全局变量:
    double g_time;//当前渲染图片在动画中的时间
    int g_cnt;//当前渲染的图片是动画所有图片中的第几帧
4,根据g_cnt在Pinhole::render_scene()中设置输出图片的名字

5,编写main()
主要是做两件事:调用viParseFile()建立动画链表mAnimations;根据时间信息循环渲染图片。
int main(int argc, const char * argv[]){
    char filename[100] = "/Users/libingzeng/CG/kitchen/aff_kitchen/kitchen.aff";
    FILE *ifp;
    if(ifp=fopen(filename,"r")){
        //printf("open file: <%s>.\n",filename);
        viParseFile(ifp);  /*此处调用只是为了创建动画链表mAnimations*/
        fclose(ifp);
    }
    else{
        printf("Error: could not open file: <%s>.\n",filename);
        exit(1);
    }

    double anim_time = 20.0;//动画的总时间
    int num_keyframe = 800;//动画的总帧数
    int max_cnt = 800;//此次循环渲染的最大帧数
    for(g_cnt=1; g_cnt<=max_cnt; g_cnt++){
        g_time = anim_time * g_cnt / num_keyframe;//计算当前图片的时间
        normal_render();//渲染当前图片
    }
    return 0;
}
3.7 将图片合成动画视频(以kitchen为例)
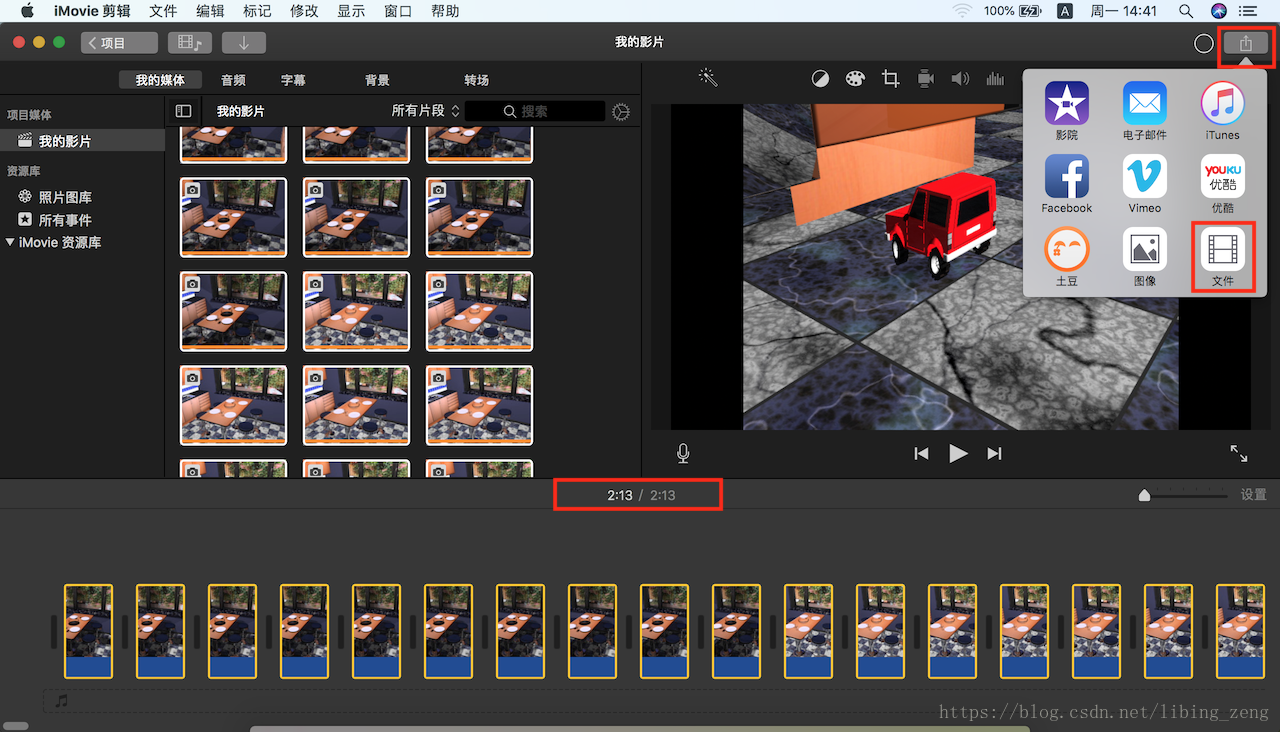
通过“3.6”我们在results文件夹中得到800张.ppm格式的图片。接下来我们将这800张图片合成为25s的视频。
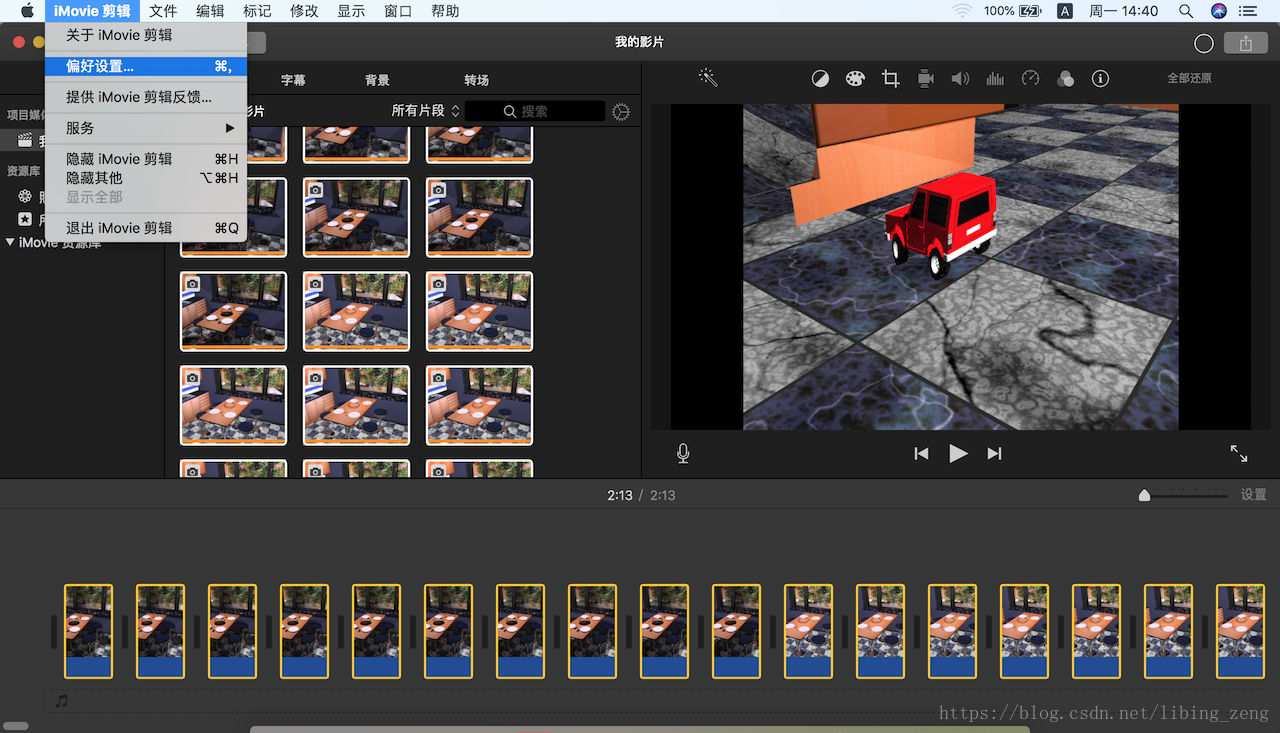
小编使用的软件是iMovie剪辑软件。操作步骤如下:
1,将800张图片按照名称顺序导入iMovie;
2,将所有导入的800张图片添加到时间线上;
3,将iMovie中的“照片时间长度”设置为“0.2”,“转场时间”设置为“0”;
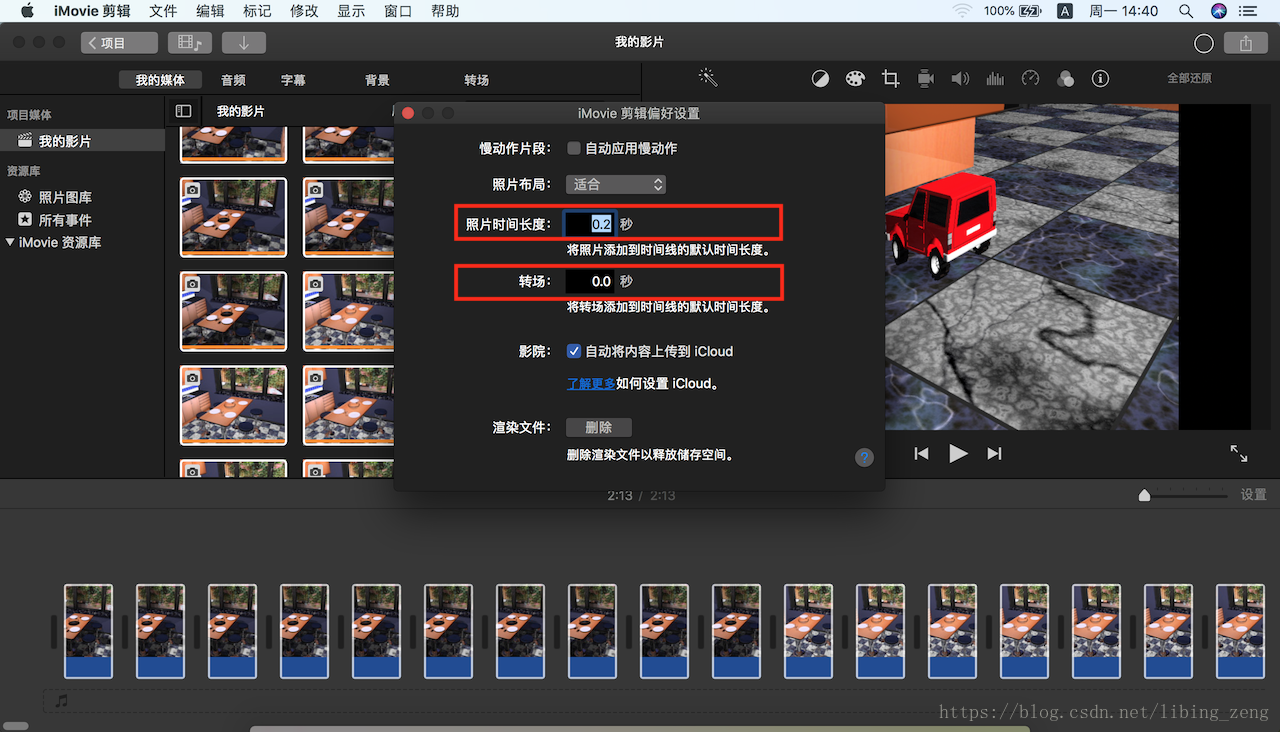
4,导出视频文件
经过第三步的设置,这时候时间线上显示的视频长度是“2:13(分钟)”。我们先将这个视频导出。
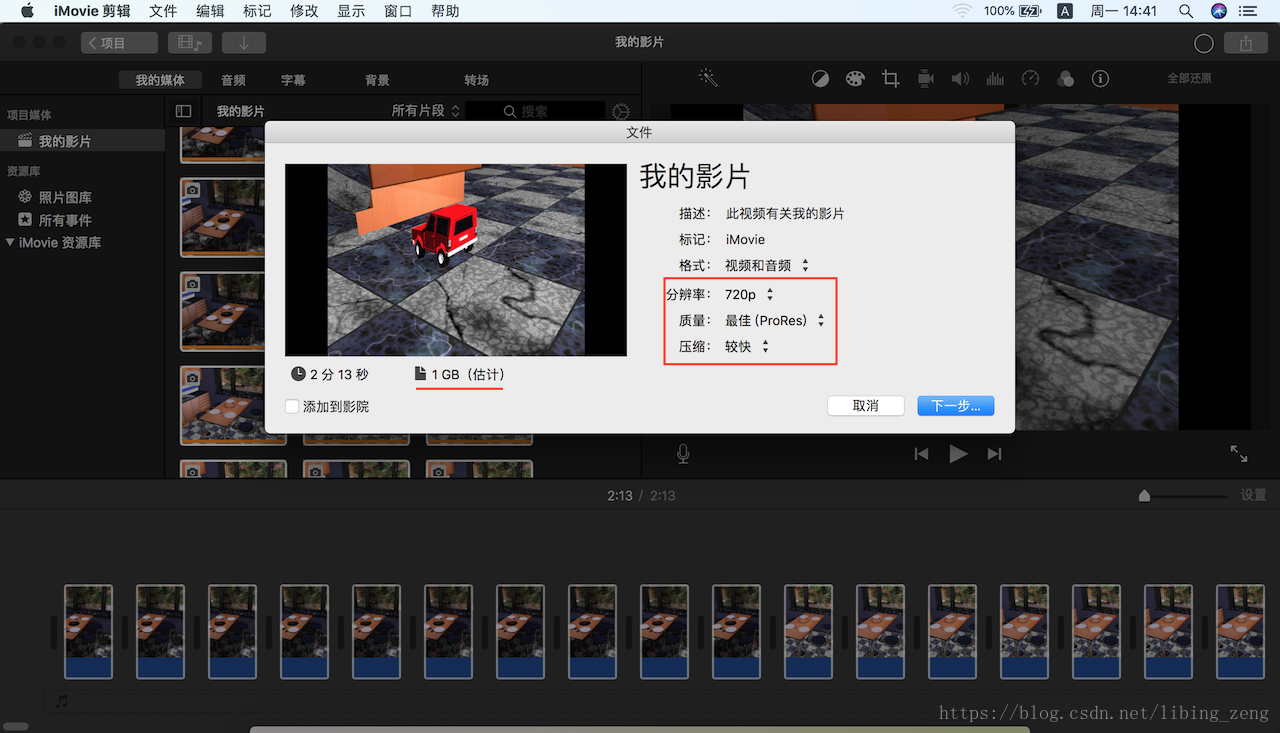
这个过程会比较慢,耐心等待。
5,将时间线上的那800张图片删除,将之前导出的那个2分13秒的视频导入并添加到时间线上。
6,将2分13秒的视频调到25秒
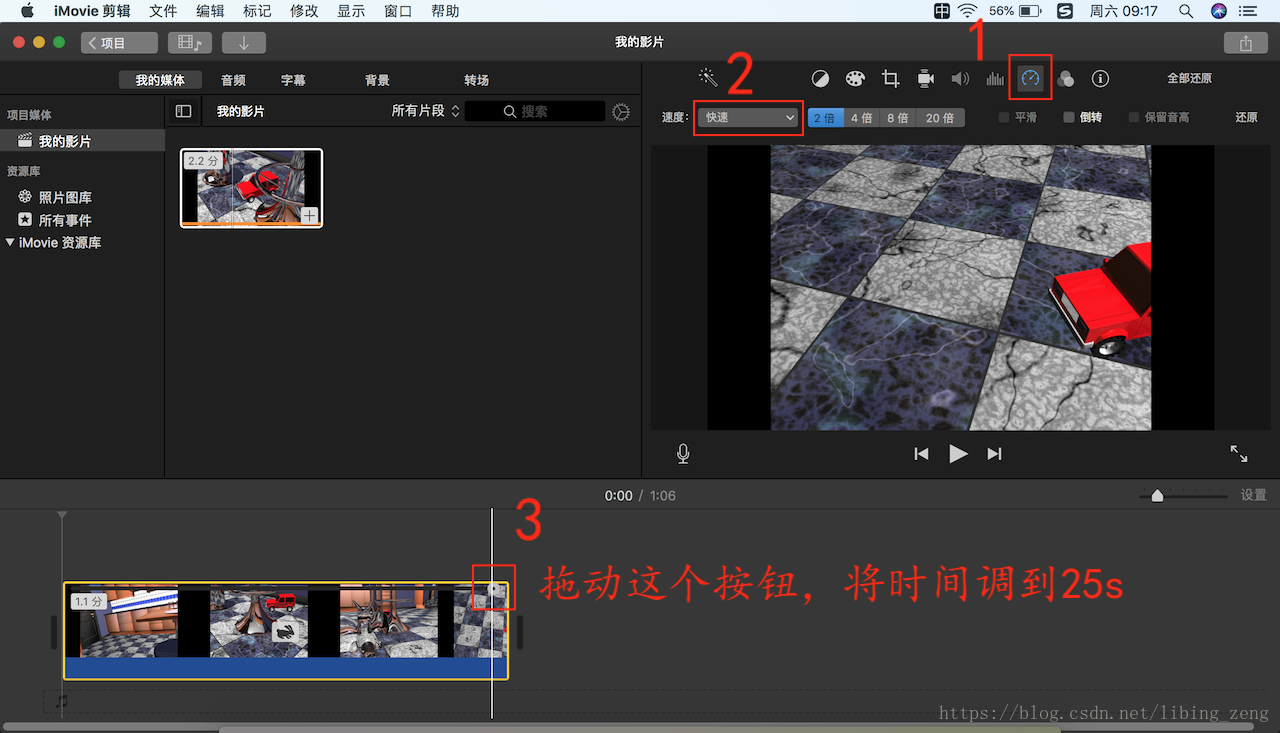
7,导出这个25s的视频
8,压缩视频
从“7”导出的25s视频的格式.mov,大小是181Mb。,现在我们HandBrake软件将.mov转换为.mp4
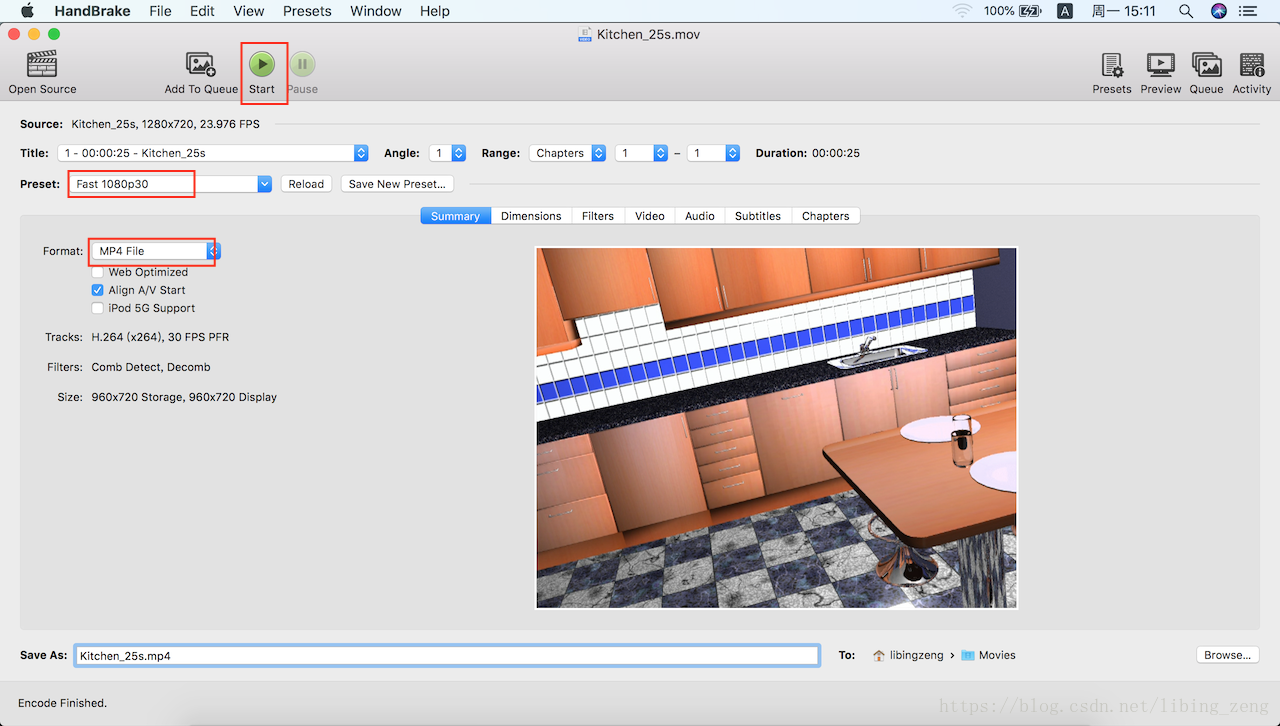
转换之后的.mp4是17Mb左右。
第四部分:针对museum场景中的一些补充
museum场景的aff文件中用到了一些新的指令p、tt、tpa。
p表示“多边形”。p 4 则表示四边形,指令之后有4个顶点的数据;p 8则表示八边形,指令之后有8个顶点的数据。数据大概长这个样子:
p 4
-3.3864 0.75 -2.18431
-3.3864 2.45 -2.18431
-2.18431 2.45 -3.3864
-2.18431 0.75 -3.3864
p 8
-0.191342 1.400000 0.461940
-0.461940 1.400000 0.191342
-0.461940 1.400000 -0.191342
-0.191342 1.400000 -0.461940
0.191342 1.400000 -0.461940
0.461940 1.400000 -0.191342
0.461940 1.400000 0.191342
0.191342 1.400000 0.461940
tt 表示textured triangle,即:贴了图的三角形。指令之后有纹理图片名和三角形的三个顶点、三个纹理坐标。museum场景中用到tt的那四幅画,每幅画是由两个这样的三角形拼成的。数据大概长这个样子:
tt tetra6.ppm
-3.28033 0.85 -2.21967 0 1
-2.21967 0.85 -3.28033 1 1
-2.21967 2.35 -3.28033 1 0
tt tetra6.ppm
-3.28033 0.85 -2.21967 0 1
-2.21967 2.35 -3.28033 1 0
-3.28033 2.35 -2.21967 0 0
tpa,后文再讲。
4.1 将p数据转换为.ply
还是因为想要使用RTGU的代码和自动生成代码方便,小编决定将多边形和纹理三角形的数据转换输出为常见的ply文件。
此处以相对复杂的八边形为例,说明怎么讲多边形数据转换为常见的ply数据格式。多边形的顶点数据有个特点:是按顺序的(这样才能保证给定的多边形是凸多边形)。正因为这样,我们将其转换为常见的ply格式也相对比较简单。
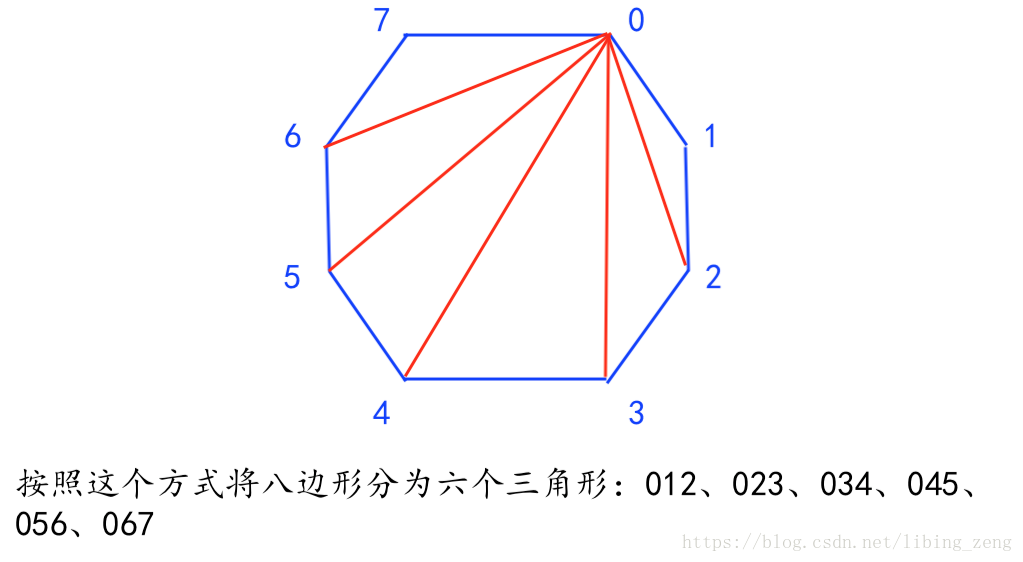
所以,我们只需要:先将多边形的顶点数据原样输出;然后按照如上分三角形的方式输出三角形顶点索引。
代码实现:
当然,在输出.ply文件前需要给当前的多边形命名。命名方式和给mesh命名的方式一样。
当parsePoly()函数中解析完多边形数据,添加如下代码即可输出对应的.ply文件。
#if CREATE_PLY_FM_XS_TN_FILES
    /*get current mesh name----begin----*/
    char str_mesh_name[100], str_sub_num[100];
    memset(str_mesh_name, 0x00, sizeof (str_mesh_name)); //clear string str_mesh_name
    for(int i=1; i<=g_fn_num; i++){
        if(i>1){
            strcat(str_mesh_name, "_");
        }
        strcat(str_mesh_name, g_fn[i].file_name);//connect strings
        strcat(str_mesh_name, "_");
        sprintf(str_sub_num, "%d", g_fn[i].sub_num);//transform int to string
        strcat(str_mesh_name, str_sub_num);
    }
    printf("current mesh: %s\n", str_mesh_name);
    /*get current mesh name----end----*/


    char fm_file_name[100], ply_file_name[100];
    strcpy(fm_file_name, str_mesh_name);//material
    strcpy(ply_file_name, str_mesh_name);//normal ply
    memset(str_mesh_name, 0x00, sizeof (str_mesh_name)); //clear string str_mesh_name


    /*creat ply files---------begin-------*/
    char new_file[200] = "/Users/libingzeng/CG/kitchen_museum/ply/";
    strcat(ply_file_name, ".ply");  // connect strings
    strcat(new_file, ply_file_name);// new_file will be a whole path including file name for the file created.


    FILE *fp_new =fopen(new_file,"at");
    if(!fp_new)
    {
        printf("Error: could not open file: <%s>.\n",new_file);
        exit(1);
    }

    //write header for ply file.
    fprintf(fp_new, "ply\n");
    fprintf(fp_new, "format ascii 1.0\n");
    fprintf(fp_new, "comment author: Libing Zeng transforms this from .aff of bart\n");
    fprintf(fp_new, "element vertex %d\n", nverts);
    fprintf(fp_new, "property float x\n");
    fprintf(fp_new, "property float y\n");
    fprintf(fp_new, "property float z\n");
    fprintf(fp_new, "element face %d\n", (nverts - 2));
    fprintf(fp_new, "property list int int vertex_indices\n");
    fprintf(fp_new, "end_header\n");

    //write vertices data for the new file
    for(int j=0; j<nverts; j++)
    {
        fprintf(fp_new, "%f %f %f\n", verts[j][X], verts[j][Y], verts[j][Z]);
    }

    //write triangles data for the new file
    for(int k=0; k<(nverts - 2); k++){
        fprintf(fp_new, "3 0 %d %d\n", k+1, k+2);
         //这里对应着将多边形分成三角形的方式
    }

    fclose(fp_new);
    /*creat ply files---------end-------*/


    /*creat fm files---------begin-------*/
    char new_fm_file[200] = "/Users/libingzeng/CG/kitchen_museum/fm/";
    strcat(fm_file_name, ".fm");  // connect strings
    strcat(new_fm_file, fm_file_name);// new_file will be a whole path including file name for the file created.
    FILE *fp_fm_new =fopen(new_fm_file,"at");
    if(!fp_fm_new)
    {
        printf("Error: could not open file: <%s>.\n",new_fm_file);
        exit(1);
    }

    for(int i=0; i<12; i++){
        fprintf(fp_fm_new, "%f ", g_fm.fm[i]);
    }

    fclose(fp_fm_new);
    /*creat fm files---------end-------*/
#endif//CREATE_PLY_FM_XS_TN_FILES
4.2 将tt数据转换为.ply
关于tt数据的转换,考虑到只有四幅画(对应着8个tt数据),小编手动改的。
比如:
tt tetra6.ppm
  -3.28033 0.85 -2.21967 0 1
  -2.21967 0.85 -3.28033 1 1
  -2.21967 2.35 -3.28033 1 0
tt tetra6.ppm
  -3.28033 0.85 -2.21967 0 1
  -2.21967 2.35 -3.28033 1 0
  -3.28033 2.35 -2.21967 0 0
对应的.ply数据就是:
vertices 4
  -3.28033 0.85 -2.21967 0 1//前三个顶点数据即为第一个tt的数据
  -2.21967 0.85 -3.28033 1 1
  -2.21967 2.35 -3.28033 1 0
  -3.28033 2.35 -2.21967 0 0//第四个顶点数据即为第二个tt的最后一个数据
triangles 2
3 0 1 2
3 0 2 3
4.3 对tpa指令的处理
4.3.1 什么是tpa
tpa的全称是animated triangle patch。
tpa描述的是一个三角形的数据,但是三角形的三个顶点数据不是固定的,而是随时间变化的。tpa后面跟的数字表示有几个变化时间点,后面会有这几个时间点对应的三角形的顶点数据。每个时间点处的顶点对应的三角形的状态相当于一个关键帧。比如:
tpa 5 //这个三角形的顶点有5个状态
  0//时间t=0时,这个三角形的三个顶点及其法向量的左边是这样
  -0.447400 1.549333 0.085189  -0.000733 -0.000329 -0.000629
   -0.426483 1.554305 0.058190  -0.000733 -0.000329 -0.000629
   -0.434044 1.522456 0.083665  -0.000733 -0.000329 -0.000629
   1//时间t=1时,这个三角形的三个顶点及其法向量的左边是这个
  0.016908 3.402943 0.244670  -0.026701 -0.038847 0.030564
   0.222918 3.280967 0.269611  -0.026701 -0.038847 0.030564
   0.115294 3.493054 0.445148  -0.026701 -0.038847 0.030564
   2//时间t=2时,这个三角形的三个顶点及其法向量的左边是这个
  0.500000 3.000000 0.500000  -0.000244 0.000244 0.000244
   0.484375 3.000000 0.484375  -0.000244 0.000244 0.000244
   0.484375 2.984375 0.500000  -0.000244 0.000244 0.000244
   3//时间t=3时,这个三角形的三个顶点及其法向量的左边是这个
  0.461880 2.961880 0.461880  0.577350 0.577350 0.577350
   0.456915 2.971654 0.456915  0.571144 0.589568 0.571144
   0.456915 2.956915 0.471654  0.571144 0.571144 0.589568
   4//时间t=5时,这个三角形的三个顶点及其法向量的左边是这个
  0.000000 1.500000 0.000000  0.000085 -0.000107 -0.000256
   -0.003906 1.515625 -0.007812  0.000085 -0.000107 -0.000256
   0.011719 1.518750 -0.003906  0.000085 -0.000107 -0.000256
那么时间t=1.5时,怎么得到这个三角形的数据呢?用t=1和t=2的数据分别进行线性插值即可得到t=1.5时的数据。
animart7.aff中有16375个tpa,也就是animart7是由16375个三角形组成,每个三角形都是随时间变化的。将这16375个三角形视为组成animart7的mesh,接下来我们看看怎么将这种mesh转换成常见的.ply。由于三角形是随时间变化的,所以每个时刻的.ply都不一样。
4.3.2 怎么保存mesh的tpa数据
我们是以animart7为例。
1,在Macros.h中定义2个宏,分别表示mesh是由几个tpa组成和每个tpa有几个时间点。
#define Tpa_Num 16375
#define Time_num 5
2,在parse.h中定义两个结构体
    typedef struct
    {
        float time;
        float vert_info[3][3];
    } TriInfo;//tpa的一个时间点的数据(表示一个三角形)

    typedef struct
    {
        TriInfo tri_info[Time_num];
    } TpaInfo;//一个tpa的数据
3,在main.cpp中定义两个全局变量。
int tpa_cnt = 0;//对mesh中的tpa进行计数
TpaInfo tpa[Tpa_Num];//用于保存mesh中的所有tpa数据
4,在parseAnimatedTriangle()中解析完一个tpa数据后,将数据保存到全局变量tpa[]中。
#if KITCHEN_ANIMATION
    for(int q=0; q<num_times; q++){
        tpa[tpa_cnt].tri_info[q].time = times[q];
        for(int w=0; w<3; w++){

            tpa[tpa_cnt].tri_info[q].vert_info[w][0] = verts[q*3+w][X];
            tpa[tpa_cnt].tri_info[q].vert_info[w][1] = verts[q*3+w][Y];
            tpa[tpa_cnt].tri_info[q].vert_info[w][2] = verts[q*3+w][Z];
        }
    }
    tpa_cnt++;

    free(times);
    free(verts);
    free(norms);
#endif//KITCHEN_ANIMATION
4.3.3 怎么将tpa[]中的数据输出为常见的.ply文件
给定时间t,根据t在tpa[]中的每个tpa中t时刻对应的三角形数据。对于某个tpa,若t小于它的最小时刻,返回最小时刻的三角形数据;若t大于它的最大时刻的三角形数据;若t在它的两个时刻之间,返回这两个时刻的三角形数据线性插值之后得到的三角形数据。
    for(int i=0; i<Tpa_Num; i++){
        if(time < tpa[i].tri_info[0].time){
            for(int j=0; j<3; j++){
                fprintf(fp_new, "%f %f %f\n",
                        tpa[i].tri_info[0].vert_info[j][0],
                        tpa[i].tri_info[0].vert_info[j][1],
                        tpa[i].tri_info[0].vert_info[j][2]);
            }
        }
        else if(time > tpa[i].tri_info[Time_num-1].time){
            for(int j=0; j<3; j++){
                fprintf(fp_new, "%f %f %f\n",
                        tpa[i].tri_info[Time_num-1].vert_info[j][0],
                        tpa[i].tri_info[Time_num-1].vert_info[j][1],
                        tpa[i].tri_info[Time_num-1].vert_info[j][2]);
            }
        }
        else{

            int k;
            for(k=0; k<Time_num-1; k++){
                if((time >= tpa[i].tri_info[k].time) && (time <= tpa[i].tri_info[k+1].time)){
                    break;
                }
            }
            ratio = (time - tpa[i].tri_info[k].time) / (tpa[i].tri_info[k+1].time - tpa[i].tri_info[k].time);
            for(int m=0; m<3; m++){//three vertices of each triangle
                for(int n=0; n<3; n++){//three coordinates of each vertex
                    vertex[n] = ratio * (tpa[i].tri_info[k+1].vert_info[m][n] - tpa[i].tri_info[k].vert_info[m][n])
                    + tpa[i].tri_info[k].vert_info[m][n];
                }
                fprintf(fp_new, "%f %f %f\n", vertex[0], vertex[1], vertex[2]);
            }
        }
}
关于.ply中的三角形的顶点索引,就是012、345、678、……按顺序下去
    for(int t=0; t<Tpa_Num; t++){
        fprintf(fp_new, "3 %d %d %d\n", 3*t, 3*t+1, 3*t+2);
    }
如上将tpa[]中的数据输出为常见的.ply文件的代码,小编是封装在函数generate_ply_from_tpa(float time)中。
4.3.4 渲染包含tpa的场景,main()怎么写
渲染包含tpa的场景,main()的写法和“3.6”中渲染普通动画图片差不多,只是在计算出时间后调用generate_ply_from_tpa()生成包含tpa的mesh在当前时刻对应的.ply文件。之后,后“3.6”中渲染普通动画图片一样调用normal_render()。
main()的部分代码:
    for(g_cnt=1; g_cnt<=max_cnt; g_cnt++){
        g_time = anim_time * g_cnt / num_keyframe;
        generate_ply_from_tpa(g_time);
        normal_render();
    }
4.3.5 注意事项
由于tpa组成的mesh并不是一个封闭的object,所以我们需要考虑光线直接打在object的内表面上。所以,当出现这种情况时,我们需要将撞击点处的法向量反向。我们用到的是smooth_uv_triangles,所以在SmoothUVMeshTriangle::hit()中判断一下反射光线和法向量的方向关系(即,判断是否打在open几何体的内表面),决定是否需要将法向量反向。
# if 1 // test for hitting from inside. 20180606
    if (-ray.d * sr.normal < 0.0) {
        sr.normal = -sr.normal;
    }
# endif // 1
第五部分:其他说明
5.1 怎么在C++中调用C函数。
BART提供的代码是c语言编写的,RTGU的那套代码则是C++,所以我们需要在C++中调用C函数。
参考:https://blog.csdn.net/libing_zeng/article/details/80348885
5.2 怎么判断一个变量是否为NaN
if(isnan(sr.normal.x)){ }
5.3 怎么没有折射光线
RGTU代码中提供的RayCast积分器是没有折射光线的,所以画不出玻璃。画玻璃时小编用的是Whitted积分器。
5.4 为什么可以透过物体看到被物体挡住的另一个物体
小编也遇到过这个问题,由于被Grid的算法吓到了,所以没有去寻找根本原因。弥补方法是:将这两个物体加到同一个grid中。
5.5 toycar上的license图片怎么显示全白
小编也遇到过这个问题:将license对应的mesh从toycar上拿下来单独画时,一切正常;放到toycar上一起画时,显示全白。
这个问题给小编留下了阴影,当时查了一整天还是没有解决。只查到,是受到贴license的部件背面那个部件的影响。如果将这两个部件分开一些,也能显示正常。
5.6 Mac pro中的“容器中的其他宗卷”为什么越来越大
程序中分配的内存没有释放,也就是内存泄漏。检查一下渲染完每一张图片之后,是否将这张图片对应的object、material已经释放。释放内存是对指针的操作,一不小心就会遇到“尝试多次释放同一个指针指向的空间”,这就会出现“bad access”错误啦。所以,泄漏就泄露吧。电脑是在撑不住了,关掉渲染程序,调整g_cnt到上次渲染到的位置,接着渲染即可。在渲染kitchen的800张图片中途,小编干过很多次这种事情。
第六部分:参考文献
[1]. BART: A Benchmark for Animated Ray Tracing. http://www.cse.chalmers.se/~uffe/BART/
[2]. Kevin Suffern, Ray Tracing from theGround Up, A K PetersLtd, 2007.
[3]. Peter Shirley, Steve Marschner, Fundamentals of Computer Graphics. 3rd. 2009.
[4]. Matt Pharr, Wenzel Jakob, Greg Humphreys Physically Based Rendering From Theory To Implementation. 3rd. 2016.