参考的资料有:
1、KUKA youbot机械臂与Moveit工具包(2):http://blog.csdn.net/yaked/article/details/45621517
2、如何利用ROS MoveIt快速搭建机器人运动规划平台:https://www.leiphone.com/news/201612/nxlXgriSLasNgAcX.html?viewType=weixin
3、ROS 运动规划 (Motion Planning): MoveIt! 与 OMPL:http://blog.csdn.net/improve100/article/details/50619925
4、ros论坛:https://answers.ros.org/question/240723/fail-aborted-no-motion-plan-found-no-execution-attempted/
一、逆运动学求解遇到的问题
1、给出末端执行器的位姿参数,就是position(x,y,z)、orientation(x,y,z,w)在确定位置可达的情况下还是无法求出逆解。Fail: ABORTED: No motion plan found. No execution attempted

2、博客资料里说的方法都尝试过,包括配置ikfast,但是我跟博客作者一样没有配置成功,后来从"ROS 运动规划 (Motion Planning): MoveIt! 与 OMPL"下载了urdf文件,进行配置测试,发现可以求解逆运动学,于是我开始新建一个机械臂的urdf文件。
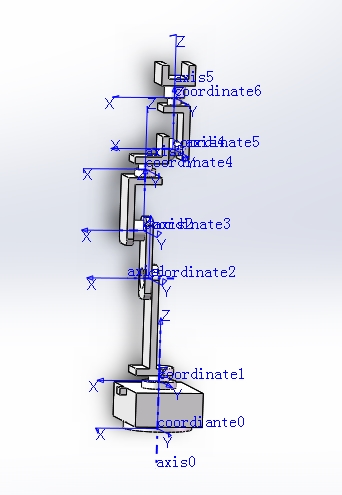
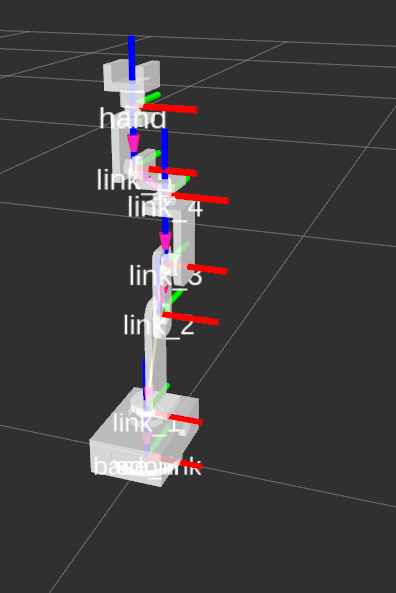
1、用SolidWorks建立一个6自由度的机械臂模型,并且通过urdf插件生成ik_urdf包。
需要注意的是:link、joint坐标系设置尽量满足所有关节为0°时候,所有坐标系同姿态(这样可以避免引入pi)

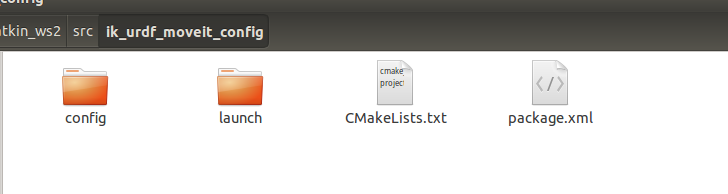
三、通过moveit设置助手生成moveit配置文件ik_urdf_moveit_config
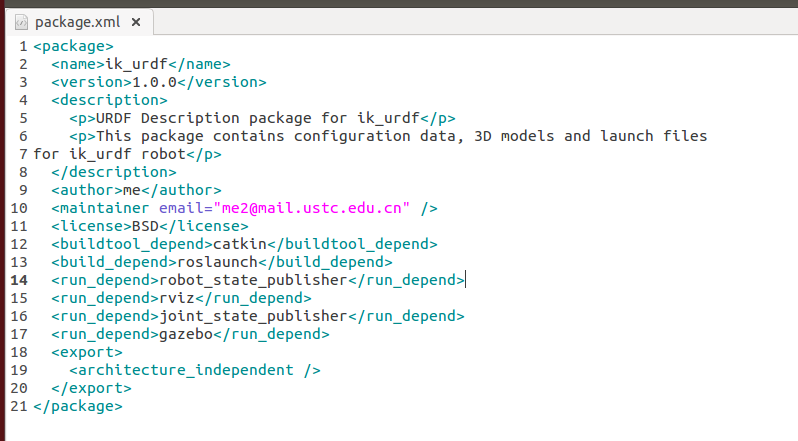
1、 修改package.xml的作者邮箱信息,原来的邮箱格式不正确
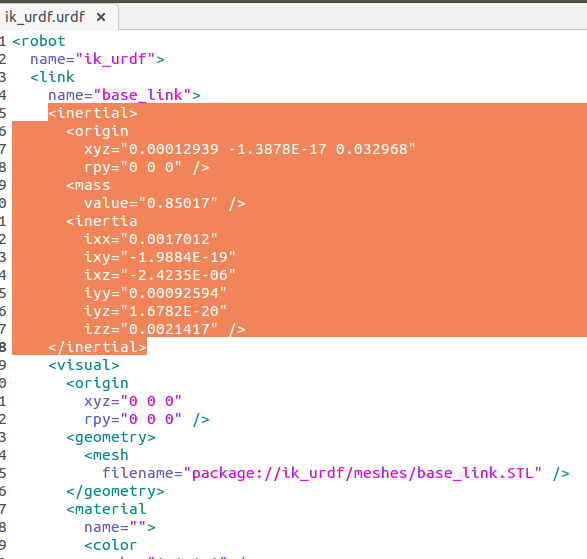
2、 删除urdf文件中base_link的inertia标签,base_link不需要定义惯性属性
3、 根据需要roslaunch的文件做一些文件目录的修改(比如做机械臂导航时遇到的问题2:solidworks用sw_urdf插件生成urdf文件包后,需要修改的部分)
(4.1) 新建启动arbotix节点文件:ik_urdf_arbotix.launch文件
我们将(做机械臂导航时遇到的问题7:正向运动学求解:在关节空间进行规划)中的my_robot_arbotix_ok.launch文件复制到urdf包内的launch文件夹下,命名ik_urdf_arbotix.launch,修改完成后的代码如下:
<launch>
   <!-- Make sure we are not using simulated time -->
   <param name="/use_sim_time" value="false" />

   <!-- Launch the arbotix driver in fake mode by default -->
   <arg name="sim" default="true" />

   <!-- If using a real controller, look on /dev/ttyUSB0 by default -->
   <arg name="port" default="/dev/ttyUSB0" />

   <!-- Load the URDF/Xacro model of our robot -->
   <param name="robot_description" textfile="/home/xs/catkin_ws2/src/ik_urdf/urdf/ik_urdf.urdf" />

   <!-- Bring up the arbotix driver with a configuration file appropriate to the robot -->
   <node name="arbotix" pkg="arbotix_python" type="arbotix_driver" clear_params="true" output="screen">
      <rosparam file="/home/xs/catkin_ws2/src/ik_urdf/config/ik_urdf_arbotix.yaml" command="load" />
      <param name="sim" value="$(arg sim)" />
      <param name="port" value="$(arg port)" />
   </node>

<!--
   Run a separate controller for the one sided gripper
   <node name="right_gripper_controller" pkg="arbotix_controllers" type="gripper_controller" output="screen">
      <rosparam>
         model: singlesided
         invert: true
         center: 0.0
         pad_width: 0.004
         finger_length: 0.065
         min_opening: -0.8
         max_opening: 0.5
         joint: right_gripper_finger_joint
      </rosparam>
   </node>
-->


  <!-- Load the URDF, SRDF and other .yaml configuration files on the param server -->
  <include file="$(find ik_urdf_moveit_config)/launch/planning_context.launch">
    <arg name="load_robot_description" value="true"/>
  </include>


  <!-- If needed, broadcast static tf for robot root -->
    <node pkg="tf" type="static_transform_publisher" name="virtual_joint_broadcaster_0" args="0 0 0 0 0 0 odom base_link 100" />


  <!-- We do not have a robot connected, so publish fake joint states >
  <node name="joint_state_publisher" pkg="joint_state_publisher" type="joint_state_publisher">
    <param name="/use_gui" value="false"/>
    <rosparam param="/source_list">[/move_group/fake_controller_joint_states]</rosparam>
  </node-->


   <!-- Publish the robot state -->
   <node name="robot_state_publisher" pkg="robot_state_publisher" type="state_publisher">
       <param name="publish_frequency" type="double" value="20.0" />
   </node>

  <!-- By default, we are not in debug mode >
  <arg name="debug" default="false" /-->
  <!-- Run the main MoveIt executable without trajectory execution (we do not have controllers configured by default) >
  <include file="$(find ik_urdf_moveit_config)/launch/move_group.launch">
    <arg name="allow_trajectory_execution" value="true"/>
    <arg name="fake_execution" value="true"/>
    <arg name="info" value="true"/>
    <arg name="debug" value="$(arg debug)"/>
  </include-->


<!--
<node
    name="rviz"
    pkg="rviz"
    type="rviz"
    args="-d /home/xs/catkin_ws2/src/robot_arm/my_moveit.rviz"
/>
-->
<!--
args="-d /home/xs/catkin_ws2/src/robot_arm/urdf.rviz"
args="-d /home/xs/catkin_ws2/src/robot_arm/arm_nav_my.rviz"


-->


   <!-- Start all servos in a relaxed state -->
   <node pkg="rbx2_dynamixels" type="arbotix_relax_all_servos.py" name="relax_all_servos" unless="$(arg sim)" />

   <!-- Load diagnostics -->
   <node pkg="diagnostic_aggregator" type="aggregator_node" name="diagnostic_aggregator" clear_params="true" unless="$(arg sim)">
      <rosparam command="load" file="$(find rbx2_dynamixels)/config/dynamixel_diagnostics.yaml" />
   </node>


   <node pkg="rqt_robot_monitor" type="rqt_robot_monitor" name="rqt_robot_monitor" unless="$(arg sim)" />

</launch>
(4.2)配置arbotix配置文件:ik_urdf_arbotix.yaml
我将配置文件ik_urdf_arbotix.yaml保存在urdf包ik_urdf中的config文件夹内,根据机械臂的关节修改完成后如下,注意controller的命名与action_name,这里应该与moveit的controllers.yaml里定义的action_ns一致。
port: /dev/ttyUSB0
baud: 1000000
rate: 100
sync_write: True
sync_read: False
read_rate: 10
write_rate: 10


joints: {
     joint_1: {id: 1, neutral: 512, min_angle: -90, max_angle: 90},
     joint_2: {id: 2, neutral: 512, min_angle: -90, max_angle: 90},
     joint_3: {id: 3, neutral: 512, min_angle: -90, max_angle: 90},
     joint_4: {id: 4, neutral: 512, min_angle: -90, max_angle: 90},
     joint_5: {id: 5, neutral: 512, min_angle: -90, max_angle: 90},
     hand_joint: {id: 6, neutral: 512, min_angle: -90, max_angle: 90}
}


controllers: {
   # base_controller: {type: diff_controller, base_frame_id: base_footprint, base_width: 0.26, ticks_meter: 4100, Kp: 12, Kd: 12, Ki: 0, Ko: 50, accel_limit: 1.0 },


   ik_arm_controller: {onboard: False, action_name: ik_arm_controller/follow_joint_trajectory, type: follow_controller, joints: [ joint_1, joint_2, joint_3,joint_4,joint_5,hand_joint]}


}
5、 配置moveit关节轨迹控制器(类似于 做机械臂导航时遇到的问题7:正向运动学求解:在关节空间进行规划)
(5.1)创建controllers.yaml文件
在moveit配置文件ik_urdf_moveit_config包下的config文件夹内创建controllers.yaml文件,暂时没有用到gripper的控制文件,注意controller_list的name和action_ns,应与(4.2节)arbotix配置文件:ik_urdf_arbotix.yaml一致
controller_list:
  - name: ik_arm_controller
    action_ns: follow_joint_trajectory
    type: FollowJointTrajectory
    default: true
    joints:
      - joint_1
      - joint_2
      - joint_3
      - joint_4
      - joint_5
      - hand_joint

#  - name: right_gripper_controller
#    action_ns: gripper_action
#    type: GripperCommand
#    default: true
#    joints:
#      - hand_joint
(5.2)添加控制器启动文件:ik_urdf_moveit_controller_manager.launch.yaml
该文件在moveit配置文件ik_urdf_moveit_config包下的launch文件夹内。修改后的内容如下,注意加载的controllers.yaml的目录
<launch>
 <!-- Set the param that trajectory_execution_manager needs to find the controller plugin -->
  <arg name="moveit_controller_manager" default="moveit_simple_controller_manager/MoveItSimpleControllerManager" />
  <param name="moveit_controller_manager" value="$(arg moveit_controller_manager)"/>


  <!-- load controller_list -->
  <rosparam file="$(find ik_urdf_moveit_config)/config/controllers.yaml"/>
</launch>
五、进行逆运动学求解
配置上述文件后需要catkin_make和source devel/setup.bash
1、用arbotix关节控制器启动虚拟机械臂模型,就是(4.1)的配置文件
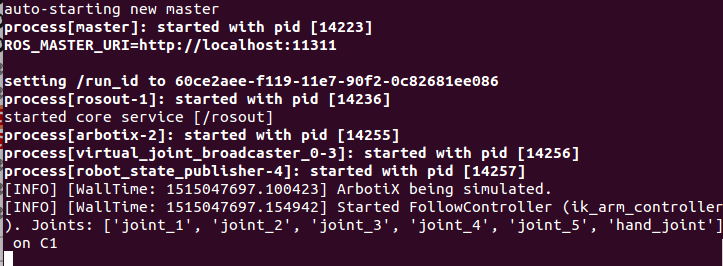
xs@xs-PC:~/catkin_ws2/src/ik_urdf/launch$ roslaunch ik_urdf_arbotix.launch
2、启动move_group
xs@xs-PC:~/catkin_ws2/src/ik_urdf_moveit_config/launch$ roslaunch move_group.launch
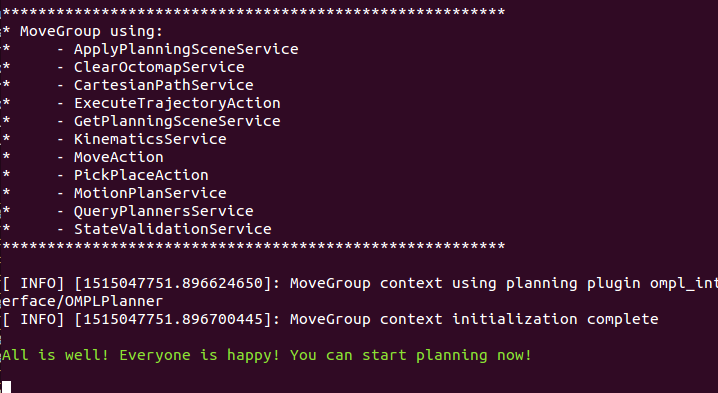
这个move_group.launch在moveit配置文件的launch目录下,文件启动的节点和服务都是moveit用来和机械臂交互的
<launch>


  <include file="$(find ik_urdf_moveit_config)/launch/planning_context.launch" />


  <!-- GDB Debug Option -->
  <arg name="debug" default="false" />
  <arg unless="$(arg debug)" name="launch_prefix" value="" />
  <arg     if="$(arg debug)" name="launch_prefix"
	   value="gdb -x $(find ik_urdf_moveit_config)/launch/gdb_settings.gdb --ex run --args" />


  <!-- Verbose Mode Option -->
  <arg name="info" default="$(arg debug)" />
  <arg unless="$(arg info)" name="command_args" value="" />
  <arg     if="$(arg info)" name="command_args" value="--debug" />


  <!-- move_group settings -->
  <arg name="allow_trajectory_execution" default="true"/>
  <arg name="fake_execution" default="false"/>
  <arg name="max_safe_path_cost" default="1"/>
  <arg name="jiggle_fraction" default="0.05" />
  <arg name="publish_monitored_planning_scene" default="true"/>


  <!-- Planning Functionality -->
  <include ns="move_group" file="$(find ik_urdf_moveit_config)/launch/planning_pipeline.launch.xml">
    <arg name="pipeline" value="ompl" />
  </include>


  <!-- Trajectory Execution Functionality -->
  <include ns="move_group" file="$(find ik_urdf_moveit_config)/launch/trajectory_execution.launch.xml" if="$(arg allow_trajectory_execution)">
    <arg name="moveit_manage_controllers" value="true" />
    <arg name="moveit_controller_manager" value="ik_urdf" unless="$(arg fake_execution)"/>
    <arg name="moveit_controller_manager" value="fake" if="$(arg fake_execution)"/>
  </include>


  <!-- Sensors Functionality -->
  <include ns="move_group" file="$(find ik_urdf_moveit_config)/launch/sensor_manager.launch.xml" if="$(arg allow_trajectory_execution)">
    <arg name="moveit_sensor_manager" value="ik_urdf" />
  </include>


  <!-- Start the actual move_group node/action server -->
  <node name="move_group" launch-prefix="$(arg launch_prefix)" pkg="moveit_ros_move_group" type="move_group" respawn="false" output="screen" args="$(arg command_args)">
    <!-- Set the display variable, in case OpenGL code is used internally -->
    <env name="DISPLAY" value="$(optenv DISPLAY :0)" />


    <param name="allow_trajectory_execution" value="$(arg allow_trajectory_execution)"/>
    <param name="max_safe_path_cost" value="$(arg max_safe_path_cost)"/>
    <param name="jiggle_fraction" value="$(arg jiggle_fraction)" />


    <!-- load these non-default MoveGroup capabilities -->
    <!--
    <param name="capabilities" value="
                  a_package/AwsomeMotionPlanningCapability
                  another_package/GraspPlanningPipeline
                  " />
    -->


    <!-- inhibit these default MoveGroup capabilities -->
    <!--
    <param name="disable_capabilities" value="
                  move_group/MoveGroupKinematicsService
                  move_group/ClearOctomapService
                  " />
    -->


    <!-- Publish the planning scene of the physical robot so that rviz plugin can know actual robot -->
    <param name="planning_scene_monitor/publish_planning_scene" value="$(arg publish_monitored_planning_scene)" />
    <param name="planning_scene_monitor/publish_geometry_updates" value="$(arg publish_monitored_planning_scene)" />
    <param name="planning_scene_monitor/publish_state_updates" value="$(arg publish_monitored_planning_scene)" />
    <param name="planning_scene_monitor/publish_transforms_updates" value="$(arg publish_monitored_planning_scene)" />
  </node>


</launch>
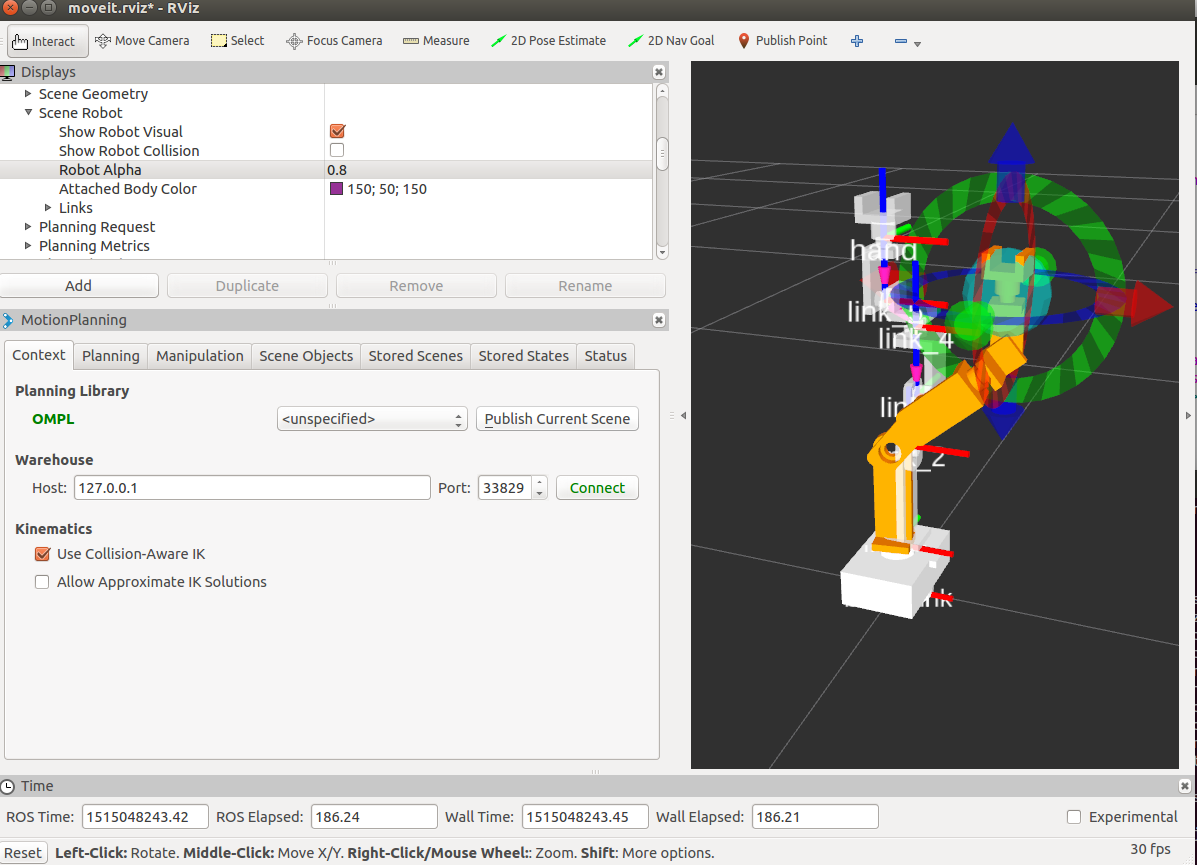
3、启动rviz, rviz文件在ik_urdf_moveit_config包内launch文件夹下
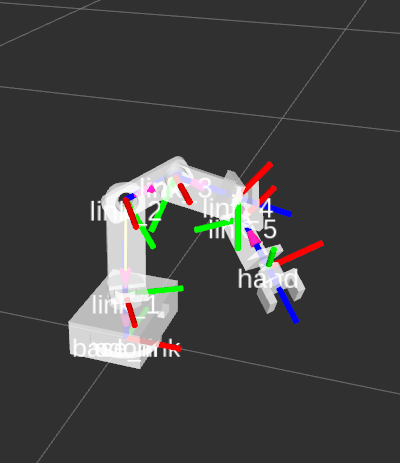
xs@xs-PC:~$ rosrun rviz rviz -d 'rospack find ik_urdf_moveit_config'/moveit.rviz我们可以通过交互标记进行拖动修改机械臂位姿,说明可以进行逆运动学求解,每一次移动标记,就运行了一次逆运动学IK求解过程。
4、运行逆运动学求解的脚本
xs@xs-PC:~$ rosrun rbx2_arm_nav moveit_ikikikik_demo.py
其中机械臂先进行正运动学求解到达设定位置,再进行逆运动学求解到达指定位置,逆运动学的目标位置,可以自己设定position、orientation,也可以通过函数获取某一姿态的位姿,通过赋值的方式给定。最终机械臂能顺利求解出逆解并执行。
#!/usr/bin/env python


"""
    moveit_ik_demo.py - Version 0.1 2014-01-14

    Use inverse kinemtatics to move the end effector to a specified pose

    Created for the Pi Robot Project: http://www.pirobot.org
    Copyright (c) 2014 Patrick Goebel.  All rights reserved.


    This program is free software; you can redistribute it and/or modify
    it under the terms of the GNU General Public License as published by
    the Free Software Foundation; either version 2 of the License, or
    (at your option) any later version.5

    This program is distributed in the hope that it will be useful,
    but WITHOUT ANY WARRANTY; without even the implied warranty of
    MERCHANTABILITY or FITNESS FOR A PARTICULAR PURPOSE.  See the
    GNU General Public License for more details at:

    http://www.gnu.org/licenses/gpl.html
"""


import rospy, sys
import moveit_commander
from moveit_msgs.msg import RobotTrajectory
from trajectory_msgs.msg import JointTrajectoryPoint


from geometry_msgs.msg import PoseStamped, Pose
from tf.transformations import euler_from_quaternion, quaternion_from_euler


class MoveItDemo:
    def __init__(self):
        # Initialize the move_group API
        moveit_commander.roscpp_initialize(sys.argv)

        rospy.init_node('moveit_demo')

        # Initialize the move group for the right arm
        right_arm = moveit_commander.MoveGroupCommander('arm')

        # Get the name of the end-effector link
        end_effector_link = right_arm.get_end_effector_link()

        # Display the name of the end_effector link
        rospy.loginfo("The end effector link is: " + str(end_effector_link))

        # Set the reference frame for pose targets
        reference_frame = 'base_link'

        # Set the right arm reference frame accordingly
        right_arm.set_pose_reference_frame(reference_frame)

        # Allow replanning to increase the odds of a solution
        right_arm.allow_replanning(True)

        # Allow some leeway in position (meters) and orientation (radians)
        right_arm.set_goal_position_tolerance(0.01)
        right_arm.set_goal_orientation_tolerance(0.05)

        # Start the arm in the "resting" pose stored in the SRDF file
        right_arm.set_named_target('resting')


        right_arm.go()

        #traj0 = right_arm.plan()


        # Execute the planned trajectory


        #right_arm.execute(traj0)
	rospy.loginfo("resting resting resting resting resting")


        rospy.sleep(1)


	joint_positions = [-1.0, -1.0, -1.0,-1.0, -1.0, -1.0]

        # Set the arm's goal configuration to the be the joint positions
        right_arm.set_joint_value_target(joint_positions)
        rospy.loginfo("0000  set_fk_target_completed  0000 ")
        # Plan and execute the motion
        ######robot_arm.go()
	traj = right_arm.plan()
        #rospy.loginfo("11111111111111111111111111 "+ str(traj))
        # Execute the planned trajectory
        right_arm.execute(traj)


	current_pose = right_arm.get_current_pose(end_effector_link)
        #rospy.loginfo("1111   execute traj completed  1111   \n "+ str(current_pose))
	rospy.loginfo("1111   execute traj completed  1111   \n ")


        rospy.sleep(1)


	# Get the end-effector pose
        ee_pose = right_arm.get_current_pose(end_effector_link)

        # Display the end-effector pose
        rospy.loginfo("End effector target pose:\n" + str(ee_pose))


	#rospy.loginfo("eeeeeeeeeeeeeeeeeee:\n" + str(ee_pose.pose.position.x))


	# Start the arm in the "resting" pose stored in the SRDF file
        right_arm.set_named_target('forward')


        right_arm.go()

        #traj0 = right_arm.plan()


        # Execute the planned trajectory


        #right_arm.execute(traj0)
	rospy.loginfo("forward  forward  forward  forward  forward")


        rospy.sleep(1)


        # Set the target pose.  This particular pose has the gripper oriented horizontally
        # 0.85 meters above the ground, 0.10 meters to the right and 0.20 meters ahead of
        # the center of the robot base.


        target_pose = PoseStamped()
        target_pose.header.frame_id = reference_frame
        target_pose.header.stamp = rospy.Time.now()


        target_pose.pose.position.x =ee_pose.pose.position.x
        target_pose.pose.position.y =ee_pose.pose.position.y
        target_pose.pose.position.z =ee_pose.pose.position.z
	target_pose.pose.orientation.x =ee_pose.pose.orientation.x
        target_pose.pose.orientation.y =ee_pose.pose.orientation.y
        target_pose.pose.orientation.z =ee_pose.pose.orientation.z
        target_pose.pose.orientation.w =ee_pose.pose.orientation.w


	'''

	target_pose.pose.position.x =0.18188
        target_pose.pose.position.y =0.04373
        target_pose.pose.position.z =0.12941
	target_pose.pose.orientation.x =0.8753672
        target_pose.pose.orientation.y =0.22988
        target_pose.pose.orientation.z =0.27960
        target_pose.pose.orientation.w =0.32048
'''


	rospy.loginfo("8888888888888888888"+ str(target_pose))

        #Set the start state to the current state
	right_arm.set_start_state_to_current_state()


        # Set the goal pose of the end effector to the stored pose
        right_arm.set_pose_target(target_pose, end_effector_link)


        ## Plan the trajectory to the goal
        traj1 = right_arm.plan()


        ## Execute the planned trajectory
        right_arm.execute(traj1)


	#rospy.loginfo("11111111111111111111111111"+ str(traj1))
	rospy.loginfo("111111  ik_executed successed   1111111")

        ## Pause for a second
        rospy.sleep(1)


	# Get the end-effector pose
        ee_pose_current = right_arm.get_current_pose(end_effector_link)

        # Display the end-effector pose
        rospy.loginfo("current ee_pose:\n" + str(ee_pose_current))


        # Shift the end-effector to the right 5cm
        right_arm.shift_pose_target(2, 0.05, end_effector_link)
        ####right_arm.go()


        traj2 = right_arm.plan()

        #rospy.loginfo("22222222222222222222222222 "+ str(traj2))
	rospy.loginfo("222222   up    22222222")

        right_arm.execute(traj2)


        rospy.sleep(1)


        # Rotate the end-effector 90 degrees
        right_arm.shift_pose_target(5, 0.1, end_effector_link)


        #######right_arm.go()


	traj3 = right_arm.plan()

	#rospy.loginfo("333333333333333333333333333 "+ str(traj3))
	rospy.loginfo("333333   roll   3333333333 ")


        right_arm.execute(traj3)


        rospy.sleep(1)


        # Store this pose as the new target_pose
        saved_target_pose = right_arm.get_current_pose(end_effector_link)

        # Move to the named pose "wave"
        right_arm.set_named_target('wave')
        #########right_arm.go()


	traj4 = right_arm.plan()

	#rospy.loginfo("4444444444444444444444444444444"+ str(traj4))


	rospy.loginfo("44444444  wave    444444444")


        right_arm.execute(traj4)


        rospy.sleep(1)


        # Go back to the stored target
        right_arm.set_pose_target(saved_target_pose, end_effector_link)
        #########right_arm.go()
	traj5 = right_arm.plan()

	#rospy.loginfo("55555555555555555555555555"+ str(traj5))
	rospy.loginfo("5555555   saved_pose    55555555")


        right_arm.execute(traj5)


        rospy.sleep(1)

        # Finish up in the resting position
        right_arm.set_named_target('resting')
        #########right_arm.go()


	traj6 = right_arm.plan()

	#rospy.loginfo("666666666666666666666666666"+ str(traj6))
	rospy.loginfo("6666666   resting    66666666")


        right_arm.execute(traj6)


        # Shut down MoveIt cleanly
	moveit_commander.roscpp_shutdown()

        # Exit MoveIt
	moveit_commander.os._exit(0)


if __name__ == "__main__":
    MoveItDemo()
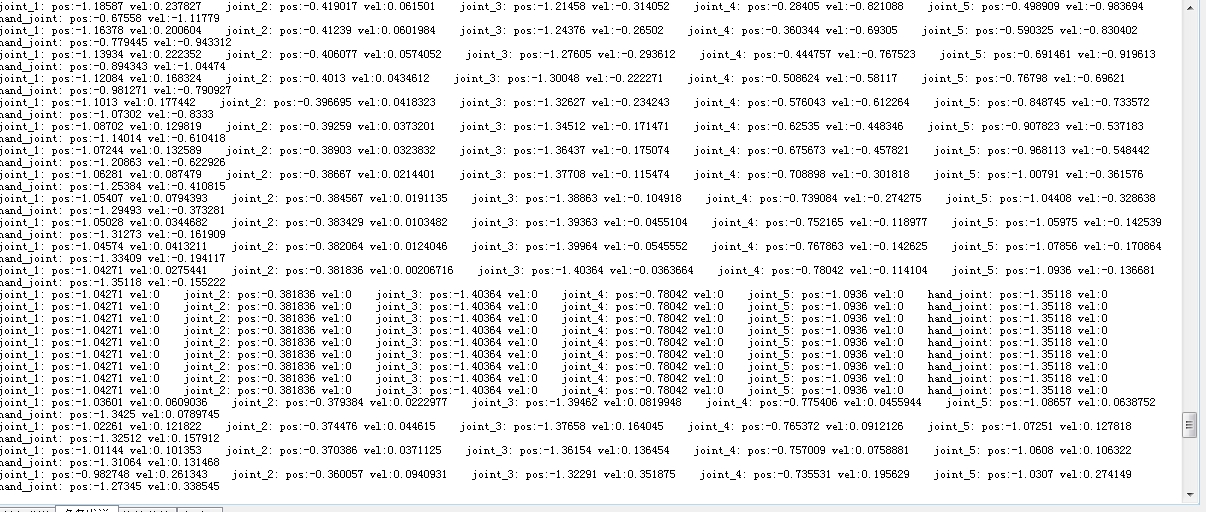
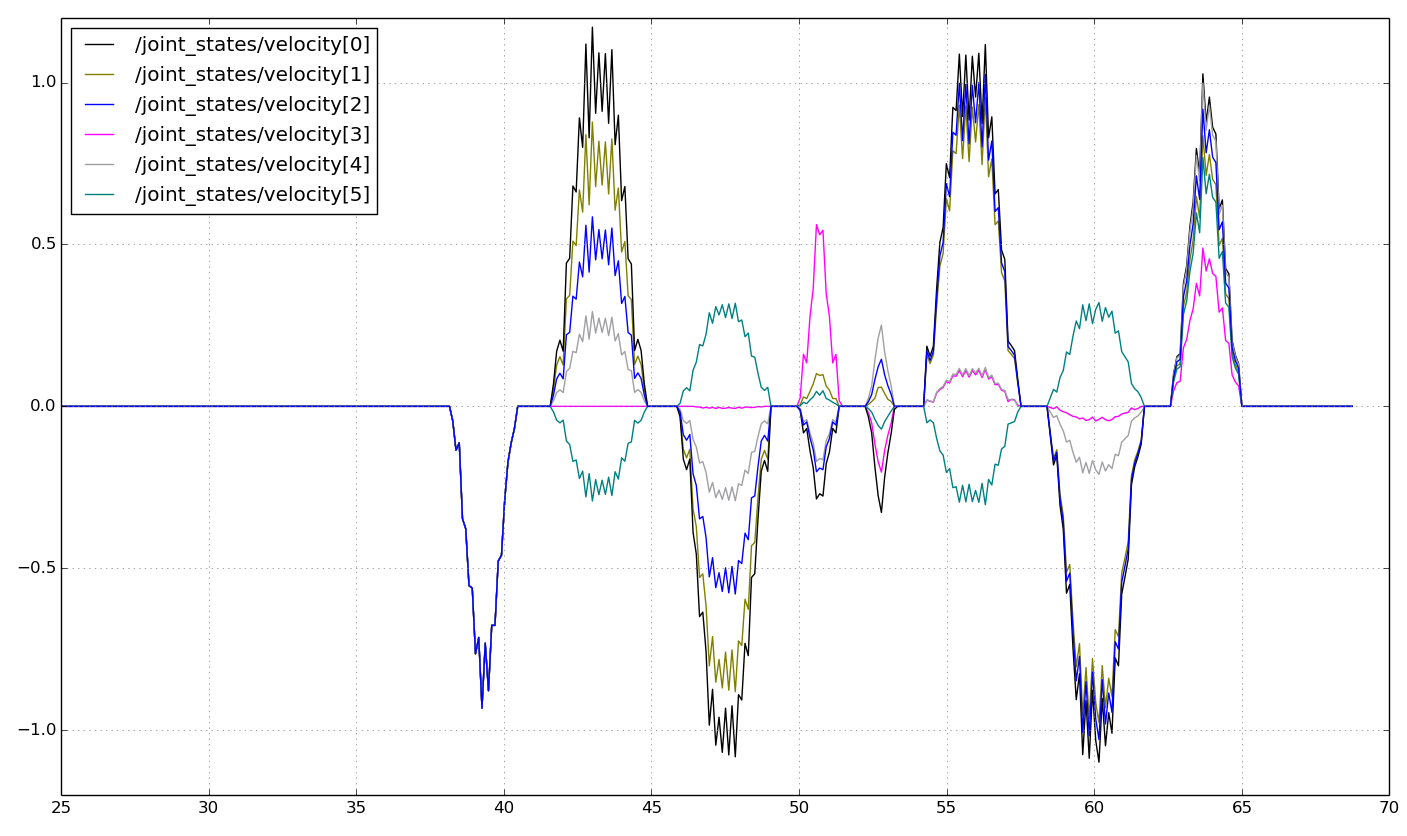
六、也观察joint_states话题中包含的position和velocity信息
xs@xs-PC:~$ rosrun rqt_plot rqt_plot
七、也成功地向串口助手发送数据