适配器模式的解析-iOS
其他设计模式的介绍
1、简单工厂模式、工厂模式、抽象工厂模式的解析-iOS
2、建造者模式的解析-iOS
3、单例模式的解析-iOS
4、原型模式的解析-iOS
5、代理模式的解析-iOS
6、适配器模式的解析-iOS
7、装饰器模式的解析-iOS
8、外观模式的解析-iOS
9、桥接模式的解析-iOS
概率描述
适配器模式(有时候也称包装样式或者包装)将一个类的接口适配成用户所期待的。一个适配允许通常因为接口不兼容而不能在一起工作的类工作在一起,做法是将类自己的接口包裹在一个已存在的类中。百度百科
实用场景
1、比如我们国家的电压是220v,可是有些电器设备的电压是低于220V的,这个时候我们就需要适配一下,让原先不适配220V的电压适配成220V
2、还有就是我们的转接头,比如我们的iPhone和安卓的充电器的是不匹配的,我们这个时候就需要安卓和iPhone的充电接口变成一个接口,这个时候我们的转换头就出现了。
上面的这些模式就是我们的适配模式,不统一的接口,通过适配器转换成统一的接口。
种类
适配器模式的实现方式:类适配器和对象适配器。
1、类适配器:主要是通过继承来适配两个接口。主要是使用多重继承的方式,但是OC不支持多继承,只支持单继承,所以在iOS中我们使用继承和协议的方式来实现类的适配。
2、对象适配器:组合一个被适配类的引用,不是采用继承被适配的类的方式。
案例解析
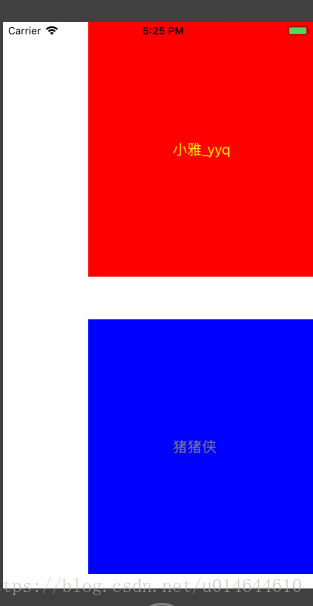
这是Demo的运行图
Demo的具体方法的代码是:
显示的View
//.h
#import <UIKit/UIKit.h>
#import "AdapterProtocol.h"

@interface ShowView : UIView
@property(nonatomic,copy)NSString *textName;
@property(nonatomic,strong)UIColor *textColor;

-(void)loadDataModel:(id<AdapterProtocol>)dataModel;

@end

//.m
#import "ShowView.h"

@interface ShowView ()
@property(nonatomic,strong)UILabel *contentLable;

@end

@implementation ShowView
@synthesize textName = _textName;
@synthesize textColor = _textColor;

-(instancetype)initWithFrame:(CGRect)frame{
    if (self = [super initWithFrame:frame]) {
        [self createView];
    }
    return self;
}
//创建View
-(void)createView{
    _contentLable = [[UILabel alloc]initWithFrame:CGRectMake(100, 100, 100, 100)];
    [self addSubview:_contentLable];
}
#pragma mark - get、set方法
-(void)setTextName:(NSString *)textName{
    _textName = textName;
    _contentLable.text = _textName;
}

-(NSString *)textName{
    return _textName;
}

-(void)setTextColor:(UIColor *)textColor{
    _textColor = textColor;
    _contentLable.textColor = _textColor;
}

-(UIColor *)textColor{
    return _textColor;
}

//根据数据源的内容加载数据
-(void)loadDataModel:(id<AdapterProtocol>)dataModel{
    self.textName = [dataModel textName];
    self.textColor = [dataModel textColor];
}


@end
协议内容
#import <Foundation/Foundation.h>

@protocol AdapterProtocol <NSObject>

-(NSString *)textName;

-(UIColor *)textColor;

@end
适配层和model的代码
ObjectAdapterTier适配器的代码
//.h
#import <Foundation/Foundation.h>

@interface ObjectAdapterTier : NSObject
@property (nonatomic,weak) id dataModel;
-(instancetype)initWithDataModel:(id)dataModel;

@end

//.m
#import "ObjectAdapterTier.h"
#import "ObjectModel.h"

@implementation ObjectAdapterTier
-(instancetype)initWithDataModel:(id)dataModel{
    if (self = [super init]) {
        self.dataModel = dataModel;
    }
    return self;
}
-(NSString *)textName{
    ObjectModel *model = self.dataModel;
    return model.textName;
}
-(UIColor *)textColor{
    ObjectModel *model = self.dataModel;
    return model.textColor;
}

@end
ObjectModel的代码
//.h
#import <Foundation/Foundation.h>
#import <UIKit/UIKit.h>

@interface ObjectModel : NSObject
@property(nonatomic,copy)NSString *textName;
@property(nonatomic,strong)UIColor *textColor;

@end
ClassAdapterTier 适配器的代码

//.h
#import <Foundation/Foundation.h>

@interface ClassAdapterTier : NSObject
@property (nonatomic,weak) id dataModel;
-(instancetype)initWithDataModel:(id)dataModel;

@end

//.m
#import "ClassAdapterTier.h"
#import "ObjectModel.h"
#import "ClassModel.h"
#define HEXRGBCOLOR(h) RGBCOLOR(((h>>16)&0xFF), ((h>>8)&0xFF), (h&0xFF))
#define RGBCOLOR(r,g,b) [UIColor colorWithRed:(r)/255.0 green:(g)/255.0 blue:(b)/255.0 alpha:1]


@implementation ClassAdapterTier
-(instancetype)initWithDataModel:(id)dataModel{
    if (self = [super init]) {
        self.dataModel = dataModel;
    }
    return self;
}
-(NSString *)textName{
    if ([self.dataModel isMemberOfClass:[ClassModel class]]) {
        ClassModel *model = self.dataModel;
        return  model.textName;
    }else{
        ObjectModel *model = self.dataModel;
        return model.textName;
    }
}
-(UIColor *)textColor{
    if ([self.dataModel isMemberOfClass:[ClassModel class]]) {
        ClassModel *model = self.dataModel;
        return HEXRGBCOLOR(model.textColor);
    }else{
        ObjectModel *model = self.dataModel;
        return model.textColor;
    }
}

@end
ClassModel的代码
#import <Foundation/Foundation.h>
#import <UIKit/UIKit.h>

@interface ClassModel : NSObject
@property(nonatomic,copy)NSString *textName;
@property(nonatomic,assign)NSInteger textColor;

@end
调用的代码
我们替换model和适配器就可以了,不需要替换试视图类的代码,这样就可以很好的解耦合,让视图类和数据类不产生耦合,具体调用的方法看下面的代码。下面的代码就是替换了model和适配器
- (void)viewDidLoad {
//适配器模式
    //适配器模式
    //方式一适配
    ShowView *objectShowView = [[ShowView alloc]initWithFrame:CGRectMake(100, 0, 300, 300)];
    objectShowView.backgroundColor = [UIColor redColor];
    [self.view addSubview:objectShowView];

     ObjectModel*model = [[ObjectModel alloc]init];
     model.textName = @"小雅_yyq";
     model.textColor = [UIColor yellowColor];

     ObjectAdapterTier *adapterTier = [[ObjectAdapterTier alloc]initWithDataModel:model];
    [objectShowView loadDataModel:adapterTier];

    [self performSelector:@selector(ll:) withObject:objectShowView afterDelay:6];

    //我们替换model和适配器就可以了,不需要替换试视图类的代码,这样就可以很好的解耦合,让视图类和数据类不产生耦合
    //方式二适配

    ShowView *classShowView = [[ShowView alloc]initWithFrame:CGRectMake(100, 350, 300, 300)];
    classShowView.backgroundColor = [UIColor blueColor];
    [self.view addSubview:classShowView];

    ClassModel *classModel = [[ClassModel alloc]init];
    classModel.textName = @"猪猪侠";
    classModel.textColor = 0x888888;

    ClassAdapterTier *classAdapterTier = [[ClassAdapterTier alloc]initWithDataModel:classModel];
    [classShowView loadDataModel:classAdapterTier];

    [self performSelector:@selector(llm:) withObject:classShowView afterDelay:3];

}
-(void)ll:(ShowView *)showview{

    ObjectModel *model = [[ObjectModel alloc]init];
    model.textName = @"小雅";
    model.textColor = [UIColor blueColor];
    ObjectAdapterTier *adapterTier = [[ObjectAdapterTier alloc]initWithDataModel:model];
    [showview loadDataModel:adapterTier];

}

-(void)llm:(ShowView *)showview{

    ClassModel *model = [[ClassModel alloc]init];
    model.textName = @"小猪猪侠";
    model.textColor = 0x222222;
    ClassAdapterTier *classAdapterTier = [[ClassAdapterTier alloc]initWithDataModel:model];
    [showview loadDataModel:classAdapterTier];

}
优缺点
优点:
解耦合,让数据类和视图类不产生耦合
缺点:
使用的类太多,可读性差。
总结
如果有写的不正确或者侵权的,希望大家给我提出来,我会及时修改。谢谢大家。