1. Spring Boot Web综述
目录结构:
Spring Boot中启动类要放在root package下面,我web工程项目结构如下:
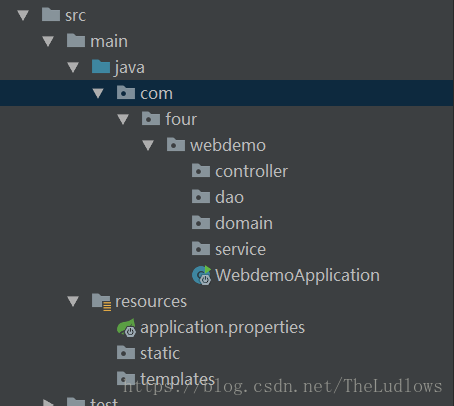
- root package结构:com.four.webdemo
- 应用启动类Application.java置于root package下,这样使用@ComponentScan注解的时候默认就扫描当前所在类的package
- 实体(Entity)置于com.four.webdemo.domain包下
- 逻辑层(Service)置于com.four.webdemo.service包下
- controller层(web)置于com.four.webdemo.controller层包下
- static可以用来存放静态资源
- templates用来存放默认的模板配置路径
Spring Web MVC框架介绍
Spring Web MVC框架(通常简称为”Spring MVC”)是一个富”模型,视图,控制器”的web框架。
Spring MVC允许你创建特定的@Controller或@RestController beans来处理传入的HTTP请求。
示例:
@RestController
@RequestMapping(value="/users")
public class MyRestController {
    @RequestMapping(value="/{user}", method=RequestMethod.GET)
    public User getUser(@PathVariable Long user) {
        // ...
    }
    @RequestMapping(value="/{user}/customers", method=RequestMethod.GET)
    List<Customer> getUserCustomers(@PathVariable Long user) {
        // ...
    }
    @RequestMapping(value="/{user}", method=RequestMethod.DELETE)
    public User deleteUser(@PathVariable Long user) {
        // ...
    }
}
Spring Boot为Spring MVC提供适用于多数应用的自动配置功能。在Spring默认基础上,自动配置添加了以下特性:
- 引入ContentNegotiatingViewResolver和BeanNameViewResolver beans。
- 对静态资源的支持,包括对WebJars的支持。
- 自动注册Converter,GenericConverter,Formatter beans。
- 对HttpMessageConverters的支持。
- 自动注册MessageCodeResolver。
- 对静态index.html的支持。
- 对自定义Favicon的支持。
如果上面这些特性不能满足,比如使用拦截器、控制器等,可以添加自己的WebMvcConfigurerAdapter类型的@Bean。如果想全面控制Spring MVC,你可以添加自己的@Configuration,并使用@EnableWebMvc对其注解。
静态文件
默认情况下,Spring Boot从classpath下一个叫/static(/public,/resources或/META-INF/resources)的文件夹或从ServletContext根目录提供静态内容。这使用了Spring MVC的ResourceHttpRequestHandler,所以你可以通过添加自己的WebMvcConfigurerAdapter并覆写addResourceHandlers方法来改变这个行为(加载静态文件)。
模板引擎
Spring Boot支持多种模版引擎包括:
- FreeMarker
- Groovy
- Thymeleaf(官方推荐)
- Mustache
JSP技术Spring Boot官方是不推荐的。当你使用上述模板引擎中的任何一个,它们默认的模板配置路径为:src/main/resources/templates。当然也可以修改这个路径。
2. 结合模板引擎
Thymeleaf是一款用于渲染XML/XHTML/HTML5内容的模板引擎。类似JSP,Velocity,FreeMaker等,它也可以轻易的与Spring MVC等Web框架进行集成作为Web应用的模板引擎。与其它模板引擎相比,Thymeleaf最大的特点是能够直接在浏览器中打开并正确显示模板页面,而不需要启动整个Web应用。它的功能特性如下:
- Spring MVC中@Controller中的方法可以直接返回模板名称,接下来Thymeleaf模板引擎会自动进行渲染
- 模板中的表达式支持Spring表达式语言(Spring EL)
- 表单支持,并兼容Spring MVC的数据绑定与验证机制
- 国际化支持
下面就进行整合Thymeleaf
引入依赖
<dependency>
    <groupId>org.springframework.boot</groupId>
    <artifactId>spring-boot-starter-thymeleaf</artifactId>
</dependency>
Controller代码:
    @Controller
    @RequestMapping("/index")
    public class IndexController {

        @RequestMapping("home")
        public ModelAndView index() {
            ModelAndView view = new ModelAndView("/index");

            view.addObject("name","four");
            view.addObject("length","28");

            return  view;
        }
    }
板路径src/main/resources/templates下编写模板文件:
<!DOCTYPE html>
<html xmlns:th="http://www.thymeleaf.org">
<head>
    <meta charset="UTF-8">
    <title></title>
</head>
name:<p th:text="${name}" />
length:<p th:text="${length}" />
<body>

</body>
</html>注:通过xmlns:th=”http://www.thymeleaf.org“ 命令空间,详细的语法细节请看这篇博客:
thymeleaf详细语法
最后输入localhost:8080/index/home就可以看到在controller中设置的属性了。
3.静态资源和拦截器
3.1静态资源
Spring Boot 默认为我们提供了静态资源处理,使用 WebMvcAutoConfiguration 中的配置各种属性。
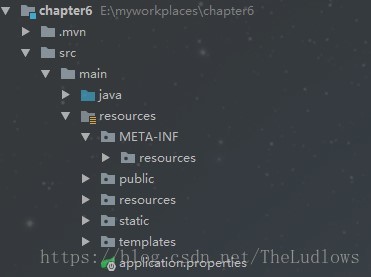
建议大家使用Spring Boot的默认配置方式,提供的静态资源映射如下:
- classpath:/META-INF/resources
- classpath:/resources
- classpath:/static
- classpath:/public
优先级顺序为:META-INF/resources > resources > static > public
我们可以通过修改spring.mvc.static-path-pattern来修改默认的映射,例如我改成/home/**,那运行的时候访问 http://lcoalhost:8080/home/index.html 才对应到index.html页面。spring.resources.static-locations设置要指向的路径,多个使用英文逗号隔开。
如果Spring Boot提供的Sping MVC不符合要求,则可以通过一个配置类(注解有@Configuration的类)加上@EnableWebMvc注解来实现完全自己控制的MVC配置。通过实现WebMvcConfigurer接口来配置这些信息,在2.0版本之前一直是通过继承WebMvcConfigurerAdapter抽象类来配置的。
通常情况下,Spring Boot的自动配置是符合我们大多数需求的。在你既需要保留Spring Boot提供的便利,有需要增加自己的额外的配置的时候,去实现webMvcConfigurer接口并且配置为@Configeration,无需使用@EnableWebMvc注解。
@Configuration
public class WebmvcConf implements WebMvcConfigurer {

    //// 可以直接使用addResourceLocations 指定磁盘绝对路径,同样可以配置多个位置,注意路径写法需要加上file:
    public  void addResourceHandlers(ResourceHandlerRegistry registry) {

        registry.addResourceHandler("/four/**").addResourceLocations("file:c:/pic/");
    }
}通过http://localhost:8080/four/1.png就可以访问了。
3.2拦截器HandllerInterceptors
拦截器在我们项目中经常使用的,比如判断用户是否登录。
要实现拦截器功能需要完成以下2个步骤:
- 创建我们自己的拦截器类并实现 HandlerInterceptor 接口
- 然后重写中WebMvcConfigurer的addInterceptors方法把自定义的拦截器类添加进来即可
public class LoginInterceptor implements HandlerInterceptor {

    @Override
    public boolean preHandle(HttpServletRequest request, HttpServletResponse response, Object handler) throws Exception {
        boolean flag =true;

        Person user=(Person)request.getSession().getAttribute("person");
        if(null==user){
            response.sendRedirect("toLogin");
            flag = false;
        }else{
            flag = true;
        }
        return flag;
    }

}
接着重写WebMvcConfigurer中的addInterceptors方法如下:
@Configuration
public class WebmvcConf implements WebMvcConfigurer {

    public void addInterceptors(InterceptorRegistry registry) {
        registry.addInterceptor(new LoginInterceptor()).addPathPatterns("/**")
                .excludePathPatterns("login");
    }

}
至此拦截器才能生效。
后面会出一篇Spring boot2.0 基于响应式的WebFlux实战,尽情期待!