自定义LayoutManager实现九宫格效果
前言
之前在项目中我有写过自定义控件九宫格是根据ViewGroup写的,功能已经实现了,但是后来我感觉如果以后性能提升的话,可能在缓存这块有要求。所以,我感觉还是改变使用自定义LayoutManager来写这个控件,后期就直接使用RecyclerView本身的缓存机制来处理回收和重用的操作。
开始
其实我们再自定义ViewGroup去编写我们的控件的时候,就有测量和布局。
在自定义LayoutManager中也有这些概念,但是还是有些区别。我们来看下。
重构和初始化
首先我们来给我们的自定义的LayoutManager取名为NineGridLayoutManager。
public class NineGridLayoutManager extends RecyclerView.LayoutManager {
    private Pool<Rect> mCacheBorders;   //用于规定Item显示的区域

    public NineGridLayoutManager(Context context) {
	mCacheBorders = new Pool<>(new Pool.New<Rect>() {
            @Override
            public Rect get() {
                return new Rect();
            }
        });
    }

    @Override
    public RecyclerView.LayoutParams generateDefaultLayoutParams() {
        return new RecyclerView.LayoutParams(ViewGroup.LayoutParams.WRAP_CONTENT, ViewGroup.LayoutParams.WRAP_CONTENT);
    }
}
编写类的构造类,这里的Pool类是我自己写的一个缓存类,目的还是用于给我们后面的Grid的布局和测量存放参数。
public class Pool<T> {
    private SparseArrayCompat<T> mPool;
    private New<T> mNewInstance;

    public Pool(New<T> newInstance) {
        mPool = new SparseArrayCompat<>();
        mNewInstance = newInstance;
    }

    public T get(int key) {
        T res = mPool.get(key);
        if (res == null) {
            res = mNewInstance.get();
            mPool.put(key, res);
        }
        return res;
    }

    public interface New<T> {
        T get();
    }
}
代码不难, 核心思想就是建立一个索引,便于我们后期来获取这个类别。
我们来看一个generateDefaultLayoutParams()方法,这里是专门设置当前RecyclerView类的大小,可以看见,这里我们设置了WRAP_CONTENT,设置这个的目的就是等到子控件也就是我们的Grid测量完毕后,再来确定我们控件的大小。
测量
与ViewGroup的区别
首先,我们平时在自定义ViewGroup的时候,测量子View是在onMeasure方法中统一测量的;
而在自定义LayoutManager中,子View是当需要layout的时候才测量,LayoutManager已经提供了两个方法给我们直接调用了:
    measureChild(View child, int widthUsed, int heightUsed)
    measureChildWithMargins(View child, int widthUsed, int heightUsed)
这两个方法都可以测量子View,不同的是第二个方法会把Item设置的Margin也考虑进去,所以如果我们的LayoutManager需要支持Margin属性的话,就用第二个了。
在Item测量完之后,我们就可以获取到Item的尺寸了,但这里并不推荐直接用getMeasuredWidth或getMeasuredHeight方法来获取,而是建议使用这两个:
    getDecoratedMeasuredWidth(View child)
    getDecoratedMeasuredHeight(View child)
这两个方法是LayoutManager提供的,其实它们内部也是会调用child的getMeasuredWidth或getMeasuredHeight的,只是在返回的时候,会考虑到Decorations的大小,并根据Decorations的尺寸对应的放大一点,所以如果我们有设置ItemDecorations的话,用这两个方法得到的尺寸往往会比直接调用getMeasuredWidth或getMeasuredHeight方法大就是这个原因了。
为什么在这里编写此测量方法
在这里,我们RecyclerView单独使用时,是不用写此方法了,但是如果我们使用RecyclerView嵌套RecyclerView的时候,我们就必须先给我们LayoutManager进行测量了。外部的RecyclerView需要预先知道我们内部被嵌套的RecyclerView所需要的空间,才能对自身进行布局操作,否则内部的RecyclerView的宽高测量结果都为0.下面我们来看下我们的测量算法。
 @Override
    public void onMeasure(RecyclerView.Recycler recycler, RecyclerView.State state, int widthSpec, int heightSpec) {
        if (getItemCount() <= 0 || state.isPreLayout()) {
            return;
        }
        itemWidth = (getWidth() - getPaddingLeft() - getPaddingRight() - gridSpacing * (mSpanCount - 1)) / mSpanCount;
        itemHeight = itemWidth;
        int childCount = getItemCount();
        if (childCount < 0) {
            return;
        }
        int height;
        if (childCount == 1) {
            height = singleImageHeight;
            widthSpec = View.MeasureSpec.makeMeasureSpec(singleImageWidth, View.MeasureSpec.EXACTLY);
        } else if (childCount > 0 && childCount <= 3) {
            height = 1 * itemHeight;
        } else if (childCount > 3 && childCount <= 6) {
            height = 2 * itemHeight;
        } else {
            height = 3 * itemHeight;
        }
        height += getPaddingBottom();
        heightSpec = View.MeasureSpec.makeMeasureSpec(height, View.MeasureSpec.EXACTLY);
        super.onMeasure(recycler, state, widthSpec, heightSpec);
    }
这里我们的九宫格是模仿了微信朋友圈的需求进行实现的,有下面几种情况:
- 1.在1张图片的情况下(这里不考虑图片的方向,统一用横向处理),我们将图片的长宽定值为
singleImageHeight和singleImageWidth进行处理。 - 2.在一排图片的情况下,我们的控件高度就为上面的itemWidth,由此我们根据微信的方式进行类推,itemWidth乘以不同的倍数来计算出我们的RecyclerView高。
最后使用View.MeasureSpec.makeMeasureSpec()方法来创建长宽规格,设置到测量的方法中。
布局
与ViewGroup的不同?
在自定义ViewGroup的时候,我们会重写onLayout方法,并在里面去遍历子View,然后调用子View的layout方法来进行布局,
但在LayoutManager里对Item进行布局时,也是不推荐直接使用layout方法,建议使用:
    layoutDecorated(View child, int left, int top, int right, int bottom)
    layoutDecoratedWithMargins(View child, int left, int top, int right, int bottom)
这两个方法也是LayoutManager提供的,我们使用layoutDecorated方法的话,它会给ItemDecorations腾出位置.
编写布局方法
   /**
     * @param recycler
     * @param state
     */
    @Override
    public void onLayoutChildren(RecyclerView.Recycler recycler, RecyclerView.State state) {
        super.onLayoutChildren(recycler, state);
        if (getItemCount() <= 0 || state.isPreLayout()) {//预布局状态不考虑
            return;
        }

        if (state.getItemCount() == 0) {
            /*
             * 没有Item可布局,就回收全部临时缓存(参考自带的LinearLayoutManager)
             * 这里没有item,是指adapter里面的数据集
             * 可能临时被清空了,但不确定何时还会继续添加回来。
             */
            removeAndRecycleAllViews(recycler);
            return;
        }
        //界面上的所有item都detach掉, 并缓存在scrap中,以便下次直接拿出来显示
        detachAndScrapAttachedViews(recycler);
        layoutChunk();
        fill(recycler);
    }
在这里我们先对缓存做一些处理操作。detachAndScrapAttachedViews()先将所有的item分离并且缓存。
- 对Grid进行测量和参数存放
  private void layoutChunk() {
        int childCount = getItemCount();
        childCount = Math.min(childCount, maxImageSize); // 计算一下最大的条目数量
        if (childCount <= 0) {
            return;
        }
        int cl = getPaddingLeft();
        int ct = 0;
        switch (getItemCount()) {
            case STATE_ONE:
                for (int i = 0; i < getItemCount(); i++) {
                    Rect item = mCacheBorders.get(i);
                    item.set(cl, ct, cl + singleImageWidth, ct + singleImageHeight);
                }
                break;
            case STATE_FOUR:
                for (int i = 0; i < getItemCount(); i++) {
                    Rect item = mCacheBorders.get(i);
                    item.set(cl, ct, cl + itemWidth, ct + itemHeight);
                    // 累加宽度
                    cl += itemWidth + gridSpacing;
                    // 如果是换行
                    if ((i + 1) % 2 == 0) {//2*2
                        // 重置左边的位置
                        cl = getPaddingLeft();
                        // 叠加高度
                        ct += itemHeight + gridSpacing;
                    }
                }
                break;
            default:
                for (int i = 0; i < getItemCount(); i++) {
                    Rect item = mCacheBorders.get(i);
                    item.set(cl, ct, cl + itemWidth, ct + itemHeight);
                    // 累加宽度
                    cl += itemWidth + gridSpacing;
                    // 如果是换行
                    if ((i + 1) % 3 == 0) {//3列
                        // 重置左边的位置
                        cl = getPaddingLeft();
                        // 叠加高度
                        ct += itemHeight + gridSpacing;
                    }
                }
                break;
        }
    }
上面的代码很清楚了,我们来重点说下4张图片和9张图片的情况。
- 4张图片
 for (int i = 0; i < getItemCount(); i++) {
                    Rect item = mCacheBorders.get(i);
                    item.set(cl, ct, cl + itemWidth, ct + itemHeight);
                    // 累加宽度
                    cl += itemWidth + gridSpacing;
                    // 如果是换行
                    if ((i + 1) % 2 == 0) {//2*2
                        // 重置左边的位置
                        cl = getPaddingLeft();
                        // 叠加高度
                        ct += itemHeight + gridSpacing;
                    }
                }
mCacheBorders.get(i);是我们再构造函数初始化的时候创建的。上面的算法可以看见,我们的分别对Grid的左上右下四个点进行计算,当时4张图片的时候,我们进行了2*2的布局。缝2重置左边距值,并且叠加当前Grid存放的高度。
- 默认处理
for (int i = 0; i < getItemCount(); i++) {
                    Rect item = mCacheBorders.get(i);
                    item.set(cl, ct, cl + itemWidth, ct + itemHeight);
                    // 累加宽度
                    cl += itemWidth + gridSpacing;
                    // 如果是换行
                    if ((i + 1) % 3 == 0) {//3列
                        // 重置左边的位置
                        cl = getPaddingLeft();
                        // 叠加高度
                        ct += itemHeight + gridSpacing;
                    }
                }
上面的代码和4的情况不同的是,这里一行存放的是3个,那就是3张图片的时候,会转行,左边距值充值,高度加一倍。当我们进行参数计算好以后,我们会用Rect来进行参数的存储。
填充
这里就是将我们的方法刚才的存放参数的Rect缓存池去除,进行布局。
    private void fill(RecyclerView.Recycler recycler) {
        int itemSpecW;
        int itemSpecH;
        for (int i = 0; i < getItemCount(); i++) {
            Rect frame = mCacheBorders.get(i);
            View scrap = recycler.getViewForPosition(i);
            addView(scrap);
            itemSpecW = View.MeasureSpec.makeMeasureSpec(frame.width(), View.MeasureSpec.EXACTLY);
            itemSpecH = View.MeasureSpec.makeMeasureSpec(frame.height(), View.MeasureSpec.EXACTLY);
            scrap.measure(itemSpecW, itemSpecH);
            layoutDecorated(scrap, frame.left, frame.top, frame.right, frame.bottom);
        }
    }
上面的代码我们需要一个逻辑:
- 从缓存中取出View。
- 添加到当前控件。
- 对控件进行测量。
- 对控件进行布局。
添加NineGridLayoutManager
holder.mNineView.setLayoutManager(new NineGridLayoutManager(holder.mNineView.getContext()));
holder.mNineView.setAdapter(new NineGridAdapter());
至此,我们的控件就完成了,这里附上我Github项目的地址:NineGridLayoutManager
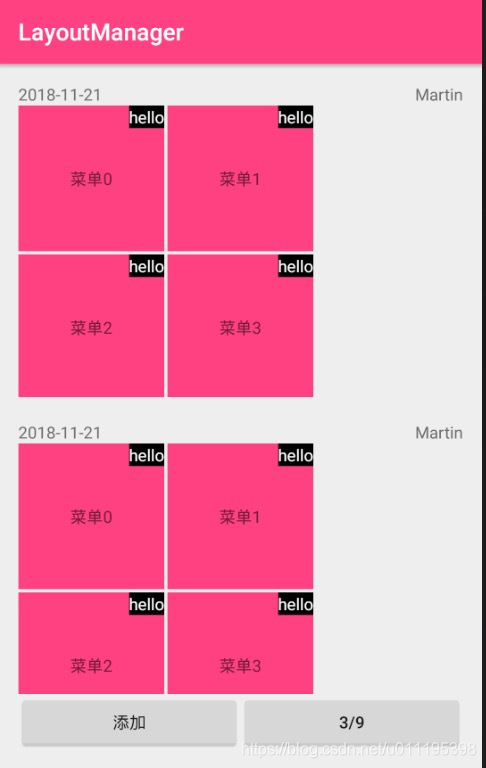
下面我们来看看图片效果:
总结
在编写之前,我其实对自定义LayoutManager并没有仔细的研究过,踩了很多坑,在这里我就推荐一些我看过的文章,对之后我们编写控件有很大的帮助。
1.《RecyclerView自定义LayoutManager,打造不规则布局》
这篇文章是我对自定义LayoutManager产生了一些兴趣,里面的代码都不难很适合拿来学习。
2.《Android RecyclerView工作原理分析(上)》
这篇文章可以说是比较全面的讲解了RecyclerView的工作原理,但是篇幅较长,读懂的话比较耗费时间,建议还是对照源码查看,这样比较清楚作者的意图。
3.Android自定义LayoutManager第十一式之飞龙在天
这篇文章可以说是对知识的一个总结和应用了,里面是作者对自己作品的一些思路剖析,非常适合用来练手。
吃透上面三篇,基本上你可以打造一个自己想要的LayoutManager了。