爬虫框架学习scrapy
Demo1
在爬虫项目的文件下面 cmd 进入到项目文件夹
Scrapy startproject test01
在利用pychrom打开创建的test01项目
项目组织架构如下图
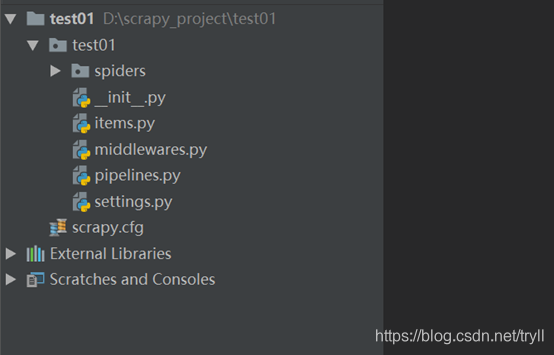
Scrapy.cfg 项目的配置文件
Test01/: 表示该项目的paython模块
Test01/spiders: 放置spider的代码目录,用于如何爬取某个(或者某些)网站, 包括了爬取的动作(例如是否跟进连接)以及如何从网页的内容中提取结构化的数据
Test01/items.py: 项目中的item文件,用于爬取的数据结构的定义,且存储数据的容器
Test01/pipelines.py: 项目中的pipelines文件,用于处理数据的过程,例如清理,去重,验证,存储等、。
Test01/settings.py:项目中的设置文件,用于提供定制的scrapy组件,可以控制包括核心core, 插件(extension)pipeline spider
1、删除原来框架默认的item.py的文件
我们自定义自己的文件CourseItems.py
| import scrapy
class CourseItems(scrapy.Item): # 课程标题 title = scrapy.Field() # 课程url url = scrapy.Field() # 课程标题图片 image_url = scrapy.Field() # 课程描述 introduction = scrapy.Field() # 访问课程人数 student_num = scrapy.Field() |
2、在spider目录下面,创建自己的爬取类MySpider.py 用于爬取网站中的课程的信息
|
import scrapy from test01.CourseItems import CourseItems
class MySpider(scrapy.Spider): # 用于区别spider name = 'MySpider' # 允许访问的域 allowed_domain = ['imooc.com'] # 爬取的网址 start_urls = ['http://www.imooc.com/course/list']
# 爬取的方法 def parse(self, response): # 实例化一个容器保存爬取的信息 item = CourseItems() # 这部分是需要我们爬取的信息 利用xpath 来选择需要的信息 具体是根据网页的html标签来进行判断 # 先获取每一个课程的div for box in response.xpath('//div[@class="course-card-container"]/a[@target="_blank"]'): # 获取浓眉哥div课程的路径 item['url'] = 'http://www.imooc.com' + box.xpath('.//@href').extract()[0] # 偶去div里面的课程标题 item['title'] = box.xpath('.//div[@class="course-card-content"]/h3/text()').extract()[0].strip() # 获取课题图片的地址 item['image_url'] = 'http:' + box.xpath('.//@src').extract()[0] # 获取div中的学生人数 item['student_num'] = box.xpath('.//span/text()').extract()[0].strip()[:-3] # 获取div中的课程简介 item['introduction'] = box.xpath('.//p/text()').extract()[0].strip() # 返回信息 yield item |
3、删除原来默认的pipeline.py的文件
创建自己的文件,存储数据为json格式
| class MyPipeline(object): # def __init__(self): # self.file = open('data.json', 'wb', encoding='utf-8') # # def process_item(self, item, spider): # # 读取item里面的数据 # line = json.dumps(dict(item), ensure_ascii=False) + "\n" # # 写入文件 # self.file.write(line) # # 返回item # return item # # # 该方法在spider被启动的时候调用 # def open_spider(self): # pass # # # 该方法在spider被关闭的时候调用 # def close_spider(self): # pass
""" 这里在按照上面的方式在进行操作的时候发现会报错区的 所以 不要在init方法,里面去操作 """
def open_spider(self, spider): self.file = codecs.open('data.json', 'wb', encoding='utf-8')
def close_spider(self, spider): # self.file.close() pass
def process_item(self, item, spider): line = json.dumps(dict(item), ensure_ascii=False) + "\n" self.file.write(line) return item |
4、重新定义数据处理类
把图片的url进行下载,并存储到指定的目录下面
| # encoding=utf-8 import scrapy from scrapy.contrib.pipeline.images import ImagesPipeline from scrapy.exceptions import DropItem
class ImgPipeline(ImagesPipeline): # 通过抓取的图片url获取一个Request用于下载 def get_media_requests(self, item, info): # 返回Request根据图片图片url下载 yield scrapy.Request(item['image_url'])
# 当下载请求完成后执行该方法 def item_completed(self, results, item, info): # 获取下载地址 image_path = [x['path'] for ok, x in results if ok] # 判断是否成功 if not image_path: raise DropItem("Item contains no images") # 将地址存入item item['image_path'] = image_path return item |
5、修改settings.py文件
最后在settings.py里面添加ITEM_PIPELINES添加爬取数据处理类的路径 以及执行顺序,添加IMAGE_STORE 图片下载的存储路径
| ITEM_PIPELINES = { 'test01.MyPipeline.MyPipeline': 100, 'test01.ImagePipeline.ImgPipeline': 1, }
IMAGES_STORE = 'd:\\img' |
6、执行命令开启爬取之旅
Scarpy crawl MySpider
7、查看结果数据文件
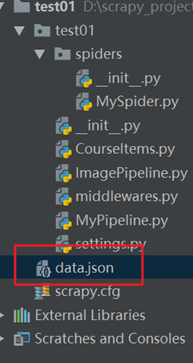
在项目下面产生的data.json 文件 该文件是在Mypipeline.py里面设置的 ,在项目文件下面的位置看下图所示:

| {"url": "http://www.imooc.com/learn/1054", "title": "走进Python量化交易--入门篇", "image_url": "http://img2.sycdn.imooc.com/5ba2386600013d3705980337-240-135.jpg", "student_num": "", "introduction": "从基础学习开启Python量化交易之路。", "image_path": ["full/c5a51605223816405089ed233953bacc53b226c6.jpg"]} {"url": "http://www.imooc.com/learn/1054", "title": "走进Python量化交易--入门篇", "image_url": "http://img2.sycdn.imooc.com/5ba2386600013d3705980337-240-135.jpg", "student_num": "", "introduction": "从基础学习开启Python量化交易之路。", "image_path": ["full/26d5e7b23aa0cfe31ccee6b25fddaede99131ade.jpg"]} {"url": "http://www.imooc.com/learn/1054", "title": "走进Python量化交易--入门篇", "image_url": "http://img2.sycdn.imooc.com/5ba2386600013d3705980337-240-135.jpg", "student_num": "", "introduction": "从基础学习开启Python量化交易之路。", "image_path": ["full/4c0c172fd04de6015922608e2113f6138fe88456.jpg"]} |