所谓整合,就是将Mybatis中的类的创建交给Spring来管理(IOC),或者说是将Mybatis整个融入到Spring中,毕竟Mybatis只是后端的持久层框架,而Spring是全栈式框架。
1、Mybatis整合Spring:
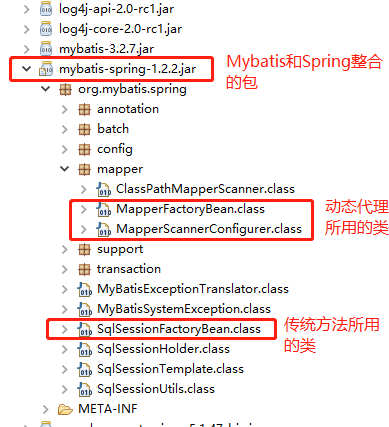
万事先导包,这里给出我的整个测试项目的源代码:source code
这里给出整合项目的基本架构:
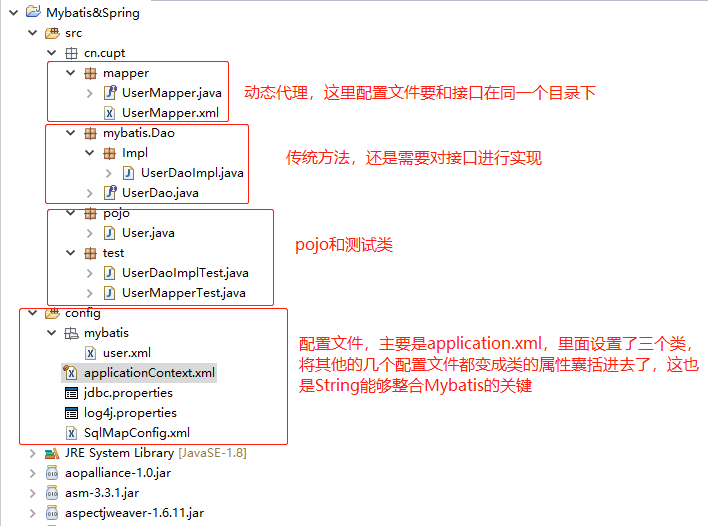
Mybatis作为持久层框架,连接数据库有两种方法,第一种是正常配置,第二种是动态代理 ,正常配置就是按照Mybatis架构体系,来一步一步地配置,动态代理就是按照Mybatis的动态代理模式,更加方便简单(官网推荐动态代理)
既然是整合到Spring里面,就必须遵循Spring的规矩,将Mybatis的类的创建全部交给Spring来管理(IOC)
Spring说Mybatis你那些配置太烦了,我给你提供几个类,你把你的配置当作属性交给我的这些类就行了
也就是下面的三个类:你会发现这三个类的属性就是在Mybatis中配置的东西
而整合的关键,就是对这三个类的属性进行配置的过程:applicationContext.xml
<?xml version="1.0" encoding="utf-8"?>
<beans
	xsi:schemaLocation="http://www.springframework.org/schema/beans http://www.springframework.org/schema/beans/spring-beans.xsd http://www.springframework.org/schema/context http://www.springframework.org/schema/context/spring-context.xsd http://www.springframework.org/schema/aop http://www.springframework.org/schema/aop/spring-aop.xsd http://www.springframework.org/schema/tx http://www.springframework.org/schema/tx/spring-tx.xsd"
	xmlns:tx="http://www.springframework.org/schema/tx" xmlns:aop="http://www.springframework.org/schema/aop"
	xmlns:context="http://www.springframework.org/schema/context"
	xmlns:xsi="http://www.w3.org/2001/XMLSchema-instance" xmlns="http://www.springframework.org/schema/beans">


	<!-- 配置文件放到properties=============================== -->

	<context:property-placeholder location="classpath:jdbc.properties" />


	<!-- 配置dbcp版连接池========================= -->
	<bean id="dataSource" class="org.apache.commons.dbcp.BasicDataSource">
		<property name="driverClassName" value="${jdbc.driverClassName}"></property>
		<property name="url" value="${jdbc.url}"></property>
		<property name="username" value="${jdbc.username}"></property>
		<property name="password" value="${jdbc.password}"></property>

		<!-- 最大链接数 =================================== -->
		<property name="maxActive" value="10"></property>

		<!-- 最大空闲数 ==================================== -->
		<property name="maxIdle" value="5"></property>

	</bean>


	<!-- 正常配置 -->

	<!-- 配置sqlSessionFactory ========================= -->
	<bean id="sqlSessionFactory" class="org.mybatis.spring.SqlSessionFactoryBean">

		<!-- 配置连接池, 之前都是写在SqlMapConfig.xml里面的=========== -->
		<property name="dataSource" ref="dataSource"></property>

		<!-- 加载Mybatis的核心配置文件========================= -->
		<property name="configLocation" value="classpath:SqlMapConfig.xml"></property>

		<!-- 包扫描器,别名就是类的全称,不区分大小写,再写pojo就不需要写全路径了,之前都是写在SqlMapConfig.xml里面的 -->
		<property name="typeAliasesPackage" value="cn.cupt.pojo"></property>


	</bean>


	<!-- 传统的Dao方式:将userDaoImpl实现类交给spring管理 =================== -->
	<bean id="userDaoImpl" class="cn.cupt.mybatis.Dao.Impl.UserDaoImpl">
		<property name="sqlSessionFactory" ref="sqlSessionFactory"></property>


	</bean>


	<!-- 动态代理模式配置 ========================================== -->
	<!-- 第一种方式,配置一个接口 -->

	<bean id="baseMapper" class="org.mybatis.spring.mapper.MapperFactoryBean" abstract="true" lazy-init="true">
		<property name="sqlSessionFactory" ref="sqlSessionFactory" />
	</bean>

	<bean id="oneMapper" parent="baseMapper">
		<property name="mapperInterface" value="cn.cupt.mapper.UserMapper" />
	</bean>


	<!-- 第二种方式,扫描整个包============================================= -->
	<bean id="mapperScannerConfigurer" class="org.mybatis.spring.mapper.MapperScannerConfigurer">

		<property name="basePackage" value="cn.cupt.mapper"></property>

	</bean>

</beans>
配置好后你就可以去做一些测试,就像之前Spring通过映射找到相关的类然后调用方法一样,这里就是对上面三个类的方法的应用,主要还是动态代理的第二种:扫描包的用法,很简单很关键(如果有多个包,用逗号隔开)
也就是说整合了之后Mybatis的核心包SqlMapConfig.xml完全可以删掉,然后只要创建动态代理的Mapper包就行了,