一.创建maven工程
工程结构

pom添加如下依赖:
	<properties>
        <es-version>5.6.1</es-version>
    </properties>
    <dependencies>
        <dependency>
            <groupId>org.elasticsearch</groupId>
            <artifactId>elasticsearch</artifactId>
            <version>${es-version}</version>
        </dependency>
        <dependency>
            <groupId>org.elasticsearch.client</groupId>
            <artifactId>transport</artifactId>
            <version>${es-version}</version>
        </dependency>
        <dependency>
            <groupId>org.apache.logging.log4j</groupId>
            <artifactId>log4j-core</artifactId>
            <version>2.9.0</version>
        </dependency>
        <dependency>
            <groupId>junit</groupId>
            <artifactId>junit</artifactId>
            <version>4.12</version>
            <scope>compile</scope>
        </dependency>
        <dependency>
            <groupId>com.fasterxml.jackson.core</groupId>
            <artifactId>jackson-core</artifactId>
            <version>2.7.3</version>
        </dependency>
        <dependency>
            <groupId>com.fasterxml.jackson.core</groupId>
            <artifactId>jackson-databind</artifactId>
            <version>2.7.3</version>
        </dependency>
        <dependency>
            <groupId>org.codehaus.jackson</groupId>
            <artifactId>jackson-mapper-asl</artifactId>
            <version>1.9.13</version>
        </dependency>
    </dependencies>
Article.java
public class Article {

    private String atcId;
    private String title;
    private String content;
log4j2.xml
<?xml version="1.0" encoding="utf-8" ?>
<Configuration xmlns="http://logging.apache.org/log4j/2.0/config">
    <Appenders>
        <Console name="Console" target="SYSTEM_OUT">
            <PatternLayout pattern="%m%n"></PatternLayout>
        </Console>
    </Appenders>
    <Loggers>
        <Root level="INFO">
            <AppenderRef ref="Console"></AppenderRef>
        </Root>
    </Loggers>
</Configuration>
二.测试API
2.1创建索引,删除索引
    @Test
    public void esTest() throws UnknownHostException {
        //获取集群信息
        Settings settings = Settings.builder().put("cluster.name","my-es-search").build();
        //获取客户端
        PreBuiltTransportClient preBuiltTransportClient = new PreBuiltTransportClient(settings);
        //连接指定客户端主机
        preBuiltTransportClient.addTransportAddress(new InetSocketTransportAddress(InetAddress.getByName("192.168.1.117"), 9300));
        System.out.println("" + preBuiltTransportClient.toString());
        //创建索引
		preBuiltTransportClient.admin().indices().prepareCreate("blog").get();
        //删除索引
//        preBuiltTransportClient.admin().indices().prepareDelete("blog").get();
        //最后关闭客户端
        preBuiltTransportClient.close();
    }
2.1插入文档
1)json格式插入文档
@Test
    public void esTest() throws UnknownHostException {
        //获取集群信息
        Settings settings = Settings.builder().put("cluster.name","my-es-search").build();
        //获取客户端
        PreBuiltTransportClient preBuiltTransportClient = new PreBuiltTransportClient(settings);
        //连接指定客户端主机
        preBuiltTransportClient.addTransportAddress(new InetSocketTransportAddress(InetAddress.getByName("192.168.1.117"), 9300));
        //插入JSON文档,没有index会创建
   		Article article = new Article();
        article.setAtcId("1");
        article.setTitle("第一文");
        article.setContent("浏览器查看http://sdafadf:9200/blog2");
        String articleJson = JsonUtils.objectToJson(article);
        //prepareIndex(index名,type名,documentId)
        IndexResponse indexResponse = preBuiltTransportClient.prepareIndex("blog", "article", "1")
                .setSource(articleJson, XContentType.JSON)
                .get();
 	    System.out.println("1" + indexResponse.getId());        //输出 11
        System.out.println("2" + indexResponse.getIndex());     //输出 2blog
        System.out.println("3" + indexResponse.getType());      //输出 3article
        System.out.println("4" + indexResponse.getResult());    //输出 4CREATED
        System.out.println("5" + indexResponse.getShardId());   //输出 5[blog][1]
        System.out.println("6" + indexResponse.getShardInfo()); //输出 6ShardInfo{total=1, successful=1, failures=[]}
        System.out.println("7" + indexResponse.getVersion());   //输出 71
        System.out.println("8" + indexResponse.getLocation(""));//输出 8/blog/article/1?routing=
        //最后关闭客户端
        preBuiltTransportClient.close();
    }
2)以map形式插入文档
@Test
    public void esTest() throws UnknownHostException {
        //获取集群信息
        Settings settings = Settings.builder().put("cluster.name","my-es-search").build();
        //获取客户端
        PreBuiltTransportClient preBuiltTransportClient = new PreBuiltTransportClient(settings);
        //连接指定客户端主机
        preBuiltTransportClient.addTransportAddress(new InetSocketTransportAddress(InetAddress.getByName("192.168.1.117"), 9300));
         //map形式插入文档
        Map<String,Object> map = new HashMap<>();
        map.put("atcId","2");
        map.put("title","第二文");
        map.put("content","ID:ffmkiejjmecolpfloofpjologoblkegm\n");
        IndexResponse indexResponse2 = preBuiltTransportClient.prepareIndex("blog", "article", "2")
                .setSource(map)
                .get();
        //最后关闭客户端
        preBuiltTransportClient.close();
    }
3)以ES构建器方式插入
@Test
    public void esTest() throws UnknownHostException {
        //获取集群信息
        Settings settings = Settings.builder().put("cluster.name","my-es-search").build();
        //获取客户端
        PreBuiltTransportClient preBuiltTransportClient = new PreBuiltTransportClient(settings);
        //连接指定客户端主机
        preBuiltTransportClient.addTransportAddress(new InetSocketTransportAddress(InetAddress.getByName("192.168.1.117"), 9300));
         //ES构建器形式插入文档
        XContentBuilder xContentBuilder = XContentFactory.jsonBuilder().startObject()
                .field("atcId", "3")
                .field("title", "第3文")
                .field("content", "页面空白 报错信息 此时页面一片空白 报错原因 Babel 默认只转换")
                .endObject();
        IndexResponse indexResponse3 = preBuiltTransportClient.prepareIndex("blog", "article", "3")
                .setSource(xContentBuilder)
                .get();
        //最后关闭客户端
        preBuiltTransportClient.close();
    }
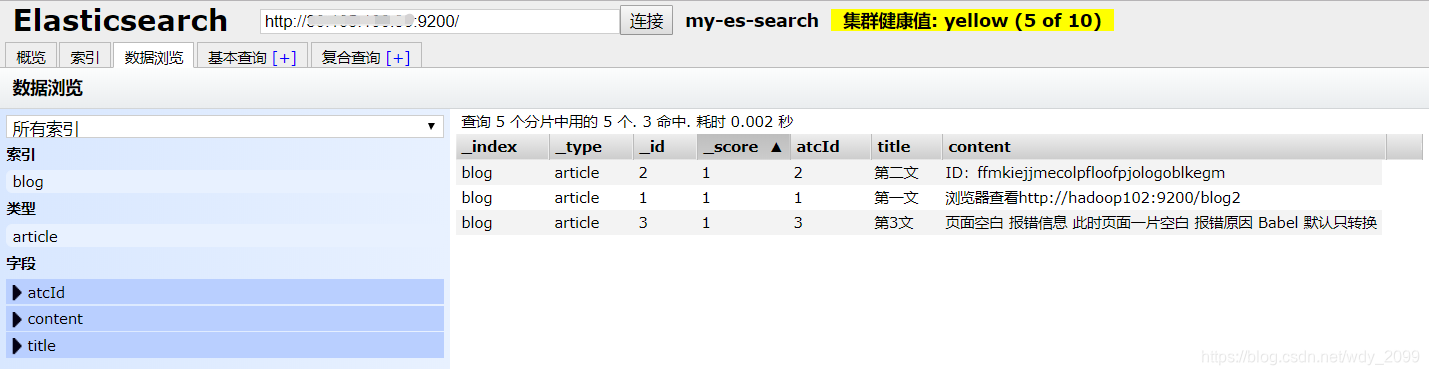
插入后效果:
2.2搜索文档
1)获取单条数据prepareGet(index名,type名,es唯一id)
    @Test
    public void esTest() throws IOException {
        //获取集群信息
        Settings settings = Settings.builder().put("cluster.name", "my-es-search").build();
        //获取客户端
        PreBuiltTransportClient preBuiltTransportClient = new PreBuiltTransportClient(settings);
        //连接指定客户端主机
        preBuiltTransportClient.addTransportAddress(new InetSocketTransportAddress(InetAddress.getByName("192.168.1.117"), 9300));
        //获取数据
        GetResponse getResponse = preBuiltTransportClient.prepareGet("blog", "article", "1").get();
        System.out.println("获取的数据为:" + getResponse.getSourceAsString());//获取的数据为:{"atcId":"1","title":"第一文","content":"浏览器查看http://hadoop102:9200/blog2"}
        //最后关闭客户端
        preBuiltTransportClient.close();
    }
2)获取多条数据
具体请看注释:
    @Test
    public void esTest() throws IOException {
        //获取集群信息
        Settings settings = Settings.builder().put("cluster.name", "my-es-search").build();
        //获取客户端
        PreBuiltTransportClient preBuiltTransportClient = new PreBuiltTransportClient(settings);
        //连接指定客户端主机
        preBuiltTransportClient.addTransportAddress(new InetSocketTransportAddress(InetAddress.getByName("192.168.1.117"), 9300));
        //连续多个add一起写,适用于获取不同index,不同type的数据
        MultiGetResponse multiGetItemResponses = preBuiltTransportClient.prepareMultiGet().add("blog", "article", "1").add("blog", "article", "2").get();
        for (MultiGetItemResponse itemResponses : multiGetItemResponses) {
            GetResponse getResponse = itemResponses.getResponse();
            //如果真的存在,则打印
            if (getResponse.isExists()) {
                System.out.println("获取的数据为:" + getResponse.getSourceAsString());//
            }
        }
        System.out.println("#########br###########");
        //add()中要的id是一个不定长参数,可以一次性获取多个id的document
        //适用于获取同一index,同一type的数据
        MultiGetResponse multiGetItemResponses1 = preBuiltTransportClient.prepareMultiGet().add("blog", "article", "1", "2").get();
        for (MultiGetItemResponse itemResponses : multiGetItemResponses1) {
            GetResponse getResponse = itemResponses.getResponse();
            //如果真的存在,则打印
            if (getResponse.isExists()) {
                System.out.println("获取的数据为:" + getResponse.getSourceAsString());//
            }
        }
        //最后关闭客户端
        preBuiltTransportClient.close();
    }
    最终输出为:
    获取的数据为:{"atcId":"1","title":"第一文","content":"浏览器查看http://hadoop102:9200/blog2"}
	获取的数据为:{"atcId":"2","title":"第二文","content":"ID:ffmkiejjmecolpfloofpjologoblkegm\n"}
	#########br###########
	获取的数据为:{"atcId":"1","title":"第一文","content":"浏览器查看http://hadoop102:9200/blog2"}
	获取的数据为:{"atcId":"2","title":"第二文","content":"ID:ffmkiejjmecolpfloofpjologoblkegm\n"}
2.3更新文档
更新文档的方式和插入文档的神似,都是那几种方式,如:
1)prepareUpdate的方式
@Test
    public void esTest() throws IOException {
        //获取集群信息
        Settings settings = Settings.builder().put("cluster.name", "my-es-search").build();
        //获取客户端
        PreBuiltTransportClient preBuiltTransportClient = new PreBuiltTransportClient(settings);
        //连接指定客户端主机
        preBuiltTransportClient.addTransportAddress(new InetSocketTransportAddress(InetAddress.getByName("192.168.1.117"), 9300));
           //更新文档
        Map<String, Object> map = new HashMap<>();
        map.put("title", "第一文-update文档");
        UpdateResponse updateResponse = preBuiltTransportClient.prepareUpdate("blog", "article", "1").setDoc(map).get();
        System.out.println("" + updateResponse);//UpdateResponse[index=blog,type=article,id=1,version=2,result=updated,shards=ShardInfo{total=2, successful=1, failures=[]}]
        //最后关闭客户端
        preBuiltTransportClient.close();
    }
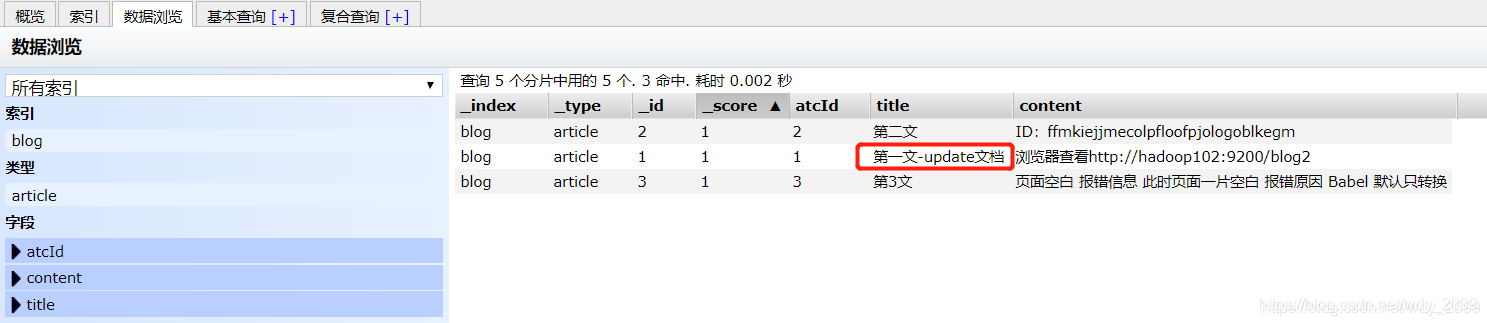
修改后的效果:
2)UpdateRequest的方式
		//##############此处获取preBuiltTransportClient和上面代码中的一样哈,就不重复了,直接关键代码##########
 		Map<String, Object> map = new HashMap<>();
        map.put("title", "第一文-第二次update文档");
        //UpdateRequest(String index, String type, String id)
        preBuiltTransportClient.update(new UpdateRequest("blog", "article", "1")
                .doc(map) //此处doc里可以放json字符串, map,XContentBuilder.jsonBuilder IndexRequest等
        ).actionGet();
        //##########关闭clien代码###########
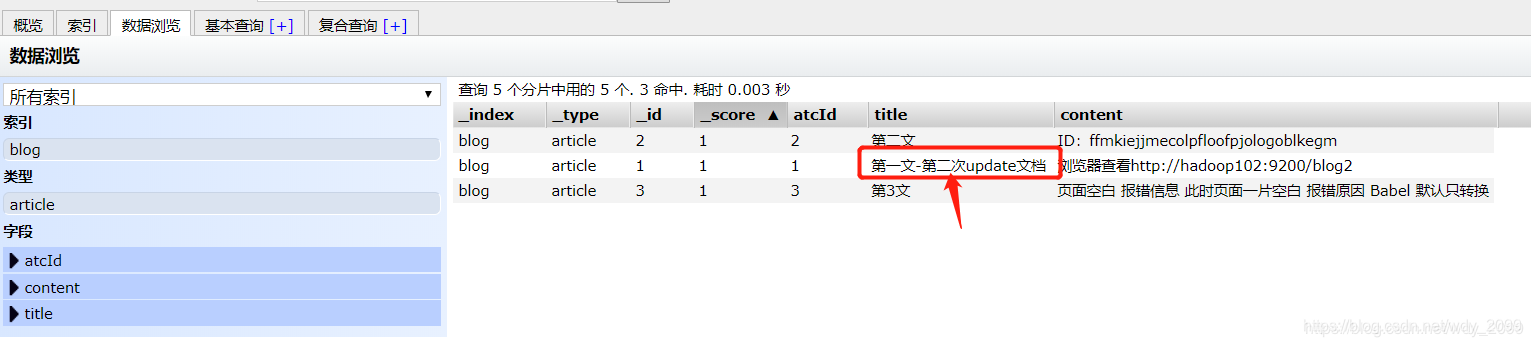
修改后的效果:
2.4 upsert文档(更新插入)
这种方式是:存在修改,不存在则插入
		//##############此处获取preBuiltTransportClient和上面代码中的一样哈,就不重复了,直接关键代码##########
 		Map<String, Object> map = new HashMap<>();
        map.put("atcId", "8");
        map.put("title", "update的文档");
        map.put("content", "This is update的文档content");
        Map<String, Object> mapUpsert = new HashMap<>();
        mapUpsert.put("atcId", "8");
        mapUpsert.put("title", "upsert的文档");
        mapUpsert.put("content", "This is upsert的文档content");
        preBuiltTransportClient.update(new UpdateRequest("blog", "article", "8")
                //此处doc和upsert里可以放json字符串, map,XContentBuilder.jsonBuilder IndexRequest等
                //如果不存在插入mapUpsert的数据,否则修改成map的数据,执行2次可看效果
                .doc(map).upsert(mapUpsert)
        ).actionGet();
        //##########关闭clien代码###########
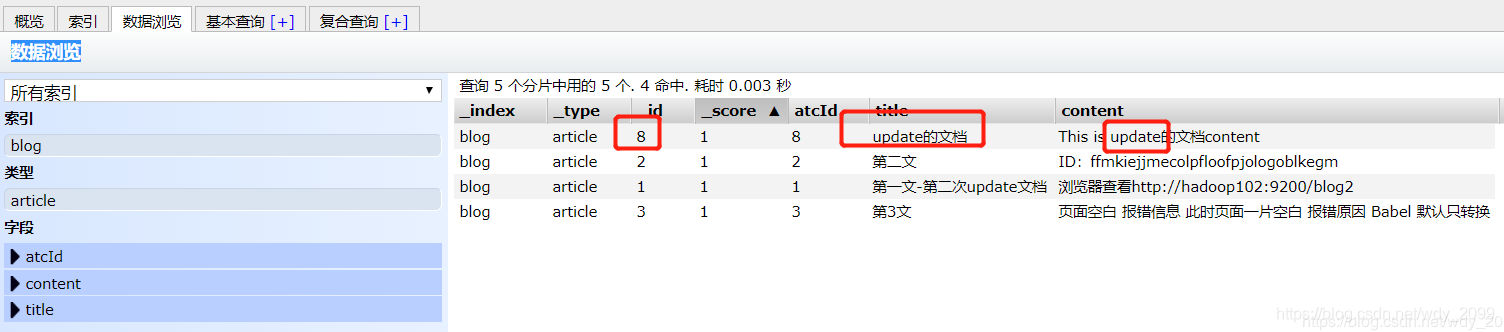
第一次执行后的效果:(因为id=8不存在,所以插入mapUpsert的数据)
第二次执行后的效果:(因为id=8已存在,所以修改为map的数据)

2.5 删除文档
删除就是根据id删除对应文档
比如:这里删除id=2的文档
		//##############此处获取preBuiltTransportClient和上面代码中的一样哈,就不重复了,直接关键代码##########
        DeleteResponse deleteResponse = preBuiltTransportClient.prepareDelete("blog", "article", "2").get();
        //DeleteRequest的方式,差不多的操作方式
//        DeleteResponse deleteResponse1 = preBuiltTransportClient.delete(new DeleteRequest("blog", "article", "2")).actionGet();
        System.out.println("删除结果:" + deleteResponse);
        //删除结果:DeleteResponse[index=blog,type=article,id=2,version=2,result=deleted,shards=ShardInfo{total=2, successful=1, failures=[]}]
        //##########关闭clien代码###########
删除后,发现id=2的数据没有了:

三.高级查询
3.1 QueryBuilders.matchAllQuery() 查询所有
		//##############此处获取preBuiltTransportClient和上面代码中的一样哈,就不重复了,直接关键代码##########
        SearchResponse searchResponse = preBuiltTransportClient.prepareSearch("blog").setTypes("article")
                .setQuery(QueryBuilders.matchAllQuery()).get();
        SearchHits searchHits = searchResponse.getHits();
        System.out.println("查询的总条数:" + searchHits.getTotalHits());//查询的总条数:3
        for (SearchHit searchHit : searchHits) {
            System.out.println("" + searchHit.getSourceAsString());
        }
        //{"atcId":"8","title":"update的文档","content":"This is update的文档content"}
        //{"atcId":"1","title":"第一文-第二次update文档","content":"浏览器查看http://hadoop102:9200/blog2"}
        //{"atcId":"3","title":"第3文","content":"页面空白 报错信息 此时页面一片空白 报错原因 Babel 默认只转换"}
        //##########关闭clien代码###########
3.2 QueryBuilders.queryStringQuery(keyword) 根据所有字段分词查询
现在的数据里只有id=1和id=8两条数据里有update关键字,且在不同的字段中,根据所有字段分词查询:在这里是指既扫描title,又扫描content字段。所以这2个字段中包含update关键字的都会被查询出来。
		//##############此处获取preBuiltTransportClient和上面代码中的一样哈,就不重复了,直接关键代码##########
        String keyword = "update";
        SearchResponse searchResponse = preBuiltTransportClient.prepareSearch("blog").setTypes("article")
                .setQuery(QueryBuilders.queryStringQuery(keyword)).get();
        SearchHits searchHits = searchResponse.getHits();
        System.out.println("查询的总条数:" + searchHits.getTotalHits());//查询的总条数:3
        for (SearchHit searchHit : searchHits) {
            System.out.println("" + searchHit.getSourceAsString());
        }
        //查询的总条数:2
        //{"atcId":"8","title":"update的文档","content":"This is update的文档content"}
        //{"atcId":"1","title":"第一文-第二次update文档","content":"浏览器查看http://hadoop102:9200/blog2"}
        //##########关闭clien代码###########
3.3 QueryBuilders.wildcardQuery(字段, 通配符关键字) 通配符查询
   ------->可用的通配符有:
   * :表示0个或多个字符
   ? :表示单个字符
1)星号通配符
		//##############此处获取preBuiltTransportClient和上面代码中的一样哈,就不重复了,直接关键代码##########
        String keywordLike = "*第*";
        SearchResponse searchResponse = preBuiltTransportClient.prepareSearch("blog").setTypes("article")
                .setQuery(QueryBuilders.wildcardQuery("title",keywordLike)).get();
        SearchHits searchHits = searchResponse.getHits();
        System.out.println("查询的总条数:" + searchHits.getTotalHits());//查询的总条数:3
        for (SearchHit searchHit : searchHits) {
            System.out.println("" + searchHit.getSourceAsString());
        }
        //查询的总条数:2
		//"atcId":"1","title":"第一文-第二次update文档","content":"浏览器查看http://hadoop102:9200/blog2"}
		//"atcId":"3","title":"第3文","content":"页面空白 报错信息 此时页面一片空白 报错原因 Babel 默认只转换"}

        //##########关闭clien代码###########
2)问号通配符
		//##############此处获取preBuiltTransportClient和上面代码中的一样哈,就不重复了,直接关键代码##########
        String keywordLike = "第?";//?第
        SearchResponse searchResponse = preBuiltTransportClient.prepareSearch("blog").setTypes("article")
                .setQuery(QueryBuilders.wildcardQuery("title",keywordLike)).get();
        SearchHits searchHits = searchResponse.getHits();
        System.out.println("查询的总条数:" + searchHits.getTotalHits());//查询的总条数:3
        for (SearchHit searchHit : searchHits) {
            System.out.println("" + searchHit.getSourceAsString());
        }
        //查询的总条数:0
        //这个是因为默认的分词器对中文的分词效果很差,所以查询不到数据,后面会介绍ik分词器
        //##########关闭clien代码###########
3.4 QueryBuilders.termQuery(字段, 词条关键字) 词条查询
		//##############此处获取preBuiltTransportClient和上面代码中的一样哈,就不重复了,直接关键代码##########
        String term = "第";
        SearchResponse searchResponse = preBuiltTransportClient.prepareSearch("blog").setTypes("article")
                .setQuery(QueryBuilders.termQuery("title",term)).get();
        SearchHits searchHits = searchResponse.getHits();
        System.out.println("查询的总条数:" + searchHits.getTotalHits());//查询的总条数:3
        for (SearchHit searchHit : searchHits) {
            System.out.println("" + searchHit.getSourceAsString());
        }
        //查询的总条数:2
		//"atcId":"1","title":"第一文-第二次update文档","content":"浏览器查看http://hadoop102:9200/blog2"}
		//"atcId":"3","title":"第3文","content":"页面空白 报错信息 此时页面一片空白 报错原因 Babel 默认只转换"}

        //##########关闭clien代码###########
3.5 QueryBuilders.fuzzyQuery(字段, 关键字) 模糊查询
这个区别于mysql的模糊查询,mysql的模糊查询和星号*通配符的方式类似的,es的模糊查询是根据模糊程度查询对应数据:
使用编辑距离的模糊查询,计算量较大,但是对用户拼写错的场景比较有用(如:模糊查询4)
可以通过设置属性来限定查询的模糊程度:
1)指定最小相似度偏差: “min_similarity”:1
2) 模糊查询将扩展到的默认最大数。默认值为50:maxExpansions。
		//##############此处获取preBuiltTransportClient和上面代码中的一样哈,就不重复了,直接关键代码##########
        //模糊查询1:Babel
        String fuzzy = "Babel";
        SearchResponse searchResponse = preBuiltTransportClient.prepareSearch("blog").setTypes("article")
                .setQuery(QueryBuilders.fuzzyQuery("content",fuzzy)).get();
        SearchHits searchHits = searchResponse.getHits();
        System.out.println("查询的总条数:" + searchHits.getTotalHits());//查询的总条数:3
        for (SearchHit searchHit : searchHits) {
            System.out.println("" + searchHit.getSourceAsString());
        }
        //查询的总条数:1
		//"atcId":"3","title":"第3文","content":"页面空白 报错信息 此时页面一片空白 报错原因 Babel 默认只转换"}

		//模糊查询2:babel(大小写的转换,全大写BABEL是查询不到的)
        String fuzzy = "nabel";
        SearchResponse searchResponse = preBuiltTransportClient.prepareSearch("blog").setTypes("article")
                .setQuery(QueryBuilders.fuzzyQuery("content",fuzzy)).get();
        SearchHits searchHits = searchResponse.getHits();
        System.out.println("查询的总条数:" + searchHits.getTotalHits());//查询的总条数:3
        for (SearchHit searchHit : searchHits) {
            System.out.println("" + searchHit.getSourceAsString());
        }
        //查询的总条数:1
		//"atcId":"3","title":"第3文","content":"页面空白 报错信息 此时页面一片空白 报错原因 Babel 默认只转换"}

		//模糊查询3:updat(去掉两边的其中1个字符)
        String fuzzy = "updat";
        SearchResponse searchResponse = preBuiltTransportClient.prepareSearch("blog").setTypes("article")
                .setQuery(QueryBuilders.fuzzyQuery("content",fuzzy)).get();
        SearchHits searchHits = searchResponse.getHits();
        System.out.println("查询的总条数:" + searchHits.getTotalHits());//查询的总条数:3
        for (SearchHit searchHit : searchHits) {
            System.out.println("" + searchHit.getSourceAsString());
        }
        //查询的总条数:1
		//{"atcId":"8","title":"update的文档","content":"This is update的文档content"}

		//模糊查询4:upfate(写错一个字符)
        String fuzzy = "upfate";
        SearchResponse searchResponse = preBuiltTransportClient.prepareSearch("blog").setTypes("article")
                .setQuery(QueryBuilders.fuzzyQuery("content",fuzzy)).get();
        SearchHits searchHits = searchResponse.getHits();
        System.out.println("查询的总条数:" + searchHits.getTotalHits());//查询的总条数:3
        for (SearchHit searchHit : searchHits) {
            System.out.println("" + searchHit.getSourceAsString());
        }
        //查询的总条数:1
		//{"atcId":"8","title":"update的文档","content":"This is update的文档content"}

		//模糊查询5:date(去掉2个字符)
        String fuzzy = "upfate";
        SearchResponse searchResponse = preBuiltTransportClient.prepareSearch("blog").setTypes("article")
                .setQuery(QueryBuilders.fuzzyQuery("content",fuzzy)).get();
        SearchHits searchHits = searchResponse.getHits();
        System.out.println("查询的总条数:" + searchHits.getTotalHits());//查询的总条数:3
        for (SearchHit searchHit : searchHits) {
            System.out.println("" + searchHit.getSourceAsString());
        }
        //查询的总条数:0
        //##########关闭clien代码###########
3.6 组合查询
//---->: queryStringQuery会将关键字进行分词,然后再对应列上进行查询匹配,不指定对应列的,在所有列进行查询
//---->: boolQuery:组合查询,多条件一起查询
//---->: must:必须条件 类似and
//---->: mustNot: 必须不条件
//---->: should: 可能含有,类似 or
//---->: filter:过滤,一般配合rangeQuery().from().to()使用
 String[] isShowArr = {0,1};
 BoolQueryBuilder boolQuery = QueryBuilders.boolQuery();
 //这里是查询:显示状态是0,1,且商品名称包含“苹果”的商品。
 boolQuery.must(QueryBuilders.termsQuery("isShow", isShowList)) //termsQuery传集合,termQuery传单个
          .must(QueryBuilders.queryStringQuery("苹果").field("productName"));
3.7 其他查询
//范围查询,类似mysql的between and:查询生日在("1990-01-01")到("1999-12-31")的
QueryBuilder qb = QueryBuilders.rangeQuery("birthday").from("1990-01-01").to("1999-12-31");
//前缀查询:查询姓名字段以“张”开头的
QueryBuilder qb = QueryBuilders.prefixQuery("name","张");
//ids查询:查询指定ids的对应文档
QueryBuilder qb = QueryBuilders.idsQuery().addIds("1","3");
//type查询,查询指定index下指定type的所有文档
QueryBuilder qb = QueryBuilders.typeQuery("blog");
四.mapping
数据如何存放到索引对象上,需要有一个映射配置,包括:数据类型、是否存储、是否分词等
mapping是类似于数据库中的表结构定义,主要作用如下:
定义index下的字段名
定义字段类型,比如数值型、浮点型、布尔型等
定义倒排索引相关的设置,比如是否索引、记录position等
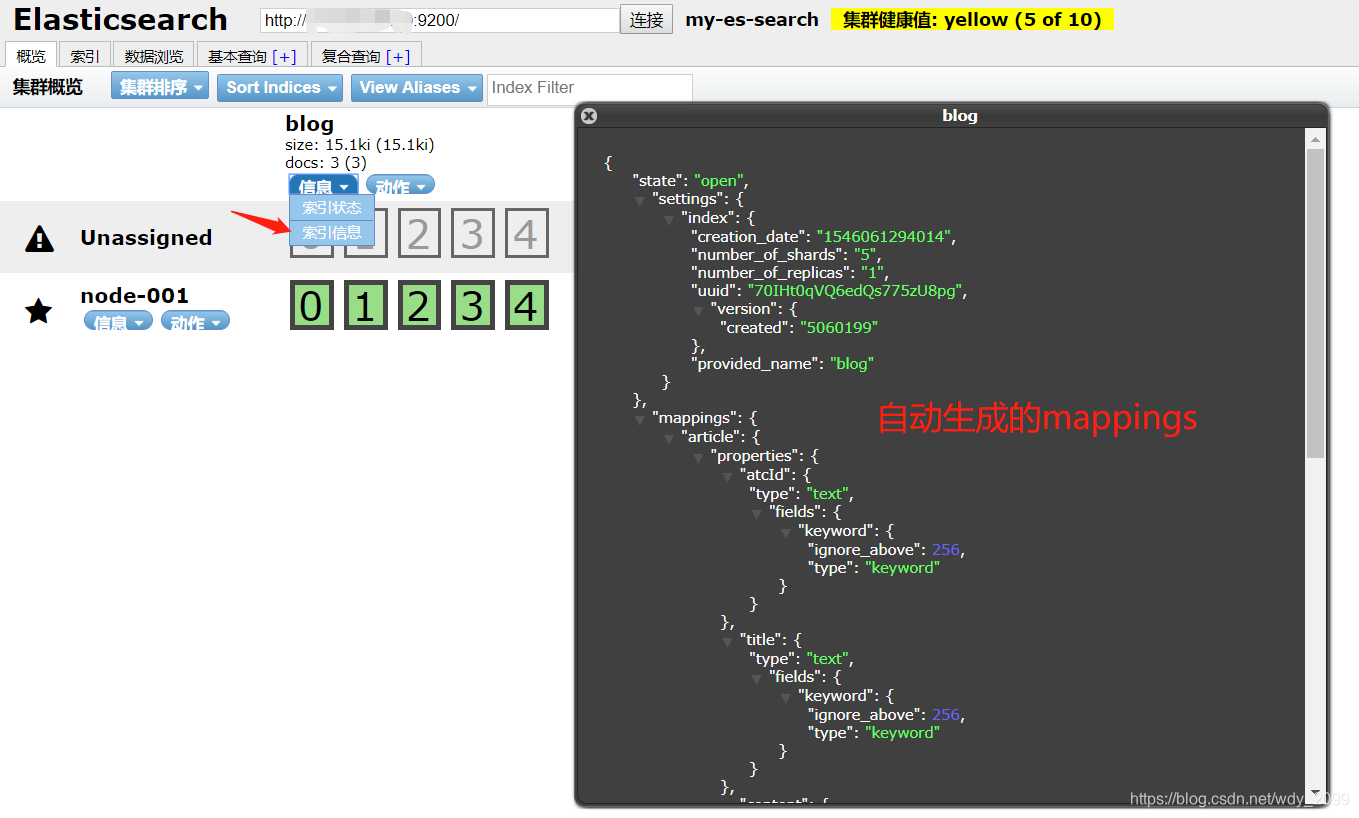
1)在插入文档的时候,es会根据插入的数据自动生成mapping映射
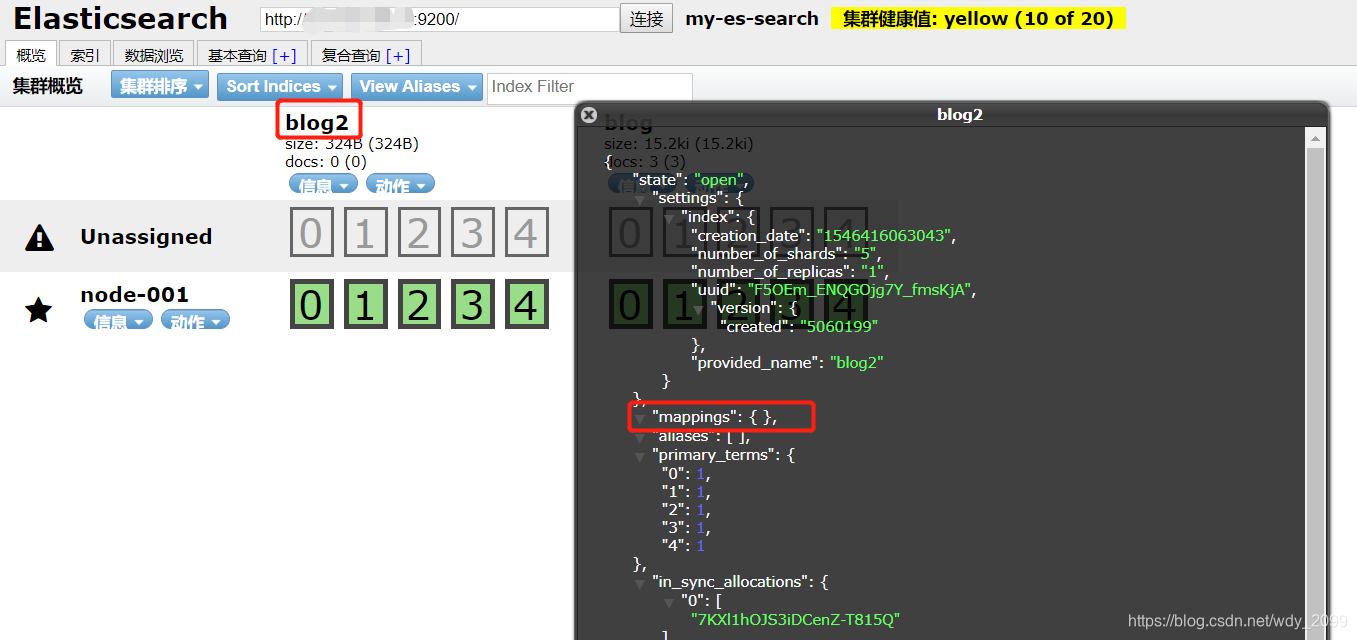
2)自定义mapping
首先,创建一个空的index(blog2)
preBuiltTransportClient.admin().indices().prepareCreate("blog2").get();
此时mapping是空的{}
然后,新增mapping
// 1设置mapping
XContentBuilder builder = XContentFactory.jsonBuilder()
.startObject()
.startObject("article")
.startObject("properties")
.startObject("id")
.field("type", "string")
.field("store", "yes")
.endObject()
.startObject("title")
.field("type", "string")
.field("store", "no")
.endObject()
.startObject("content")
.field("type", "string")
.field("store", "yes")
.endObject()
.endObject()
.endObject()
.endObject();
// 2 添加mapping
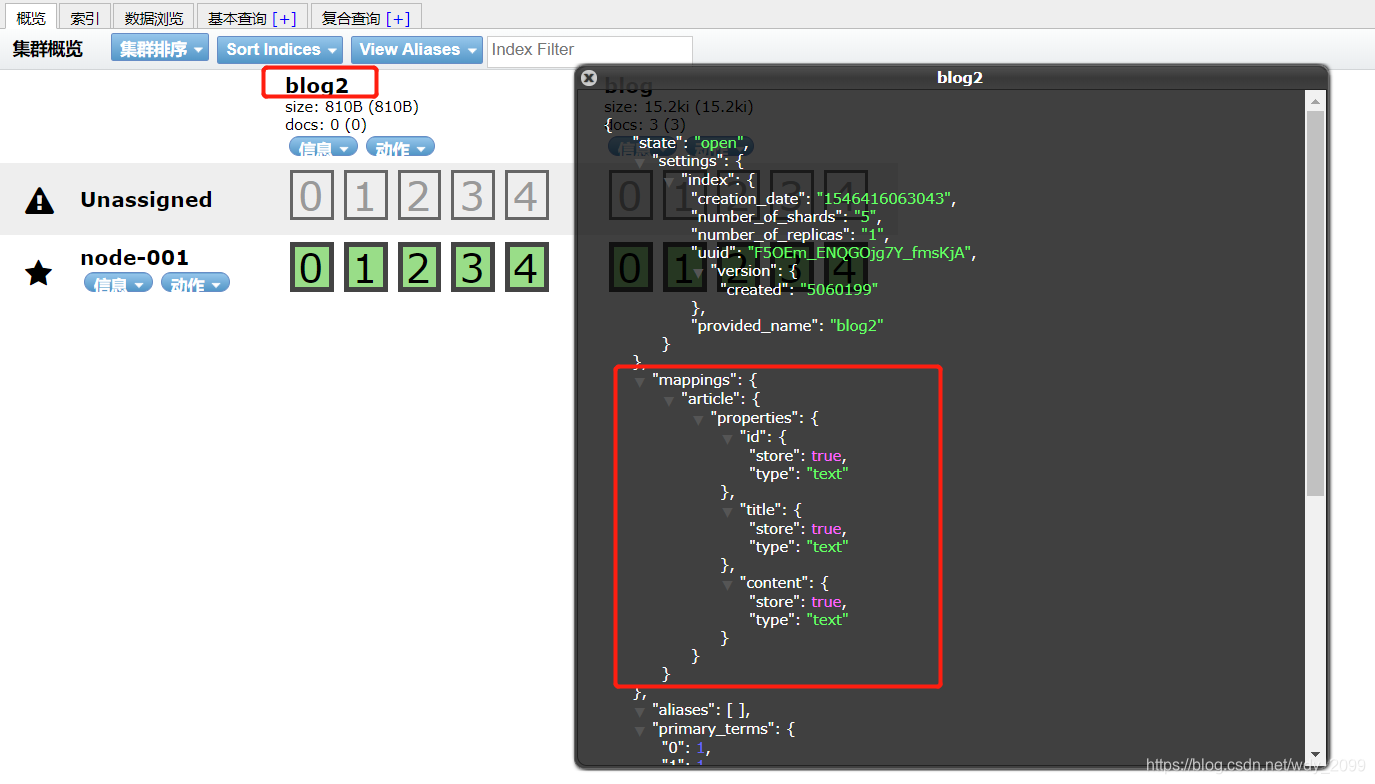
PutMappingRequest mapping = Requests.putMappingRequest("blog2").type("article").source(builder);
preBuiltTransportClient.admin().indices().putMapping(mapping).get();
刷新,重新查看索引信息如下:
发现:string会被自动转换成text类型
【end】这个就是Java操作Elasticsearch的常用API啦,关于ik分词器,下篇再见。