Thymeleaf前端模板是Spring Boot提供的模板。通俗的说,Thymeleaf完全可以替代JSP。Thymeleaf 是现代服务端的模板引擎,与传统的 JSP 不同,Thymeleaf 可以使用浏览器直接打开,因为它可以忽略掉拓展属性,相当于打开原生页面,给前端人员也带来了一定的便利。
thymeleaf 的模板可以静态地运行;当有数据返回到页面时,Thymeleaf 标签会动态地替换掉静态内容,使页面动态显示。
Spring Boot整合thymeleaf步骤:
1、pom.xml 引入依赖
		<dependency>
     		<groupId>org.springframework.boot</groupId>
    		 <artifactId>spring-boot-starter-thymeleaf</artifactId>
	    </dependency>
2、配置application.yml配置文件
 thymeleaf:
    cache: false   # 开发时禁用缓存
    prefix: classpath:/templates/
    suffix: .html
    encoding: UTF-8
    content-type: text/html
    mode: HTML5
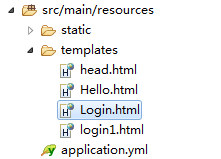
3、在src/main/resources下新建文件夹templates,并建立login.html
4、编写login.html页面
<!DOCTYPE html>
<html>
  <head>
    <title>login1.html</title>

    <meta name="keywords" content="keyword1,keyword2,keyword3"/>
    <meta name="description" content="this is my page"/>
    <meta name="content-type" content="text/html; charset=UTF-8"/>
    <head th:insert="templates/head.html"></head>
    <!--<link rel="stylesheet" type="text/css" href="./styles.css">-->
<link href="/css/style.css" rel="stylesheet" type="text/css"/>
  </head>

  <body>
    <div class="container">
        <div class="form row">
            <div class="form-horizontal col-md-offset-3" id="login_form">
                <h3 class="form-title">Movie System</h3>
                <div class="col-md-9">
                    <div class="form-group">
                        <i class="fa fa-user fa-lg"></i>
                        <input class="form-control required" type="text" placeholder="Username" id="username" name="userid" autofocus="autofocus" maxlength="20" />
                    </div>
                    <div class="form-group">
                        <i class="fa fa-lock fa-lg"></i>
                        <input class="form-control required" type="password" placeholder="Password" id="password" name="pwd" maxlength="8" />
                    </div>
                    <div class="form-group">
                        <label class="checkbox">

                        </label>
                    </div>
                    <div class="form-group col-md-offset-9">
                        <button type="submit" class="btn btn-success pull-right" name="submit" id="login_submit">登录</button>
                        <button type="submit" class="btn btn-success pull-right" name="submit" id="login_submit">注册</button>
                    </div>

                </div>

        </div>
    </div>
    </div>
  </body>
  <script src="/script/login.js" type="text/javascript"></script>
<script type="text/javascript">
    $(function() {
        login.init();
    });
</script>
</html>
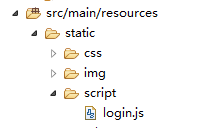
5、在src/main/resources下新建文件夹static,该文件夹下存放css,js等文件。
6、编写业务控制层Controller
@Controller  //处理请求
@RequestMapping("/movie")
public class MovieController {
@RequestMapping("/Login")
    public String Login() {
        return "Login";
    }
}
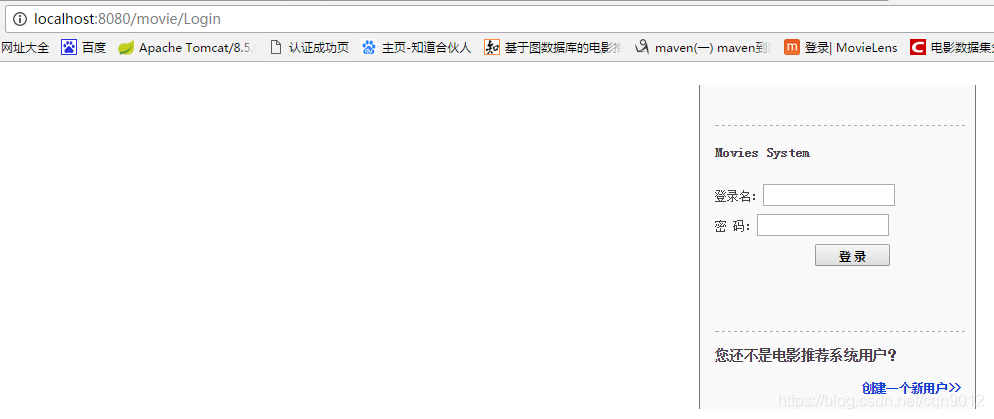
7、结果展示
优化Spring Boot操作:
开启Spring Boot项目后,如若修改代码,无需重启项目,配置以下信息,即可无需重启Tomcat,项目会自动开启(即热部署操作):
1、在pom.xml中注入依赖:
<!-- 无需重启Tomcat -->
	    <dependency>
    		<groupId>org.springframework.boot</groupId>
    		<artifactId>spring-boot-devtools</artifactId>
    		<optional>true</optional> <!-- 这个需要为 true 热部署才有效 -->
		</dependency>
		<dependency>
    		<groupId>org.springframework</groupId>
    		<artifactId>springloaded</artifactId>
    		<version>1.2.6.RELEASE</version>
		</dependency>
2、配置application.yml文件
devtools:
  livereload:
    enabled: true #是否支持livereload
    port: 35729
  restart:
    enabled: true #是否支持热部署
3、在Myeclipse中选择project->Build Automatically,打上对勾。
