文章目录
参考文档
电脑系统:ubuntu16.04
ROS版本:kinetic
参考书籍:Learning ROS for Robotics Programming Second Edition第四章
其内容为:

书籍的github库:https://github.com/AaronMR/Learning_ROS_for_Robotics_Programming_2nd_edition
操作步骤
利用microUSB线连接游戏手柄
连接以后手柄会震动。震感贼棒。哈哈哈!
下载安装游戏手柄驱动库
sudo apt-get install ros-kinetic-joystick-drivers
参考文档:http://wiki.ros.org/joy
里面的介绍:支持所有的游戏手柄

github库:https://github.com/ros-drivers/joystick_drivers
将github库中的源文件放到catkin工作空间的src文件夹下编译。此时会遇到很多问题:
解决方法参考链接:https://blog.csdn.net/p942005405/article/details/86559966
我的方法:
sudo apt-get install libbluetooth-dev
安装完蓝牙驱动后还是报错,然后把joystick_drivers下的wiimote文件夹删除或者移除到其他位置。
然后在工作空间下重新编译
catkin_make
因为wiimote文件介绍:http://wiki.ros.org/wiimote
这个包好像是关于蓝牙协议和通信的,具体可以参考上面ROS中的介绍。
测试游戏手柄
连接游戏手柄
查看游戏手柄是否识别:
ls /dev/input/

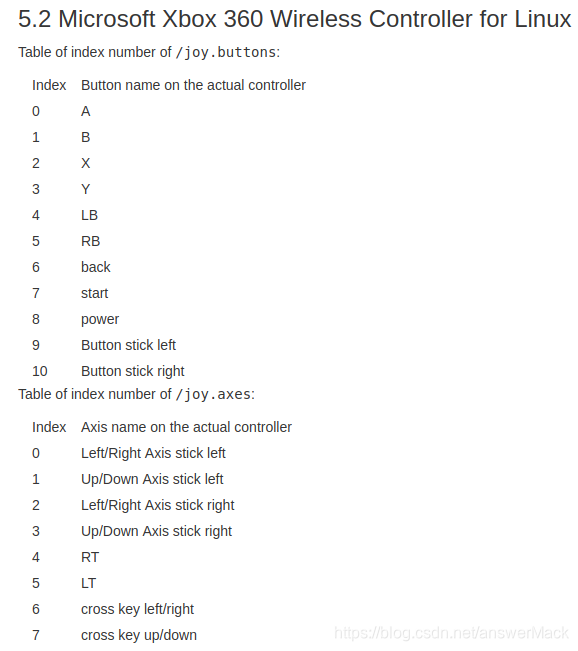
检查每个按钮的对应:
sudo jstest /dev/input/js0

提供的有:轴0-7 共8个 ; 按钮0-10 共11个
查看游戏手柄节点信息
启动ros,运行roscore。
然后,运行joy包中的节点:
rosrun joy joy_node
运行成功的标志:(力反馈后续在整)

rostopic list
rostopic echo /joy
操作按钮可以到上面轴或者按钮数值的变化。
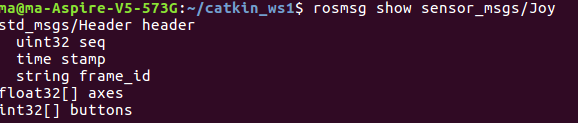
rostopic type /joy
rosmsg show sensor_msgs/Joy
显示手柄发送的数据类型:
查看小乌龟消息类型
rosrun turtlesim turtlesim_node
rostopic list
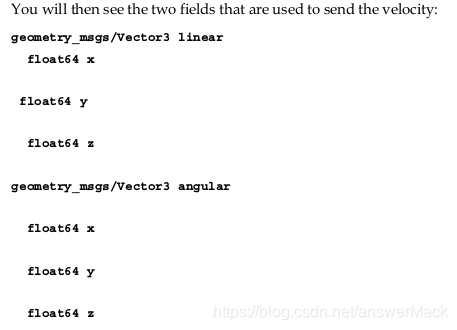
rostopic type /turtle1/cmd_vel
rosmsg show geometry_msgs/Twist
编程控制一个小乌龟运动
创建ros包
创建joystick_example的ros包
在catkin_ws/src/joystick_drivers下运行命令:
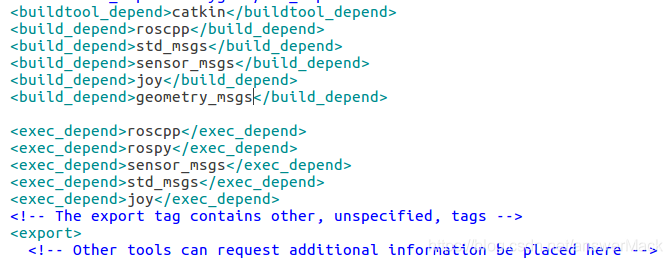
catkin_create_pkg joystick_example roscpp std_msgs sensor_msgs joy geometry_msgs
因为依赖的比较多,我的package.xml文件为:
创建cpp文件:
在catkin_ws/src/joystick_drivers/joystick_example/src下新建一个example.cpp:
#include<ros/ros.h>
#include<geometry_msgs/Twist.h>
#include<sensor_msgs/Joy.h>
#include<iostream>

using namespace std;

class TeleopJoy{
	public:
		TeleopJoy();
	private:
		void callBack(const sensor_msgs::Joy::ConstPtr& joy);
		ros::NodeHandle n;
		ros::Publisher pub;
		ros::Subscriber sub;
		int i_velLinear, i_velAngular;
};

TeleopJoy::TeleopJoy()
{
	n.param("axis_linear",i_velLinear,i_velLinear);
	n.param("axis_angular",i_velAngular,i_velAngular);

	//pub = n.advertise<turtlesim::Velocity>("turtle1/command_velocity",1);
	//sub = n.subscribe<sensor_msgs::Joy>("joy", 10, &TeleopJoy::callBack, this);
        pub = n.advertise<geometry_msgs::Twist>("/turtle1/cmd_vel",1);
	sub = n.subscribe<sensor_msgs::Joy>("joy", 10, &TeleopJoy::callBack, this);
}

void TeleopJoy::callBack(const sensor_msgs::Joy::ConstPtr& joy)
{
	//turtlesim::Velocity vel;
        geometry_msgs::Twist vel;
	vel.angular.z = joy->axes[i_velAngular];
	vel.linear.x = joy->axes[i_velLinear];
	pub.publish(vel);
	//vel.angular = joy->axes[i_velAngular];
	//vel.linear = joy->axes[i_velLinear];
	//pub.publish(vel);
}

int main(int argc, char** argv)
{
	ros::init(argc, argv, "teleopJoy");
	TeleopJoy teleop_turtle;

	ros::spin();
}
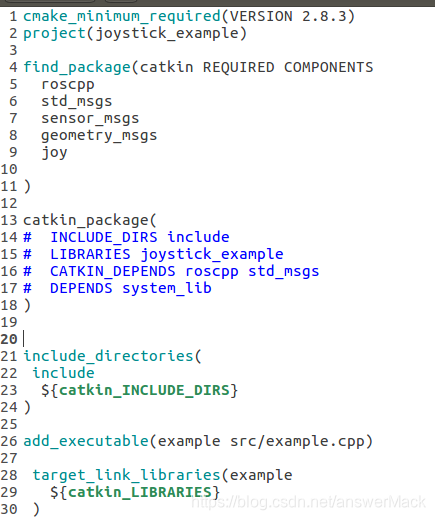
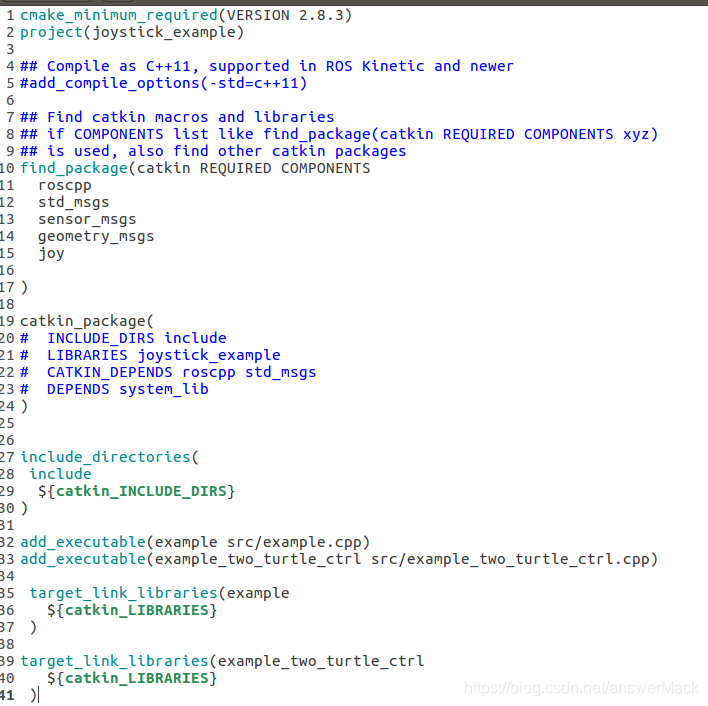
修改CMakeLists文件:
在catkin_ws/src/joystick_drivers/joystick_example修改CMakeLists.txt:
新建example.launch文件:
在catkin_ws/src/joystick_drivers/joystick_example中:
新建launch文件夹----新建example.launch文件:
文件内容为:
<launch>
	<node pkg="turtlesim" type="turtlesim_node" name="sim"/>
	<node pkg="joystick_example" type="example" name="example" />
	<param name="axis_linear" value="1" type="int" />
	<param name="axis_angular" value="0" type="int" />
	<node respawn="true" pkg="joy" type="joy_node" name="joy_node">
	<param name="dev" type="string" value="/dev/input/js0" />
    	<param name="deadzone" value="0.12" />
	</node>
</launch>
然后在catkin_ws下重新编译包:
catkin_make
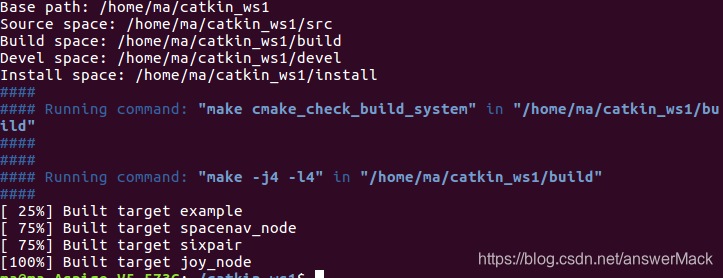
运行测试文件:
编译成功后:
运行roscore
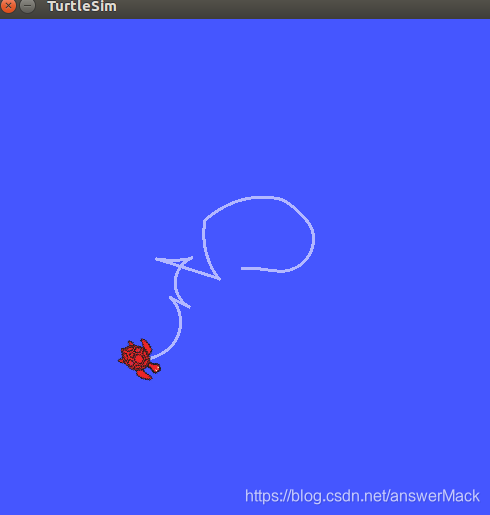
运行
roslaunch joystick_example example.launch
用手柄操作
代码解释
cpp代码解释
#include<ros/ros.h>
#include<geometry_msgs/Twist.h>
#include<sensor_msgs/Joy.h>
#include<iostream>

int main(int argc, char** argv)
{
	ros::init(argc, argv, "teleopJoy");
	TeleopJoy teleop_turtle;

	ros::spin();
}
主函数中创建TeleopJoy的一个实例teleop_turtle。
TeleopJoy::TeleopJoy()
{
	n.param("axis_linear",i_velLinear,i_velLinear);
	n.param("axis_angular",i_velAngular,i_velAngular);
    pub = n.advertise<geometry_msgs::Twist>("/turtle1/cmd_vel",1);
	sub = n.subscribe<sensor_msgs::Joy>("joy", 10, &TeleopJoy::callBack, this);
}
在这个构造函数中,四个变量需要初始化。前两个变量用游戏手柄的轴值填充。其余两个变量为发布和订阅。
advertise:告诉master要在/turtle1/cmd_vel上要发布一个geometry_msgs::Twist消息。1代表发布序列的大小。在这样的情况下,如果我们发布的消息太快,缓冲区中的消息在大于1个的时候就会开始丢弃先前发布的消息。
subscribe:订阅手柄消息,当有消息到达joy时,ROS就会调用TeleopJoy::callBack函数。第二个参数是队列大小,以防我们处理消息的速度不够快,在缓存了10个消息后,再有新的消息到来就将开始丢弃先前接收的消息。
void TeleopJoy::callBack(const sensor_msgs::Joy::ConstPtr& joy)
{
    geometry_msgs::Twist vel;
	vel.angular.z = joy->axes[i_velAngular];
	vel.linear.x = joy->axes[i_velLinear];
	pub.publish(vel);
}
回调函数,创建一个新变量vel用来发布数据。游戏手柄轴的数值给vel。
launch代码解释
<launch>
	<node pkg="turtlesim" type="turtlesim_node" name="sim"/>
	<node pkg="joystick_example" type="example" name="example" />
	<param name="axis_linear" value="1" type="int" />
	<param name="axis_angular" value="0" type="int" />
	<node respawn="true" pkg="joy" type="joy_node" name="joy_node">
	<param name="dev" type="string" value="/dev/input/js0" />
    	<param name="deadzone" value="0.12" />
	</node>
</launch>
launch文件中有3个节点:sim、example、joy。
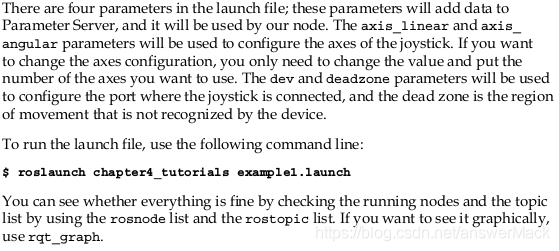
axis_linear、axis_angular用来设置游戏手柄的摇杆序号。
dev用来配置游戏手柄的接口。
deadzone不被设备识别的运动区域。
编程控制两个小乌龟同步运动
代码修改
因为在roslaunch的学习中启用过两个turtlesim,利用rostopic pub发布固定消息。
参考了其中的launch文件:http://wiki.ros.org/cn/ROS/Tutorials/UsingRqtconsoleRoslaunch
cpp修改
将发布话题选为turtlesim1下的话题:
pub = n.advertise<geometry_msgs::Twist>("/turtlesim1/turtle1/cmd_vel",1);
launch文件修改
<launch>
	<group ns="turtlesim1">
        <node pkg="turtlesim" name="sim" type="turtlesim_node"/>
        </group>
        <group ns="turtlesim2">
	<node pkg="turtlesim" name="sim" type="turtlesim_node"/>
        </group>
        <node pkg="joystick_example" type="example" name="example" />
	<param name="axis_linear" value="3" type="int" />
	<param name="axis_angular" value="4" type="int" />
	<node respawn="true" pkg="joy" type="joy_node" name="joy_node">
	<param name="dev" type="string" value="/dev/input/js0" />
    	<param name="deadzone" value="0.05" />
        </node>
        <node pkg="turtlesim" name="mimic" type="mimic">
        <remap from="input" to="turtlesim1/turtle1"/>
        <remap from="output" to="turtlesim2/turtle1"/>
	</node>
</launch>
编译运行
catkin_make
roslaunch joystick_example example.launch
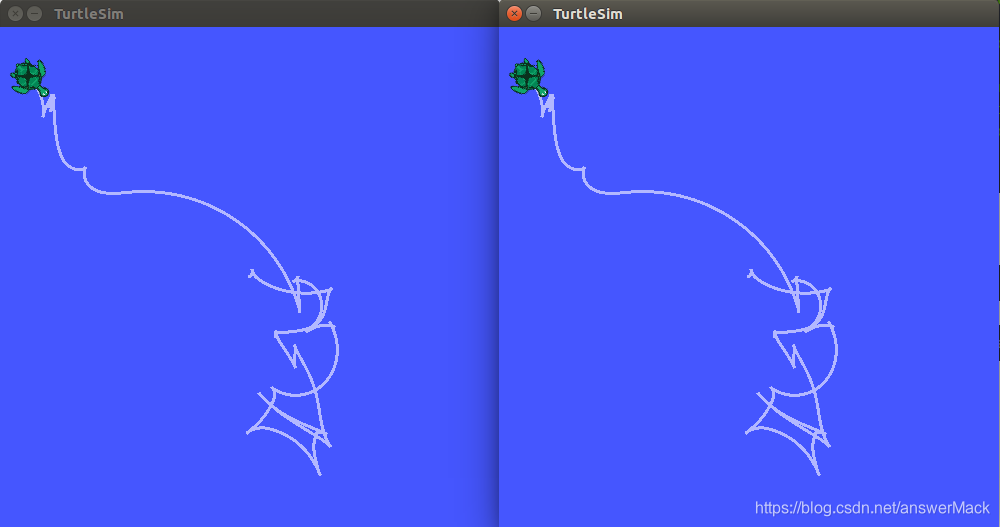
节点关系图:

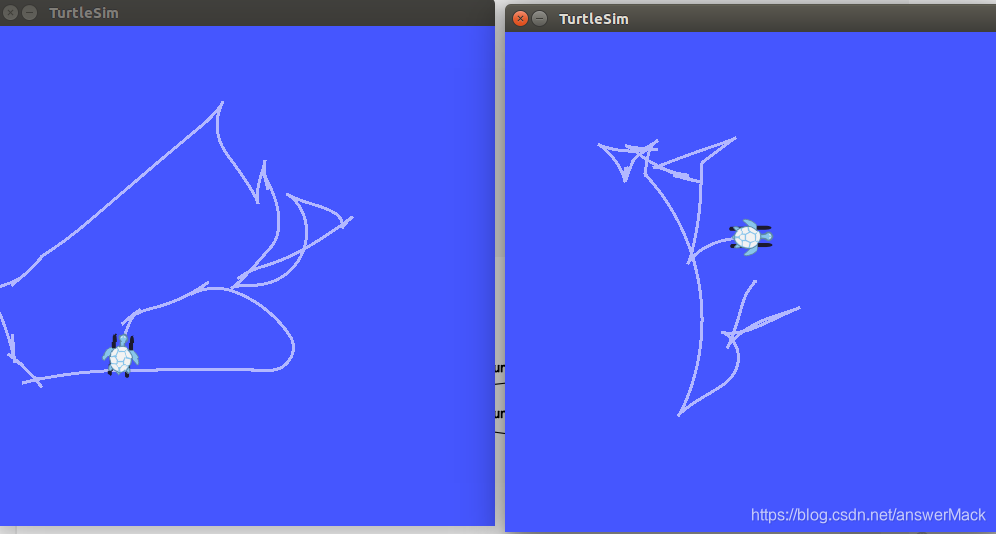
编程控制两个小乌龟单独运动
此处用XBOX手柄的摇杆1控制小乌龟1turtlesim1, 摇杆2控制小乌龟2–turtlesim2。
话不多说,直接粘代码。哈哈哈哈哈哈!!!!!
代码编写
在catkin_ws/src/joystick_drivers/joystick_example/src下新建example_two_turtle_ctrl.cpp
cpp文件:
#include<ros/ros.h>
#include<geometry_msgs/Twist.h>
#include<sensor_msgs/Joy.h>
#include<iostream>

using namespace std;

class TeleopJoy{
	public:
		TeleopJoy();
	private:
		void callBack(const sensor_msgs::Joy::ConstPtr& joy);
		void callBack1(const sensor_msgs::Joy::ConstPtr& joy);
		ros::NodeHandle n;
		ros::Publisher pub,pub1;
		ros::Subscriber sub,sub1;
		int i_velLinear, i_velAngular;
		int i_velLinear1, i_velAngular1;
};

TeleopJoy::TeleopJoy()
{
	n.param("axis_linear",i_velLinear,i_velLinear);
	n.param("axis_angular",i_velAngular,i_velAngular);
	n.param("axis_linear1",i_velLinear1,i_velLinear1);
	n.param("axis_angular1",i_velAngular1,i_velAngular1);

	pub = n.advertise<geometry_msgs::Twist>("/turtlesim1/turtle1/cmd_vel",1);
	pub1 = n.advertise<geometry_msgs::Twist>("/turtlesim2/turtle1/cmd_vel",1);

	sub = n.subscribe<sensor_msgs::Joy>("joy", 10, &TeleopJoy::callBack, this);
	sub1 = n.subscribe<sensor_msgs::Joy>("joy", 10, &TeleopJoy::callBack1, this);
}

void TeleopJoy::callBack(const sensor_msgs::Joy::ConstPtr& joy)
{
        geometry_msgs::Twist vel;
	vel.angular.z = joy->axes[i_velAngular];
	vel.linear.x = joy->axes[i_velLinear];
	pub.publish(vel);

}
void TeleopJoy::callBack1(const sensor_msgs::Joy::ConstPtr& joy)
{
    geometry_msgs::Twist vel1;
	vel1.angular.z = joy->axes[i_velAngular1];
	vel1.linear.x = joy->axes[i_velLinear1];
	pub1.publish(vel1);
}


int main(int argc, char** argv)
{
	ros::init(argc, argv, "teleopJoy");
	TeleopJoy teleop_turtle;

	ros::spin();
}
修改CMakeLists.txt文件:
编写launch文件:
在catkin_ws/src/joystick_drivers/joystick_example/launch新建example_two_turtle_ctrl.launch文件:
<launch>
	<group ns="turtlesim1">
        <node pkg="turtlesim" name="sim" type="turtlesim_node"/>
        </group>
        <group ns="turtlesim2">
	<node pkg="turtlesim" name="sim" type="turtlesim_node"/>
        </group>
    <node pkg="joystick_example" type="example_two_turtle_ctrl" name="example_two_turtle_ctrl" />
	<param name="axis_linear" value="3" type="int" />
	<param name="axis_angular" value="4" type="int" />
    <param name="axis_linear1" value="0" type="int" />
	<param name="axis_angular1" value="1" type="int" />
    <node respawn="true" pkg="joy" type="joy_node" name="joy_node">
	<param name="dev" type="string" value="/dev/input/js0" />
    <param name="deadzone" value="0.05" />
    </node>
</launch>
编译运行
catkin_make
roslaunch joystick_example example_two_turtle_ctrl.launch
结果图:
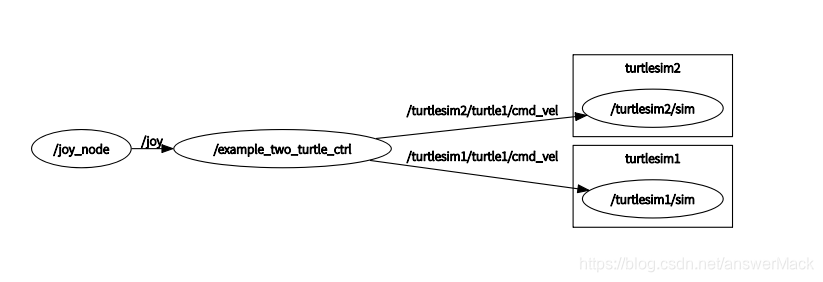
节点关系:
哈哈哈哈哈哈哈哈,开心!!!!!!!!!
震感修改后续再说!!!!!!
20190417
20190418