1,android 5.0之前打包的apk只有一个dex文件,android5.0之后打包的apk有多个dex文件。我们现在要为dex文件加密。要先做一个代理的Application,还需要一个tools工具,该工具负责对dex文件加密。加密完成后这些dex文件和其它的文件在打包成一个新的apk,用户在反编译我的dex文件的话会什么也看不到。但是程序无法运行加密后的文件。所以我们就使用代理的Application 解密,解密后与android系统对接,把解密后的文件交给android系统运行。用户看到的使我们加密后的apk,程序却可以正常运行。
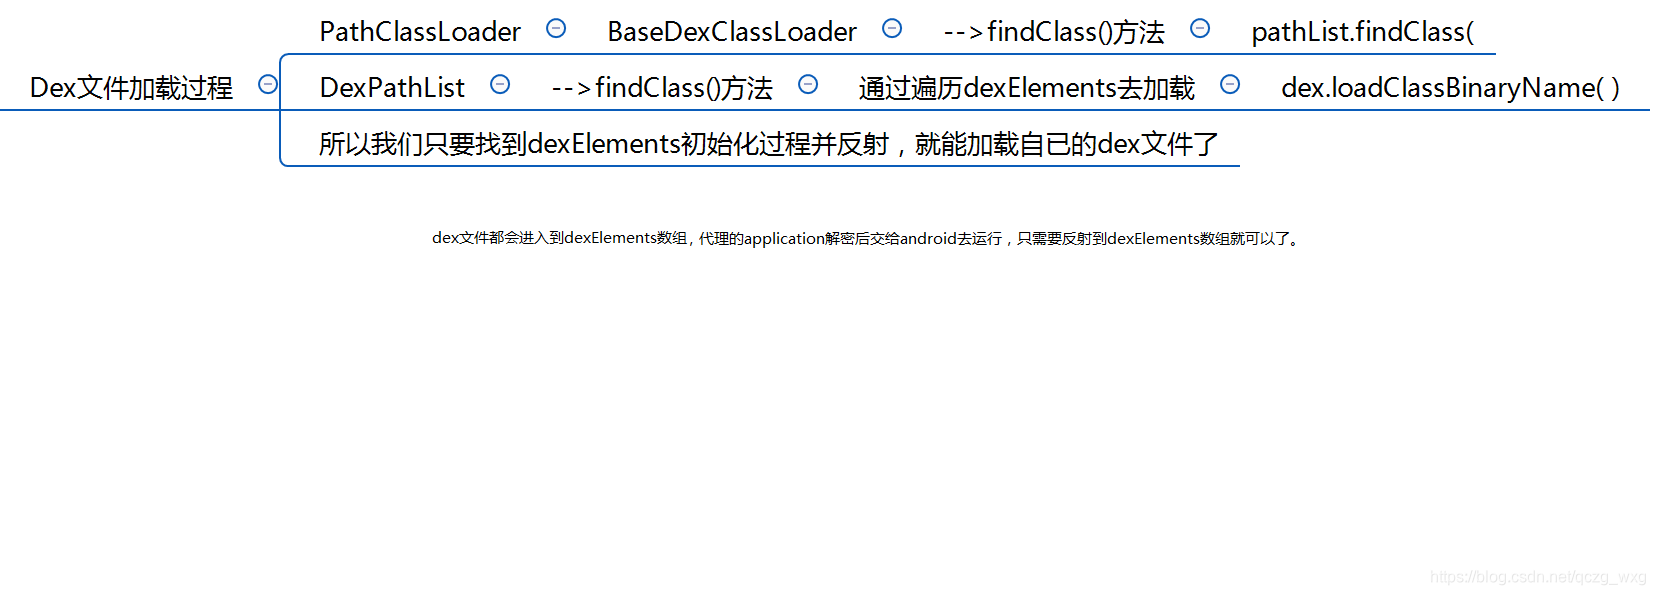
2,我们先了解下dex文件的加载过程。
(1),PathClassLoader
(2),BaseDexClassLoader
(3),findClass()方法
(4),pathList.findClass(
(5),DexPathList
(6),findClass()方法
(7),通过遍历dexElements去加载
(8),dex.loadClassBinaryName()
dex文件都会进入到dexElements数组,代理application
解密后交给android去运行,只需要反射到dexElements数组就可以了。
3,我们在android studio中创建一个module,负责解密;操作new——>module——>Android Library;
创建一个java工程来负责加密:new——>module——>Java Library;
注意:在app运行过程中不需要加密,在后台编译的时候进行加密。
让我们的工程依赖新创建的两个module,project structure 中选择绿色的+,选择第三个Module dependency
4,贴代码之前先贴三个工具类
package com.example.proxy_core;


import java.security.InvalidKeyException;
import java.security.NoSuchAlgorithmException;

import javax.crypto.BadPaddingException;
import javax.crypto.Cipher;
import javax.crypto.IllegalBlockSizeException;
import javax.crypto.NoSuchPaddingException;
import javax.crypto.spec.SecretKeySpec;

/**
 * AES加密算法
 */
public class AES {

    //16字节
    public static final String DEFAULT_PWD = "abcdefghijklmnop";
    //填充方式
    private static final String algorithmStr = "AES/ECB/PKCS5Padding";
    private static Cipher encryptCipher;
    private static Cipher decryptCipher;

    public static void init(String password) {
        try {
            // 生成一个实现指定转换的 Cipher 对象。
            encryptCipher = Cipher.getInstance(algorithmStr);
            decryptCipher = Cipher.getInstance(algorithmStr);// algorithmStr
            byte[] keyStr = password.getBytes();
            SecretKeySpec key = new SecretKeySpec(keyStr, "AES");
            encryptCipher.init(Cipher.ENCRYPT_MODE, key);
            decryptCipher.init(Cipher.DECRYPT_MODE, key);
        } catch (NoSuchAlgorithmException e) {
            e.printStackTrace();
        } catch (NoSuchPaddingException e) {
            e.printStackTrace();
        } catch (InvalidKeyException e) {
            e.printStackTrace();
        }
    }

    public static byte[] encrypt(byte[] content) {
        try {
            byte[] result = encryptCipher.doFinal(content);
            return result;
        } catch (IllegalBlockSizeException e) {
            e.printStackTrace();
        } catch (BadPaddingException e) {
            e.printStackTrace();
        }
        return null;
    }

    public static byte[] decrypt(byte[] content) {
        try {
            byte[] result = decryptCipher.doFinal(content);
            return result;
        } catch (IllegalBlockSizeException e) {
            e.printStackTrace();
        } catch (BadPaddingException e) {
            e.printStackTrace();
        }
        return null;
    }
}
package com.example.proxy_core;

import java.io.File;
import java.io.RandomAccessFile;
import java.lang.reflect.Field;
import java.lang.reflect.Method;
import java.util.Arrays;


public class Utils {

    /**
     * 读取文件
     * @param file
     * @return
     * @throws Exception
     */
    public static byte[] getBytes(File file) throws Exception {
        RandomAccessFile r = new RandomAccessFile(file, "r");
        byte[] buffer = new byte[(int) r.length()];
        r.readFully(buffer);
        r.close();
        return buffer;
    }

    /**
     * 反射获得 指定对象(当前-》父类-》父类...)中的 成员属性
     * @param instance
     * @param name
     * @return
     * @throws NoSuchFieldException
     */
    public static Field findField(Object instance, String name) throws NoSuchFieldException {
        Class clazz = instance.getClass();
        //反射获得
        while (clazz != null) {
            try {
                Field field = clazz.getDeclaredField(name);
                //如果无法访问 设置为可访问
                if (!field.isAccessible()) {
                    field.setAccessible(true);
                }
                return field;
            } catch (NoSuchFieldException e) {
                //1,如果找不到往父类找
                //2,在当前类和她所有的父类中找name这个字段
                clazz = clazz.getSuperclass();
            }
        }
        throw new NoSuchFieldException("Field " + name + " not found in " + instance.getClass());
    }


    /**
     * 反射获得 指定对象(当前-》父类-》父类...)中的 方法;
     * @param instance
     * @param name
     * @param parameterTypes 参数个数不受限制
     * @return
     * @throws NoSuchMethodException
     */
    public static Method findMethod(Object instance, String name, Class... parameterTypes)
            throws NoSuchMethodException {
        Class clazz = instance.getClass();
        while (clazz != null) {
            try {
                Method method = clazz.getDeclaredMethod(name, parameterTypes);
                if (!method.isAccessible()) {
                    method.setAccessible(true);
                }
                return method;
            } catch (NoSuchMethodException e) {
                //1,如果找不到往父类找

                clazz = clazz.getSuperclass();
            }
        }
        throw new NoSuchMethodException("Method " + name + " with parameters " + Arrays.asList
                (parameterTypes) + " not found in " + instance.getClass());
    }
}
package com.example.proxy_core;

import java.io.File;
import java.io.FileInputStream;
import java.io.FileOutputStream;
import java.io.InputStream;
import java.util.Enumeration;
import java.util.zip.CRC32;
import java.util.zip.CheckedOutputStream;
import java.util.zip.ZipEntry;
import java.util.zip.ZipFile;
import java.util.zip.ZipOutputStream;


public class Zip {
//删除文件的
    private static void deleteFile(File file){
        if (file.isDirectory()){
            File[] files = file.listFiles();
            for (File f: files) {
                deleteFile(f);
            }
        }else{
            file.delete();
        }
    }

    /**
     * 解压zip文件至dir目录
     * @param zip
     * @param dir
     */
    public static void unZip(File zip, File dir) {
        try {
            //目录中的文件清空
            deleteFile(dir);
            ZipFile zipFile = new ZipFile(zip);
            //zip文件中每一个条目
            Enumeration<? extends ZipEntry> entries = zipFile.entries();
            //遍历目录下所有信息
            while (entries.hasMoreElements()) {
                ZipEntry zipEntry = entries.nextElement();
                //zip中 文件/目录名
                String name = zipEntry.getName();
                //原来的签名文件 不需要了
                if (name.equals("META-INF/CERT.RSA") || name.equals("META-INF/CERT.SF") || name
                        .equals("META-INF/MANIFEST.MF")) {
                    continue;
                }
                //空目录不管
                if (!zipEntry.isDirectory()) {
                    File file = new File(dir, name);
                    //创建目录
                    if (!file.getParentFile().exists()) {
                        file.getParentFile().mkdirs();
                    }
                    //写文件
                    FileOutputStream fos = new FileOutputStream(file);
                    InputStream is = zipFile.getInputStream(zipEntry);
                    byte[] buffer = new byte[2048];
                    int len;
                    while ((len = is.read(buffer)) != -1) {
                        fos.write(buffer, 0, len);
                    }
                    is.close();
                    fos.close();
                }
            }
            zipFile.close();
        } catch (Exception e) {
            e.printStackTrace();
        }
    }

    /**
     * 压缩目录为zip
     * @param dir 待压缩目录
     * @param zip 输出的zip文件
     * @throws Exception
     */
    public static void zip(File dir, File zip) throws Exception {
        zip.delete();
        // 对输出文件做CRC32校验
        CheckedOutputStream cos = new CheckedOutputStream(new FileOutputStream(
                zip), new CRC32());
        ZipOutputStream zos = new ZipOutputStream(cos);
        //压缩
        compress(dir, zos, "");
        zos.flush();
        zos.close();
    }

    /**
     * 添加目录/文件 至zip中
     * @param srcFile 需要添加的目录/文件
     * @param zos   zip输出流
     * @param basePath  递归子目录时的完整目录 如 lib/x86
     * @throws Exception
     */
    private static void compress(File srcFile, ZipOutputStream zos,
                                 String basePath) throws Exception {
        if (srcFile.isDirectory()) {
            File[] files = srcFile.listFiles();
            for (File file : files) {
                // zip 递归添加目录中的文件
                compress(file, zos, basePath + srcFile.getName() + "/");
            }
        } else {
            compressFile(srcFile, zos, basePath);
        }
    }

    private static void compressFile(File file, ZipOutputStream zos, String dir)
            throws Exception {
        // temp/lib/x86/libdn_ssl.so
        String fullName = dir + file.getName();
        // 需要去掉temp
        String[] fileNames = fullName.split("/");
        //正确的文件目录名 (去掉了temp)
        StringBuffer sb = new StringBuffer();
        if (fileNames.length > 1){
            for (int i = 1;i<fileNames.length;++i){
                sb.append("/");
                sb.append(fileNames[i]);
            }
        }else{
            sb.append("/");
        }
        //添加一个zip条目
        ZipEntry entry = new ZipEntry(sb.substring(1));
        zos.putNextEntry(entry);
        //读取条目输出到zip中
        FileInputStream fis = new FileInputStream(file);
        int len;
        byte data[] = new byte[2048];
        while ((len = fis.read(data, 0, 2048)) != -1) {
            zos.write(data, 0, len);
        }
        fis.close();
        zos.closeEntry();
    }

}
5,我们先看下proxy_core工程(负责用来解密,就是我们创建的那个Android Library)
package com.example.proxy_core;

import android.app.Application;
import android.content.Context;
import android.content.pm.ApplicationInfo;
import android.content.pm.PackageManager;
import android.os.Bundle;
import android.text.TextUtils;

import java.io.File;
import java.io.FileOutputStream;
import java.io.IOException;
import java.lang.reflect.Array;
import java.lang.reflect.Field;
import java.lang.reflect.Method;
import java.util.ArrayList;
import java.util.List;

/**
 * 1,解密,注意在APP工程(我们加密解密的工程)文件清单中注册,
 * 2,一旦工程运行起来,首先执行的肯定是我们的ProxyApplication
 * 3,ActivityThread创建Application之后调用的第一个方法是attachBaseContext
 */
public class ProxyApplication extends Application {

    //1,定义好解密后的文件的存放路径
    //2,这两个属性在主App中进行配置,我们要反射文件清单中的信息。
    private String app_name;
    private String app_version;

    /**
     *1, ActivityThread创建Application之后调用的第一个方法
     * 2,可以在这个方法中进行解密,同时把dex交给android去加载
     * 3,使用三个工具类Zip,AES,Utils获取系统classloader中的dexElements数组
     */
    @Override
    protected void attachBaseContext(Context base) {
        super.attachBaseContext(base);
        //1,获取用户填入的metadata,
        //2,反射metadata中的信息,并把信息赋值给app_name和app_version
        getMetaData();

        //得到当前加密了的APK文件
        File apkFile=new File(getApplicationInfo().sourceDir);

        //1,把apk解压
        // 2,生成私有操作目录,别的App不能访问,
        // 3,app_name+"_"+app_version目录中的内容需要boot权限才能用
        File versionDir = getDir(app_name+"_"+app_version,MODE_PRIVATE);
        //在私有目录下创建一个文件夹,
        //app解压后存放的目录
        File appDir=new File(versionDir,"app");
        //app下载创建一个dexDir的文件夹,用于存放dex文件
        File dexDir=new File(appDir,"dexDir");


        //得到我们需要加载的Dex文件
        //执行完下面的代码,dexFiles存放的就是所有需要交到android系统执行的dex文件
        List<File> dexFiles=new ArrayList<>();
        //1,进行解密(最好做MD5文件校验,校验是否已经解过密,我这里省略了这一步骤)
        //2,目录不存在或者目录中没有内容
        if(!dexDir.exists() || dexDir.list().length==0){
            //是空目录就把apk解压到appDir
            Zip.unZip(apkFile,appDir);
            //获取目录下所有的文件
            File[] files=appDir.listFiles();
            //只拿dex文件
            for (File file : files) {
                String name=file.getName();
                //主dex文件(classes.dex)不要解密,程序要跑起来一定要有个主dex文件。这个主dex文件不能加密
                if(name.endsWith(".dex") && !TextUtils.equals(name,"classes.dex")){
                    try{
                        //用密码进行初始化,这个密码你可以随便填
                        AES.init(AES.DEFAULT_PWD);
                        //读取文件内容
                        byte[] bytes=Utils.getBytes(file);
                        //解密
                        byte[] decrypt=AES.decrypt(bytes);
                        //解密好的内容写到指定的目录(就是原来的目录)
                        FileOutputStream fos=new FileOutputStream(file);
                        fos.write(decrypt);
                        fos.flush();
                        fos.close();
                        //把file加到集合
                        dexFiles.add(file);

                    }catch (Exception e){
                        e.printStackTrace();
                    }
                }
            }
        }else{
            for (File file : dexDir.listFiles()) {
                dexFiles.add(file);
            }
        }

        try{
            //2.把解密后的文件加载到系统
            loadDex(dexFiles,versionDir);
        }catch (Exception e){
            e.printStackTrace();
        }


    }
   //解密的dex文件加载到系统中运行
    private void loadDex(List<File> dexFiles, File versionDir) throws Exception{
        //1.获取pathlist
        Field pathListField = Utils.findField(getClassLoader(), "pathList");
        Object pathList = pathListField.get(getClassLoader());
        //2.获取数组dexElements
        Field dexElementsField=Utils.findField(pathList,"dexElements");
        //这是系统的数组
        Object[] dexElements=(Object[])dexElementsField.get(pathList);
        //3.反射到初始化dexElements的方法;makePathElements有三个参数List.class,File.class,List.class
        Method makeDexElements=Utils.findMethod(pathList,"makePathElements",List.class,File.class,List.class);

        ArrayList<IOException> suppressedExceptions = new ArrayList<IOException>();
        //执行该方法,
        Object[] addElements=(Object[])makeDexElements.invoke(pathList,dexFiles,versionDir,suppressedExceptions);

        //合并我们的数组和系统的
        Object[] newElements= (Object[])Array.newInstance(dexElements.getClass().getComponentType(),dexElements.length+addElements.length);
        //往数组里面放东西
        System.arraycopy(dexElements,0,newElements,0,dexElements.length);
        System.arraycopy(addElements,0,newElements,dexElements.length,addElements.length);

        //替换classloader中的element数组
        dexElementsField.set(pathList,newElements);
    }

    private void getMetaData() {
        try{
            ApplicationInfo applicationInfo = getPackageManager().getApplicationInfo(
                    getPackageName(), PackageManager.GET_META_DATA);
            Bundle metaData=applicationInfo.metaData;
            if(null!=metaData){
                if(metaData.containsKey("app_name")){
                    app_name=metaData.getString("app_name");
                }
                if(metaData.containsKey("app_version")){
                    app_version=metaData.getString("app_version");
                }
            }

        }catch(Exception e){
            e.printStackTrace();
        }
    }
}
主工程的文件清单
<?xml version="1.0" encoding="utf-8"?>
<manifest xmlns:android="http://schemas.android.com/apk/res/android"
    package="com.example.administrator.lsn_11_demo">

    <application
        android:name="com.example.proxy_core.ProxyApplication"
        android:allowBackup="true"
        android:icon="@mipmap/ic_launcher"
        android:label="@string/app_name"
        android:roundIcon="@mipmap/ic_launcher_round"
        android:supportsRtl="true"
        android:theme="@style/AppTheme">
        <activity android:name=".MainActivity">
            <intent-filter>
                <action android:name="android.intent.action.MAIN" />

                <category android:name="android.intent.category.LAUNCHER" />
            </intent-filter>
        </activity>
        <!--真实的Application的全名-->
        <meta-data android:name="app_name" android:value="com.example.administrator.lsn_11_demo.MyApplication"/>
        <!--用于dex后的目录名_版本号-->
        <meta-data android:name="app_version" android:value="\dexDir_1.0"/>

    </application>

</manifest>
6,我现在在proxy_tools中进行加密,
package com.example.proxy_tools;

import java.io.File;
import java.io.FileOutputStream;
import java.io.FilenameFilter;

public class Main {
    public static void main(String[] args) throws Exception {
        /**
         * 1.制作只包含解密代码的dex文件
         */
        //1,选中proxy_core文件,然后rebuild project一下,会产生一个arr文件。我们要把这个文件解压出来
        //它里面就会存在一个主dex文件
        File aarFile=new File("proxy_core/build/outputs/aar/proxy_core-debug.aar");
        //放在自己工程的一个临时目录里面
        File aarTemp=new File("proxy_tools/temp");
        //把aarFile解压到aarTemp目录里面来
        Zip.unZip(aarFile,aarTemp);
        //主工程的jar包,在临时目录里面拿到这个jar包
        File classesJar=new File(aarTemp,"classes.jar");
        //把jar包变成dex文件,这是我们整个项目的入口
        File classesDex=new File(aarTemp,"classes.dex");

        //dx --dex --output out.dex in.jar
        //要配置环境,Runtime用来执行命令行的代码
        Process process=Runtime.getRuntime().exec("cmd /c dx --dex --output "+classesDex.getAbsolutePath()
                                    +" "+classesJar.getAbsolutePath());
        process.waitFor();
        //System.exit(0)是正常退出程序,而System.exit(1)或者说非0表示非正常退出程序。
        if(process.exitValue()!=0){
            throw new RuntimeException("dex error");
        }

        /**
         * 2.加密APK中所有的dex文件
         */
        File apkFile=new File("app/build/outputs/apk/debug/app-debug.apk");
        //解压的目录
        File apkTemp=new File("app/build/outputs/apk/debug/temp");
        Zip.unZip(apkFile,apkTemp);
        //apkTemp.listFiles是拿出所有的文件,但是我只要dex文件拿出来加密
        File[] dexFiles=apkTemp.listFiles(new FilenameFilter() {
            @Override
            //s就是文件字符的名字
            public boolean accept(File file, String s) {
                return s.endsWith(".dex");
            }
        });
        //AES加密了
        AES.init(AES.DEFAULT_PWD);
        //对文件进行迭代,每个文件都要进行加密
        for (File dexFile : dexFiles) {
            byte[] bytes = Utils.getBytes(dexFile);
            byte[] encrypt = AES.encrypt(bytes);
            FileOutputStream fos=new FileOutputStream(new File(apkTemp,
                    //1,注意文件名字的写法,不能是dexFile.getName()+"secret-"
                    //2,换了名字后文件就是加密后的文件
                    "secret-"+dexFile.getName()));
            fos.write(encrypt);
            fos.flush();
            fos.close();
            dexFile.delete();
        }

        /**
         * 3.把dex放入apk解压目录,重新压成apk文件
         * 把temp文件下的select-XXXX.dex文件放到apk的解压目录在压缩成一个apk,
         */
        //改个名字
        classesDex.renameTo(new File(apkTemp,"classes.dex"));
        //这个apk做出来是不能执行的
        File unSignedApk=new File("app/build/outputs/apk/debug/app-unsigned.apk");
        //加密的东西在重新压缩
        Zip.zip(apkTemp,unSignedApk);
        //以上三个步骤作了什么呢?
        //把apk解压,把里面的dex加密,然后重新打包成一个新的apk(unSignedApk)

        /**
         * 4.对齐和签名
         * 签名以后apk就可以使用了。
         */
//        对齐执行这个命令:zipalign -v -p 4 my-app-unsigned.apk my-app-unsigned-aligned.apk
        File alignedApk=new File("app/build/outputs/apk/debug/app-unsigned-aligned.apk");
        process=Runtime.getRuntime().exec("cmd /c zipalign -v -p 4 "+unSignedApk.getAbsolutePath()
                        +" "+alignedApk.getAbsolutePath());
        process.waitFor();
        //现在debug目录下有三个apk文件了,那三个?
        // app-debug.apk    app-unsigned.apk  app-unsigned-aligned.apk(对齐命令之后生成的)
//        if(process.exitValue()!=0){
//            throw new RuntimeException("dex error");
//        }


//        apksigner sign --ks my-release-key.jks --out my-app-release.apk my-app-unsigned-aligned.apk
//        apksigner sign  --ks jks文件地址 --ks-key-alias 别名 --ks-pass pass:jsk密码 --key-pass pass:别名密码 --out  out.apk in.apk
        File signedApk=new File("app/build/outputs/apk/debug/app-signed-aligned.apk");
        //jks文件,自己生成的。用它来签名
        File jks=new File("proxy_tools/proxy2.jks");
        process=Runtime.getRuntime().exec("cmd /c apksigner sign --ks "+jks.getAbsolutePath()
                //jett 使我们的别名,第一个123456是别名密码
                            +" --ks-key-alias jett --ks-pass pass:123456 --key-pass pass:123456 --out "
                                +signedApk.getAbsolutePath()+" "+alignedApk.getAbsolutePath());
        process.waitFor();
        if(process.exitValue()!=0){
            throw new RuntimeException("dex error");
        }
        System.out.println("执行成功");
        //现在debug目录下有四个apk文件了,哪四个?
        // app-debug.apk    app-unsigned.apk
        // app-unsigned-aligned.apk(对齐命令之后生成的) app-signed-aligned.apk(签名之后生成的)
    }
}
