所有的dex文件都加密,使用的时候通过代理解密,用户拿到以后是无法解读源代码的。加密算法可以自由选择,
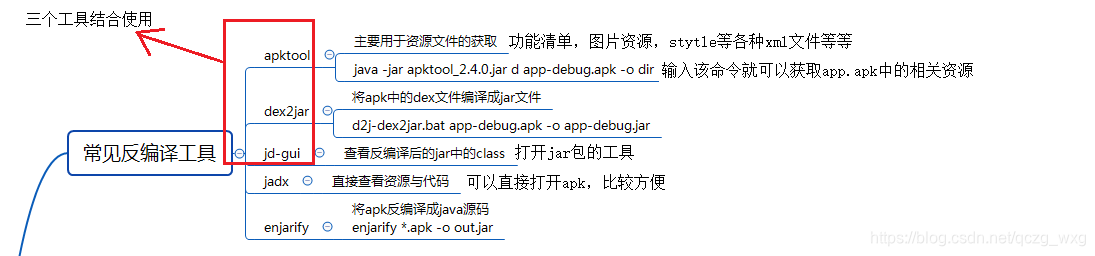
第一:反编译工具
第二:Proguard的使用与配置
Proguard是一个代码优化和混淆工具。能够提供对Java类文件的压缩、优化、混淆,和预校验。压缩的步骤是检测并移除未使用的类、字段、方法和属性。优化的步骤是分析和优化方法的字节码。混淆的步骤是使用短的毫无意义的名称重命名剩余的类、字段和方法。压缩、优化、混淆使得代码更小,更高效。
比如整个APK中有一些没有用过的东西。在导包的时候可以把那些不需要的全去掉。
开启proguard
buildTypes {
        release {
            minifyEnabled false
            proguardFiles getDefaultProguardFile('proguard-android.txt'), 'proguard-rules.pro'
        }
        debug {
            minifyEnabled true
            proguardFiles getDefaultProguardFile('proguard-android.txt'), 'proguard-rules.pro'
        }
    }
minifyEnabled false:混淆功能默认是关闭的。改为true就是开启混淆功能
点击运行在gradle里面默认生成proguard-android,按照文件提供的规则,进行混淆。
 #不做优化
-dontoptimize
#不适用大小写
-dontusemixedcaseclassnames
#不跳过公共库的class
-dontskipnonpubliclibraryclasses
-keep 指定类和类成员(变量和方法)不被混淆。
	-keep class com.dongnao.proxy.guard.test.Bug
	(保护了类名)
	-keep class com.dongnao.proxy.guard.test.Bug{
   		public static void *();
	}
	(保护了 public static void的没有参数的函数)
	-keep class com.dongnao.proxy.guard.test.Bug{
   		*;
	}
	(保护所有)
-keepclassmembers 指定类成员不被混淆(就是-keep的缩小版,不管类名了)。
	-keepclassmembers
	class com.dongnao.proxy.guard.test.Bug
	(都被混淆了)
-keepclasseswithmembers 指定类和类成员不被混淆,前提是指定的类成员存在。
	-keepclasseswithmembers class 	com.dongnao.proxy.guard.test.Bug
	(保护类名,但是没指定成员,所以函数名被混淆)
	-keepclasseswithmembers class   	com.dongnao.proxy.guard.test.Bug{
		native <methods>;
	}
proguard-rules.pro文件中的一些配置
1,指定类不被混淆的方法;
类前加注释@Keep
在proguard-rules.pro中添加代码
-keep class com.example.administrator.lsn_8_demo.User
如果user类需要反射,就不能混淆了。
3,
# We want to keep methods in Activity that could be used in the XML attribute onClick.
-keepclassmembers class * extends android.app.Activity {
    public void *(android.view.View);
}
保证所有继承Activity类,方法参数名是View的方法不被混淆
4,View 类的set get方法不被混淆
# Keep setters in Views so that animations can still work.
-keepclassmembers public class * extends android.view.View {
    void set*(***);
    *** get*();
}
5,静态内部类里的静态属性不做混淆
-keepclassmembers class **.R$* {
    public static <fields>;
}
6.native 方法是不能参与混淆的。如果混淆了,就无法使用JNI了。
	-keepclasseswithmembers class   	com.dongnao.proxy.guard.test.Bug{
		native <methods>;
	}
7,#只让一个类中的某个成员或某个方法不加参。
 -keep class com.example.administrator.lsn_8_demo.User{
   		public static void *();
 		java.lang.String *;
 }
该类String类型的成员变量不参与混淆,static void方法不被混淆。注意这样写类名也不会别混淆。我们看下下面这种写法
-keepclassmembers class com.example.administrator.lsn_8_demo.User{
                     		public static void *();
                     		java.lang.String *;
                  	}
这种写法和上面的区别是,类名也会被混淆
8,注意:混淆后的代码不能直接在android studio中运行,要在真机上运行。
9,如果运行出错,而又因为混淆无法定位到错误地方
,可以添加这句代码
-keepattributes SourceFile,LineNumberTable
在app build outputs mapping debug 路径下有mapping.txt文件,在这个文件中有混淆后的对应关系。
如何恢复呢?分两步
第一步:.把错误信息保存到文件
第二步:.使用工具 sdk/tools/groguard/bin/retrace.bat
先配置 -keepattributes SourceFile,LineNumberTable
再执行 retrace.bat -verbose mappint文件 bug文件
bug文件就是我们把错误的日志内容复制粘贴到这个文件里;
第三:加密技术
这里有两个加密需要用到的jar包sun.misc.BASE64Decoder.jar和commons-codec-1.11.jar
1,单项加密
使用加密算法生成一个密码,向服务器发送的数据包含明文和密码,服务器收到数据后,使用相同的算法对明文进行加密,得到的密码与收到的密码相同,这说明数据发送过程是安全的,没有问题的。
package com.example.administrator.lsn_10_demo;

import org.apache.commons.codec.digest.Sha2Crypt;
import org.junit.Test;

public class SHA {
    @Test
    public void test(){
		//对jett进行加密,得到加密的密码
        String result=Sha2Crypt.sha256Crypt("jett".getBytes());
        System.out.println(result);
    }
}
2,对称加密
一个密码对应着一个解密的秘钥,加密和解密是一对一的关系。比如AEA(https链接支付宝就是用的这种算法)加密算法,
package com.example.administrator.lsn_10_demo;

import org.junit.Test;

import java.security.SecureRandom;

import javax.crypto.Cipher;
import javax.crypto.KeyGenerator;
import javax.crypto.SecretKey;
import javax.crypto.spec.SecretKeySpec;

public class AES {
	//算法的名称
    public static String ALGORITHM="AES";
    //1,得到加密后的数据
	//2,content:加密的内容、
	//3,password:加密的密码
    public static byte[] encrypt(String content,String password) throws Exception{
		//根据AES算法生成键值,用来生成aes秘钥
        KeyGenerator kgen = KeyGenerator.getInstance(ALGORITHM);
        //1,用用户密码作为随机数初始化
		//2,大小128位
        kgen.init(128,new SecureRandom(password.getBytes()));
        //得到一个密钥,注意输入的密码和秘钥是不一样的。
        SecretKey secretKey=kgen.generateKey();
        //对钥密进行基本的编码
        byte[] enCodeFormat = secretKey.getEncoded();
        //转换成AES专用的密钥
        SecretKeySpec key=new SecretKeySpec(enCodeFormat,ALGORITHM);
        //创建一个密码器
        Cipher cipher=Cipher.getInstance(ALGORITHM);

        //加密的时候需要把数据填到一个byte数组
        byte[] byteContent=content.getBytes();
        //开始加密了
        cipher.init(Cipher.ENCRYPT_MODE,key);
		//加密后的结果就在resul里面
        byte[] result=cipher.doFinal(byteContent);

        return result;

    }
//解密
    public static byte[] decrypt(byte[] content,String password) throws Exception{
        //创建AES的key生产者
        KeyGenerator kgen=KeyGenerator.getInstance(ALGORITHM);
        //利用用户密码作为随机数初始化
        kgen.init(128,new SecureRandom(password.getBytes()));
        //根据用户密码,生成一个密钥  (所有对称算法通用的)
        SecretKey secretKey=kgen.generateKey();
        //对密钥进行基本的编码
        byte[] enCodeFormat=secretKey.getEncoded();
        //转换成AES专用的密钥 RoundKey
        SecretKeySpec key=new SecretKeySpec(enCodeFormat,ALGORITHM);
        //创建一个密码器
        Cipher cipher=Cipher.getInstance(ALGORITHM);

        //解密
        cipher.init(Cipher.DECRYPT_MODE,key);
        byte[] result=cipher.doFinal(content);
        return result;
    }
	//测试代码
    @Test
    public void test() throws Exception{
        String content="jett53425234523452345234523452345234";
        String password="123";
        //加密
        byte[] encryptByte=encrypt(content,password);
        System.out.println("加密的数据:"+new String(encryptByte));//打印内容显示,content已经面目全非了。
        //解密,要用同样的密码
        byte[] decrypt=decrypt(encryptByte,password);
        System.out.println("解密后的效果:"+new String(decrypt));//打印输出的内容就是content的内容

    }

}
3,rsa公钥私钥加密算法
假设有一万人注册了银行卡,如果是以前我们需要这么做,我给你一份密码,我银行这里还需要一个存根。如果是两个人,就需要两套。如果是一万人,那么银行就要有一万个存根。这样管理起来很不方便。
公钥私钥的好处在哪里呢?
公钥加密,私钥解密
package com.example.administrator.lsn_10_demo;

import org.junit.Test;

import java.io.FileInputStream;
import java.io.FileOutputStream;
import java.io.ObjectInputStream;
import java.io.ObjectOutputStream;
import java.io.OutputStream;
import java.security.Key;
import java.security.KeyPair;
import java.security.KeyPairGenerator;
import java.security.SecureRandom;

import javax.crypto.Cipher;

import Decoder.BASE64Decoder;
import Decoder.BASE64Encoder;

public class RSA {
	//算法名称
    public static String ALGORITHM="RSA";

    //指定key的位数,数字比较大生成钥匙对会需要很长时间。我们这里使用1024位
    public static int KEYSIZE=1024;//65536
	//公钥和私钥是分开存放的,一个存放在服务器,一个存放在客户端。

    //指定公钥存放的文件
    public static String PUBLIC_KEY_FILE="public_key.dat";

    //指定私钥存放的文件
    public static String PRIVATE_KEY_FILE="private_key.dat";

//公钥和私钥是成对出现的。本方法就是生成钥匙对
//执行这两个方法会生成两个文件
    public static void generateKeyPair() throws Exception{
        SecureRandom sr=new SecureRandom();
        //需要一个KeyPairGenerator来生成钥对
        KeyPairGenerator keyPairGenerator=KeyPairGenerator.getInstance(ALGORITHM);
        keyPairGenerator.initialize(KEYSIZE,sr);
        //生成钥匙
        KeyPair keyPair=keyPairGenerator.generateKeyPair();

        Key publicKey=keyPair.getPublic();
        Key privateKey=keyPair.getPrivate();
        //把公钥私钥存放到文件里面
        ObjectOutputStream objectOutputStream1 = new ObjectOutputStream(new FileOutputStream(PUBLIC_KEY_FILE));
        ObjectOutputStream objectOutputStream2 = new ObjectOutputStream(new FileOutputStream(PRIVATE_KEY_FILE));

        objectOutputStream1.writeObject(publicKey);
        objectOutputStream2.writeObject(privateKey);
        objectOutputStream2.close();
        objectOutputStream1.close();

    }

    /**
     * 加密
     */
    public static String encrypt(String source) throws Exception{
		//生成钥匙对
        generateKeyPair();
        //取出公钥
        ObjectInputStream ois=new ObjectInputStream(new FileInputStream(PUBLIC_KEY_FILE));
        Key key=(Key)ois.readObject();
        ois.close();
        //开始使用,拿到钥匙加密
        Cipher cipher=Cipher.getInstance(ALGORITHM);
        cipher.init(Cipher.ENCRYPT_MODE,key);
		//把你输入的内容source,加密以后放到另外一个数组b1
        byte[] b=source.getBytes();
        byte[] b1=cipher.doFinal(b);
        //转一下base64,字符和二进制之间的转换
        BASE64Encoder encoder=new BASE64Encoder();
        return encoder.encode(b1);

    }
    /**
     * 解密
     */
    public static String decrypt(String source) throws Exception{

        //取出公钥
        ObjectInputStream ois=new ObjectInputStream(new FileInputStream(PRIVATE_KEY_FILE));
        Key key=(Key)ois.readObject();
        ois.close();
        //开始使用
        Cipher cipher=Cipher.getInstance(ALGORITHM);
        cipher.init(Cipher.DECRYPT_MODE,key);
        BASE64Decoder decoder=new BASE64Decoder();
		//source是要解码的文字,把内容解码到b数组
        byte[] b=decoder.decodeBuffer(source);
		//密码器解码,把数组b中的内容解密出来,放到数组b1
        byte[] b1=cipher.doFinal(b);

        return new String(b1);

    }
    @Test
    public void test() throws Exception{
		//
        String content="jett12121212121212121";
		//对content进行加密
        String password=encrypt(content);
		//打印输出几十个字母,反正看不懂
        System.out.println("密文"+password);

        //到了服务器以后,对密文进行解密
        String target=decrypt(password);
		//打印输出content
        System.out.println("明文"+target);
    }
}
https传输原理,首先把数据使用AES加密,然发送数据的时候是带着公钥一起发送的。