https://blog.csdn.net/akof1314/article/details/8924915
最近使用Zbar识别二维码信息的,用到了Zbar。只用调用zbaring.exe即可扫描出二维码信息,如下所示。

想用C++来调用,但需要使用Magick++动态库,所以自己找了下这方面的信息。
Magick++是ImageMagick图像库的C++封装。ImageMagick是一个集创建、编辑、合成和转换图像格式的软件套件。
编译步骤:
1.从http://www.imagemagick.org/download/windows/ImageMagick-windows.zip下载源代码包;
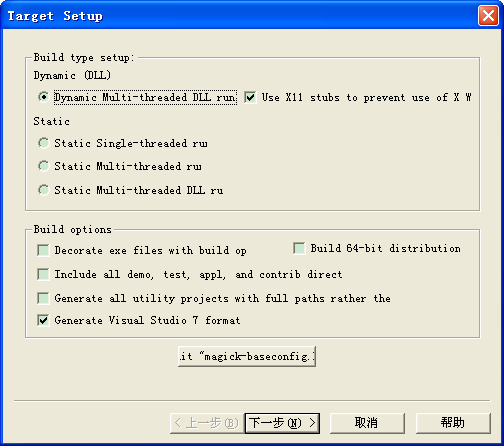
2.解压到文件夹,打开"..\VisualMagick\configure"目录下的configure.exe文件,按"下一步"进入配置界面,可以进行设置编译类型和编译选项,在这里我使用默认的编译类型,即Dynamic Multi-threaded DLL runtimes类型,编译选项选择默认选项,如下图所示:
3.继续点击"下一步",直到"完成",就可以看到在"..\VisualMagick"目录自动生成了"VisualDynamicMT.sln"文件(此名称会根据不同的编译类型而不同),用VS2008进行打开,右键解决方案里的"All"工程,选择"Clean",然后再选择"Build"。编译完成之后,就可以在"..\VisualMagick"下的"bin"文件夹和"lib"文件夹看到所生成的文件。
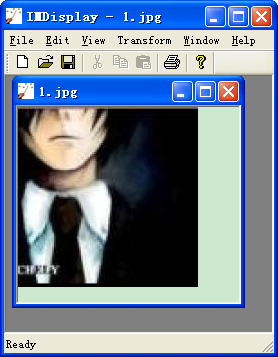
4.打开"\VisualMagick\bin"目录下的"IMDisplay.exe",载入任意一张图片(不支持中文路径),看是否可以正常显示,如下图所示:
下面介绍在VS2008中使用Magick++
1.新建win32控制台项目,选择"Empty project",去除"Precompiled header",工程名为TestMagick;
2.添加新建一个cpp文件,名称为test.cpp,代码如下:
|
1
2 3 4 5 6 7 8 9 10 11 |
#include <Magick++.h>
using namespace Magick; int main( int /*argc*/, char ** argv) { InitializeMagick(*argv); Image image( "100x100", "white"); image.pixelColor( 49, 49, "red"); image.write( "red_pixel.png"); return 0; } |
代码的功能是创建一张100x100像素的白色背景图片,中心像素为红色。
3.右键工程→"Properties"→"C/C++"下,"General"→"Additional Include Directories"填入"X:\ImageMagick-6.8.5";"X:\ImageMagick-6.8.5\Magick++\lib","Preprocessor"→"Preprocessor Definitions"增加填入";_VISUALC_;_CRT_SECURE_NO_WARNINGS;_CRT_NONSTDC_NO_WARNINGS"。"Linker"下,"General"→"Additional Library Directories"填入"X:\ImageMagick-6.8.5\VisualMagick\lib","Input"→"Additional Dependencies"填入"CORE_DB_Magick++_.lib"。"Debugging"→"Working Directory"填入"X:\ImageMagick-6.8.5\VisualMagick\bin"。
4.编译运行,即可在"..\VisualMagick\bin"目录下看到生成的red_pixel.png文件。
下面介绍在MFC中使用Magick++
1.创建MFC单文档应用程序,工程名为TestMagickMFC;
2.在stdafx.h文件中,加入以下代码:
|
1
|
#include <Magick++.h>
|
|
1
|
Magick::InitializeMagick(
NULL);
|
|
1
2 3 |
Magick::Image m_pImage;
CDC* mOffscreenDC; void DoDisplayImage(CDC* pDC); |
|
1
2 3 4 5 6 7 8 9 10 11 12 13 14 15 16 17 18 19 20 21 22 23 24 25 26 27 28 29 30 31 32 33 34 35 36 37 38 39 40 41 42 43 44 45 46 47 48 49 50 51 52 53 54 55 56 57 58 59 60 61 62 63 64 65 66 67 68 69 70 71 72 73 74 75 76 77 78 79 80 81 82 83 84 85 86 87 88 89 90 91 92 93 94 95 96 97 98 99 100 101 102 103 104 105 106 107 108 109 110 111 112 113 114 115 116 117 118 119 120 121 122 123 124 125 126 127 128 129 130 131 132 133 134 135 136 137 138 139 140 141 142 143 |
#if (QuantumDepth ==
8)
#define ScaleQuantumToChar(quantum) (( unsigned char) (quantum)) #elif (QuantumDepth == 16) #define ScaleQuantumToChar(quantum) (( unsigned char) ((quantum)/ 257)) #elif (QuantumDepth == 32) #define ScaleQuantumToChar(quantum) (( unsigned char) ((quantum)/16843009UL)) #elif (QuantumDepth == 64) #define ScaleQuantumToChar(quantum) \ (( unsigned char) ((quantum)/ 71777214294589695)) #endif CTestMagickMFCView::CTestMagickMFCView() : mOffscreenDC( NULL), m_pImage( NULL) { } CTestMagickMFCView::~CTestMagickMFCView() { if (mOffscreenDC) { delete mOffscreenDC; } } void CTestMagickMFCView::OnDraw(CDC* pDC) { CTestMagickMFCDoc* pDoc = GetDocument(); ASSERT_VALID(pDoc); if (!pDoc) return; DoDisplayImage(pDC); } void CTestMagickMFCView::OnInitialUpdate() { CView::OnInitialUpdate(); m_pImage.read( "E:\\MyPrivate\\1.jpg"); } void CTestMagickMFCView::DoDisplayImage(CDC* pDC) { if (!m_pImage.isValid()) { return; } if (!pDC) { return; } // if we don't already have a ready offscreen, then prepare one if (!mOffscreenDC) { // Set up the Windows bitmap header BITMAPINFOHEADER bmi; bmi.biSize = sizeof(BITMAPINFOHEADER); // Size of structure bmi.biWidth = (LONG) m_pImage.columns(); // Bitmaps width in pixels bmi.biHeight = (- 1)*(LONG) m_pImage.rows(); // Bitmaps height n pixels bmi.biPlanes = 1; // Number of planes in the image bmi.biBitCount = 32; // The number of bits per pixel bmi.biCompression = BI_RGB; // The type of compression used bmi.biSizeImage = 0; // The size of the image in bytes bmi.biXPelsPerMeter = 0; // Horizontal resolution bmi.biYPelsPerMeter = 0; // Veritical resolution bmi.biClrUsed = 0; // Number of colors actually used bmi.biClrImportant = 0; // Colors most important RGBQUAD *prgbaDIB = 0; HBITMAP hBitmap; hBitmap = CreateDIBSection ( pDC->m_hDC, // handle to device context (BITMAPINFO *)&bmi, // pointer to structure containing bitmap size, format, and color data DIB_RGB_COLORS, // color data type indicator: RGB values or palette indices ( void**)&prgbaDIB, // pointer to variable to receive a pointer to the bitmap's bit values NULL, // optional handle to a file mapping object 0 // offset to the bitmap bit values within the file mapping object ); if (!hBitmap) { return; } // // If image is non-opaque, create overlay the image on top of // a pattern background so non-opaque regions become evident. // Magick::Image image = m_pImage; if (m_pImage.matte()) { Magick::Image matteImage; matteImage.size(Magick::Geometry(m_pImage.columns(), m_pImage.rows())); matteImage.read( "pattern:checkerboard"); matteImage.composite(m_pImage, 0, 0,Magick::AtopCompositeOp); image = matteImage; } // // Extract the pixels from Magick++ image object and convert to a DIB section // const unsigned int columns = ( unsigned int)image.columns(); const unsigned int rows = ( unsigned int)image.rows(); RGBQUAD *pDestPixel = prgbaDIB; for( unsigned int row = 0 ; row < rows ; row++ ) { const Magick::PixelPacket *pPixels = image.getConstPixels( 0, row, columns, 1); #if QuantumDepth == 8 // Form of PixelPacket is identical to RGBQUAD when QuantumDepth==8 memcpy(( void*)pDestPixel,( const void*)pPixels, sizeof(PixelPacket)*columns); pDestPixel += columns; #else // 16 or 32 bit Quantum // Transfer pixels, scaling to Quantum for( unsigned long nPixelCount = columns; nPixelCount ; nPixelCount-- ) { pDestPixel->rgbRed = ScaleQuantumToChar(pPixels->red); pDestPixel->rgbGreen = ScaleQuantumToChar(pPixels->green); pDestPixel->rgbBlue = ScaleQuantumToChar(pPixels->blue); pDestPixel->rgbReserved = 0; ++pDestPixel; ++pPixels; } #endif } // Create a display surface mOffscreenDC = new CDC(); mOffscreenDC->CreateCompatibleDC(pDC); // Now copy the bitmap to device mOffscreenDC->SelectObject(hBitmap); DeleteObject(hBitmap); } pDC->BitBlt( 0, 0, ( unsigned int)m_pImage.columns(), ( unsigned int)m_pImage.rows(), mOffscreenDC, 0, 0, SRCCOPY); } |
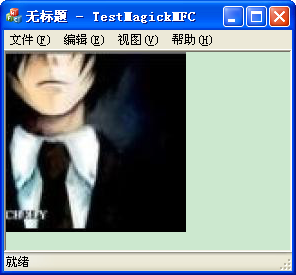
6.工程属性的设置跟上一个测试工程一样。编译运行,如下图所示:
参考资料:
1.ImageMagick Advanced Windows Installation http://www.imagemagick.org/script/advanced-windows-installation.php
2.Magick++在Vs2012的编译与使用 http://www.stardrad.com/blog/magick%E5%9C%A8vs2012%E7%9A%84%E7%BC%96%E8%AF%91%E4%B8%8E%E4%BD%BF%E7%94%A8/
3.在Visual Studio下建立ImageMagick开发环境 http://hi.baidu.com/soulmachine/item/2bed97dd3dda813f48e1dde0
4.ImageMagick 魔咒 http://www.ibm.com/developerworks/cn/opensource/os-imagemagick/
5.ImageMagicK功能使用 http://www.netingcn.com/category/imagemagick