学习目标
- 更自然地调整法线贴图零件 Adjust normal map parts more naturally.
- 添加自然色彩 Adding natural colors.
- 定义和输出最终属性 Defining and Outputting Final Attributes.
从上一步继续 Continue from previous part step.

添加BnW Spots 3.
Add BnW Spots 3.
添加一个Blend并将BnW Spots 3连接到Background输入,并将Surface细节合成框的Blend连接到新添加的Blend前景输入。
Add a Blend and connect BnW Spots 3 to the Background input and a Blend of Surface detail composite Frame to the newly added Blend foreground input.
添加一个“ Normal Sobel”并将“ Blend”连接到“ Normal Sobel”输入。
Add a Normal Sobel and connect Blend to the Normal Sobel Input.
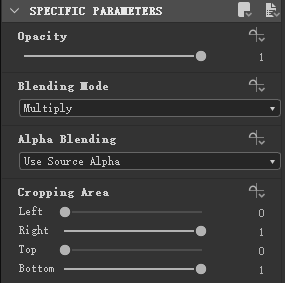
Blend
Blending Mode : Multiply
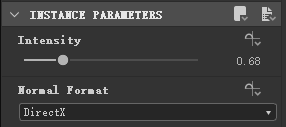
Normal Sobel
Intensity : 0.68
Normal Format : DirectX
Normal map preview of result.

AO地图制作。

添加“Normal To Height HQ”。
添加 Ambient Occlusion (HBAO).
 Normal To Height HQ
Relief Balance : 0.5
Height Intensity : 1.0
 Ambient Occlusion (HBAO)
Use World Units : True
Surface Size : 300(cm)
Height Scale : 2(cm)
Quality : 16 samples
GPU Optimization : True
预览应用“Normal Map”和“ AO Map”。
Preview applying Normal Map and AO Map.

中间节点清理。Intermediate node cleanup.

在将“Dot node”添加到“Normal To Height HQ”后,分别通过分别重新连接到“Ambient Occlusion (HBAO)”和最终的“Height Output”来清理节点。
After adding ‘Dot node’ to ‘Normal To Height HQ’, clean up the nodes by reconnecting to ‘Ambient Occlusion (HBAO)’ and the final ‘Height Output’ respectively.
基本色调配置。
Basic color tone configuration.

添加“Gradient Map” Add ‘Gradient Map’
添加“Uniform Color”。Add a Uniform Color.
添加Blend并连接。Add Blend and connect.

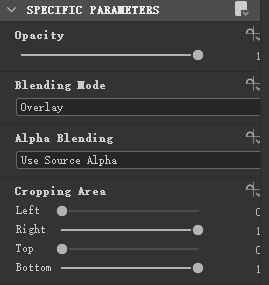
Blend
Blending Mode : Overlay

单击“Gradient Node”的“Gradient Editor”以打开颜色编辑器。
Click on the ‘Gradient Editor’ of the ‘Gradient Node’ to open the color editor.

在Internet搜索框中使用术语“Wood Floor”搜索图像。
Search for an image using the terms “Wood Floor” in the Internet search box.
 在“Gradient Editor”中单击“Pick Gradient”,然后将鼠标拖到所需的图像上以捕获颜色。
Click ‘Pick Gradient’ in the Gradient Editor and drag the mouse over the desired image to capture the color.
编辑背景色。
Edit Background Color.
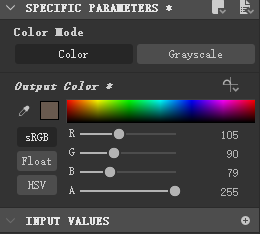
选择“Uniform Color”将输出颜色更改为RGB(105,90,79)。
Select ‘Uniform Color’ to change the Output Color to RGB (105,90,79).

 请参阅上面的第一个编辑。
See above for the first edit.
确认已应用默认基色。
Confirm the default base color is applied.

在检查输出时,适当地修改“ AO”或“Normal map”的强度。
Modify the ‘AO’ or ‘Normal map’ strengths as appropriate while checking the output.
就个人而言,上述中间结果的法线贴图强度似乎有点过高。
Personally, the normal map strength of the above intermediate results seems to be a bit excessive.
让我们更改中间值以设置标准值。
Let’s change the middle value to set the standard value.
重要说明:如果您修改法线贴图,则链接的HeightMap或AO贴图也会被修改。
Important: If you modify the Normal Map, the linked HeightMap or AO map is also modified.
粗糙度图.

添加Curvature Smooth.
Add ‘Curvature Smooth’
“Curvature Smooth”将“Tangent normal map”信息转换为平滑曲率贴图。
‘Curvature Smooth’ converts ‘Tangent normal map’ information into smooth curvature maps.
“Curvature Smooth”结果有点像“HighPass filter”,可以用作“Roughness Map”。
The ‘Curvature Smooth’ result is a bit like a ‘HighPass filter’, which can be used as a ‘Roughness Map’.
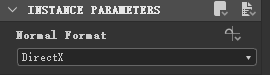
Curvature Smooth
Normal Format : DirectX
添加边角颜色。
Add Edge of corner color.

“Curvature Smooth”计算曲率,因此可以用作拐角的遮罩区域。
Curvature Smooth calculates the curvature so it can be used as a mask area for corners.
您可以使用它为基础色添加细节色。
You can use this to add detail colors to the Base Color.
让我们使反弹更加明亮。
Let’s make the bounce area to brighter.
您需要添加一个Blend并连接“Curvature Smooth”。 由于无法将灰度与颜色直接混合,因此请在中间添加一个“Gradient Map”以将“Curvature Smooth”输出转换为颜色。
You need to add a Blend and connect Curvature Smooth. Since the Gray Scale cannot be mixed with Color directly, add a Gradient Map in the middle to convert the Curvature Smooth output to Color.
Blend
Blending Mode : Overlay
辅助节点清理。
Secondary node cleanup.

对适当的值进行全局修改。
Make global modifications to the appropriate values.
 基础材料完成。
Base Material finished.
About JP
链接: Website.
在这里插入图片描述

出生在韩国的TA。
1997年开始从事电脑图形视觉化工作后,在这个行业已经有21年经验了。
在多个网络游戏公司引领过美术团队,之前在allegorithmic担任TA负责人,在中国网易盘古工作室担任TA总监,现在是巨人网络TA部门的总负责人。
懒惰的人才有创意”是他坚信并执行的哲学道理。