实现的效果图

动态换肤一般实现的原理
- 对页面需要换肤的View进行标记
- 在
Activity#setContentView()加载view时获取到标记的view(后面会说是要怎么获取到) - 创建一个Library项目制作我们的皮肤包(res下的资源名称需要与app使用的一致,换肤就是通过使用的资源名称去
皮肤包里加载相同名字的资源) - 创建皮肤包对应的
Resources对象(用于加载皮肤包内的资源) - 点击换肤将我们标记的View的一些属性上设置的值修改为皮肤包里的值,这样就达到换肤的效果
一、对页面需要换肤的View进行标记
这一步是相对简单的,只要自定义一个属性即可;在获取View的时候判断有无这个属性 有就将这个view存起来
<?xml version="1.0" encoding="utf-8"?>
<LinearLayout xmlns:android="http://schemas.android.com/apk/res/android"
    xmlns:skin="http://schemas.android.com/apk/azhon-skin"
    xmlns:tools="http://schemas.android.com/tools"
    android:layout_width="match_parent"
    android:layout_height="match_parent"
    android:orientation="vertical"
    android:padding="16dp"
    tools:context=".MainActivity">

    <TextView
        android:layout_width="wrap_content"
        android:layout_height="wrap_content"
        android:background="@color/bg_1"
        android:text="我是一个TextView"
        android:textColor="@color/title_1"
        android:textSize="16sp"
        skin:enable="true" />

    <Button
        android:id="@+id/btn_dark"
        android:layout_width="match_parent"
        android:layout_height="wrap_content"
        android:layout_marginTop="20dp"
        android:background="@color/bg_2"
        android:text="@string/btn_text"
        android:textColor="@color/title_2"
        skin:enable="true" />

    <Button
        android:id="@+id/btn_default"
        android:layout_width="match_parent"
        android:layout_height="wrap_content"
        android:layout_marginTop="20dp"
        android:background="@color/bg_3"
        android:text="@string/btn_reset_text"
        android:textColor="@color/title_3" />
</LinearLayout>
skin:enable="true"这个就是自定的一个属性取值为boolean,如果为true就表示在换肤的时候需要去皮肤包加载对应的资源
二、获取在布局标记好的View
这里使用的是自定义布局加载器LayoutInflater的LayoutInflater.Factory2来监听View的创建;下面我们来通过阅读源码来具体说一下为什么使用的这个:
- 查看AppCompatActivity的setContentView()方法
public class MainActivity extends AppCompatActivity {
    @Override
    protected void onCreate(Bundle savedInstanceState) {
        super.onCreate(savedInstanceState);
        setContentView(R.layout.activity_main);
}
- 接着继续调用了getDelegate()的setContentView()方法
// AppCompatActivity.java
@Override
public void setContentView(@LayoutRes int layoutResID) {
    getDelegate().setContentView(layoutResID);
}
getDelegate()获取到的是AppCompatDelegate这个抽象类的实现类,而他的实现类就只有一个AppCompatDelegateImpl
- 接着调用了AppCompatDelegateImpl的setContentView()
// AppCompatDelegateImpl.java
@Override
public void setContentView(int resId) {
    ensureSubDecor();
    ViewGroup contentParent = mSubDecor.findViewById(android.R.id.content);
    contentParent.removeAllViews();
    //重点就是这样代码,通过布局加载器加载xml文件
    LayoutInflater.from(mContext).inflate(resId, contentParent);
    mAppCompatWindowCallback.getWrapped().onContentChanged();
}
阅读到这里就可以看到有用的代码了
LayoutInflater.from(mContext).inflate(resId, contentParent)加载我们的xml布局文件,他传入了我们的布局资源id和android.R.id.content这个ViewGroup;有了解过Activity的布局层次结构的同学肯定就知道是什么了。
- 接着往下看LayoutInflater的inflate()方法
// LayoutInflater.java
//No.1
public View inflate(@LayoutRes int resource, @Nullable ViewGroup root) {
    return inflate(resource, root, root != null);
}

//No.2 接着调用了
public View inflate(@LayoutRes int resource, @Nullable ViewGroup root, boolean attachToRoot) {
    final Resources res = getContext().getResources();
    if (DEBUG) {
        Log.d(TAG, "INFLATING from resource: \"" + res.getResourceName(resource) + "\" ("
                + Integer.toHexString(resource) + ")");
    }
    final XmlResourceParser parser = res.getLayout(resource);
    try {
        return inflate(parser, root, attachToRoot);
    } finally {
        parser.close();
    }
}

//No.3 接着调用了
public View inflate(XmlPullParser parser, @Nullable ViewGroup root, boolean attachToRoot) {
    synchronized (mConstructorArgs) {
        Trace.traceBegin(Trace.TRACE_TAG_VIEW, "inflate");

			// 省略若干源代码....

            if (TAG_MERGE.equals(name)) {
                if (root == null || !attachToRoot) {
                    throw new InflateException("<merge /> can be used only with a valid "
                            + "ViewGroup root and attachToRoot=true");
                }
                rInflate(parser, root, inflaterContext, attrs, false);
            } else {
                // Temp is the root view that was found in the xml
                final View temp = createViewFromTag(root, name, inflaterContext, attrs);
                ViewGroup.LayoutParams params = null;

 			// 省略若干源代码....

            }
      }
}
调用
inflate()最终调用了createViewFromTag()这个方法根据布局写的代码开始创建对应的View实体,继续向下查看createViewFromTag()的代码
// LayoutInflater.java
// No.1
private View createViewFromTag(View parent, String name, Context context, AttributeSet attrs) {
    return createViewFromTag(parent, name, context, attrs, false);
}

// No.2
View createViewFromTag(View parent, String name, Context context, AttributeSet attrs,
        boolean ignoreThemeAttr) {

   // 省略若干源代码....

    try {
        View view;
        if (mFactory2 != null) {
            view = mFactory2.onCreateView(parent, name, context, attrs);
        } else if (mFactory != null) {
            view = mFactory.onCreateView(name, context, attrs);
        } else {
            view = null;
        }
        if (view == null && mPrivateFactory != null) {
            view = mPrivateFactory.onCreateView(parent, name, context, attrs);
        }
        if (view == null) {
            final Object lastContext = mConstructorArgs[0];
            mConstructorArgs[0] = context;
            try {
                if (-1 == name.indexOf('.')) {
                    view = onCreateView(parent, name, attrs);
                } else {
                    view = createView(name, null, attrs);
                }
            } finally {
                mConstructorArgs[0] = lastContext;
            }
        }
        return view;
    } catch (InflateException e) {
        throw e;
    }
    // 省略若干源代码....
}
代码查看到这里终于看到了开头所说的Factory这个东西,上面代码最终通过调用onCreateView()来创建view;所以我们只需要对LayoutInflater设置一个Factory即可。
先来看看设置setFactory()的方法
// LayoutInflater.java
public void setFactory(Factory factory) {
    if (mFactorySet) {
        throw new IllegalStateException("A factory has already been set on this LayoutInflater");
    }
    if (factory == null) {
        throw new NullPointerException("Given factory can not be null");
    }
    mFactorySet = true;
    if (mFactory == null) {
        mFactory = factory;
    } else {
        mFactory = new FactoryMerger(factory, null, mFactory, mFactory2);
    }
}
- 可以很清楚的看到,如果我们调用了这个方法那么肯定会抛出一个异常
IllegalStateException ,A factory has already been set on this LayoutInflater,所以设置之前我们需要通过反射将mFactorySet这个变量置为false
需要注意的一点:
既然是干预View的加载创建,那肯定设置Factory需要在LayoutInflater实例创建之后,在加载创建View之前;而Activity是通过setContentView()加载View所以设置Factory需要在setContentView()之前;这里可以通过Application设置Activity的生命周期监听器,即registerActivityLifecycleCallbacks()
上面bb了一堆现在来上代码了
public class App extends Application {
    @Override
    public void onCreate() {
        super.onCreate();
        registerActivityLifecycleCallbacks(new ActivityLifecycleCallbacks() {
            @Override
            public void onActivityCreated(Activity activity, Bundle savedInstanceState) {
				setFactory(activity);
            }

            @Override
            public void onActivityStarted(Activity activity) {
            }

            @Override
            public void onActivityResumed(Activity activity) {
            }

            @Override
            public void onActivityPaused(Activity activity) {
            }

            @Override
            public void onActivityStopped(Activity activity) {
            }

            @Override
            public void onActivitySaveInstanceState(Activity activity, Bundle outState) {
            }

            @Override
            public void onActivityDestroyed(Activity activity) {
            }
        });
    }
}
- 创建
SkinFactory.java
public final class SkinFactory implements LayoutInflater.Factory2 {
    private static final String TAG = "SkinFactory";
    private static final String[] classPrefixList = {"android.view.", "android.widget.", "android.webkit."};
    private static final String NAME_SPACE = "http://schemas.android.com/apk/azhon-skin";
    private static final String ATTRIBUTE = "enable";

    @Override
    public View onCreateView(View parent, String name, Context context, AttributeSet attrs) {

        //找到布局使用属性(skin:enable="true")标记需要换肤的view
        boolean isSkinView = attrs.getAttributeBooleanValue(NAME_SPACE, ATTRIBUTE, false);
        //如果不是换肤的View就直接不处理
        if (!isSkinView) return null;
        View view = null;
        //name不包含.的说明是系统的控件
        if (-1 == name.indexOf('.')) {
            for (String prefix : classPrefixList) {
                view = createView(name, prefix, context, attrs);
                if (view != null) break;
            }
        } else {
            view = createView(name, null, context, attrs);
        }
        LogUtil.d(TAG, "onCreateView: 加载换肤View成功..." + view);
        return view;
    }


    /**
     * 创建系统自带View
     */
    private View createView(String name, String prefix, Context context, AttributeSet attrs) {
        View view = null;
        try {
            view = LayoutInflater.from(context).createView(name, prefix, attrs);
        } catch (ClassNotFoundException e) {
            //
        }
        return view;
    }

    @Override
    public View onCreateView(String name, Context context, AttributeSet attrs) {
        return null;
    }
}
- 设置Factory
/**
 * 设置布局解析Factory
 * 需要将LayoutInflater的mFactorySet变量设置为false
 */
private void setFactory(Activity activity) {
    try {
        LayoutInflater inflater = activity.getLayoutInflater();
        Field field = LayoutInflater.class.getDeclaredField("mFactorySet");
        field.setAccessible(true);
        field.setBoolean(inflater, false);
        //设置自己的Factory
        LayoutInflaterCompat.setFactory2(inflater, new SkinFactory());
    } catch (Exception e) {
        e.printStackTrace();
    }
}
在SkinFactory#onCreateView()中就可以获取到我们标记的View了,这里需要保存换肤的View,需要替换的属性和属性的值
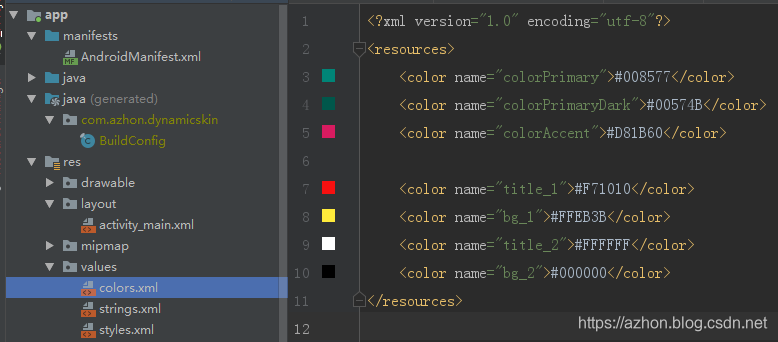
三、创建一个Library项目制作皮肤包资源
- app默认的颜色资源
- 对应的皮肤包如下:
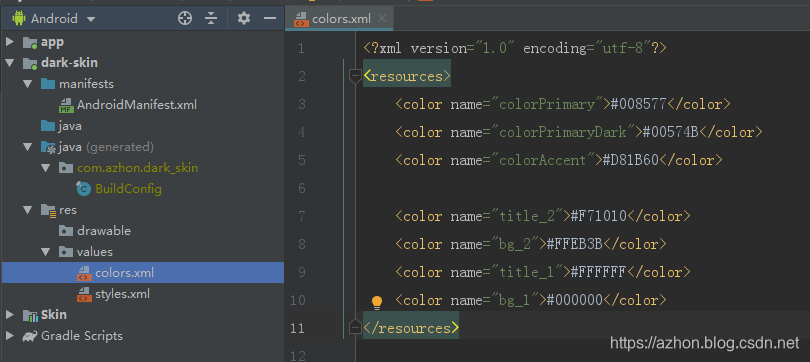
- 作为皮肤包只需要
res目录可以将java的目录代码全部删除 - 皮肤包中定义的
资源名称必须与主app定义的一模一样 - 然后通过
AS的菜单——>Build——>Build Bundle(s) / APK(s)——> Build APK(s)就可以打包出来了
四、有了皮肤包资源就可以创建Resources对象拿到res/下的所有资源
- 创建Resources对象
/**
 * 创建皮肤包的Resources
 *
 * @param path 皮肤包路径
 */
public void createResources(Context context, String path) {
    try {
        AssetManager assetManager = AssetManager.class.newInstance();
        Method addAssetPath = assetManager.getClass().getMethod("addAssetPath", String.class);
        addAssetPath.invoke(assetManager, path);
        Resources resources = context.getResources();
        //创建对象
        Resources skinResources = new Resources(assetManager, resources.getDisplayMetrics(), resources.getConfiguration());
        //获取皮肤包(也就是apk)的包名
        PackageManager packageManager = context.getPackageManager();
        PackageInfo packageInfo = packageManager.getPackageArchiveInfo(path, PackageManager.GET_ACTIVITIES);
        String skinPackageName = packageInfo.packageName;
    } catch (Exception e) {
        e.printStackTrace();
    }
}
- path 就是皮肤包路径了
/sdcard/Android/data/com.azhon.dynamicskin/cache/dark.skin - 通过
PackageManager获取皮肤包的包名,包名在获取皮肤包内的资源时会用到
五、加载皮肤包内的资源,下面通过一个示例来讲解
- 我们需要替换这个TextView的
background,textColor这两个属性
<TextView
    android:layout_width="wrap_content"
    android:layout_height="wrap_content"
    android:background="@color/bg_1"
    android:text="我是一个TextView"
    android:textColor="@color/title_1"
    android:textSize="16sp"
    skin:enable="true" />
在自定义的SkinFactory中就可以获取每一个属性和属性对应的值,如下:
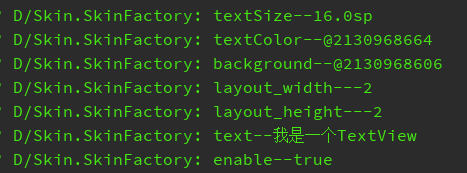
这里的@开头值后面的数字就是res下的资源对应的Id(也是就是R文件的Id)
先介绍一个重要的(api)方法
int resId = resources.getIdentifier(String name, String defType, String defPackage);
第一个参数:资源的名字,例如:bg_1、titile_1
第二个参数:资源类型,例如:drawable、color、string
第三个参数:resources资源对应的包名
根据资源id加载皮肤包内对应的资源
- 封装的方法
/**
 * 根据资源Id获取资源的名称
 * @param resources 	app自身的资源对象
 * @param skinResources 皮肤包创建的资源对象
 * @param id            当前使用的资源id
 */
public static int getResourcesIdByName(Resources resources,Resources skinResources, String packageName, int id) {
    String[] res = getResourcesById(resources, id);
    //使用皮肤包创建的Resources加载资源
    return skinResources.getIdentifier(res[0], res[1], packageName);
}


/**
 * 根据资源Id获取资源的名称
 *
 * @param id 资源id
 * @return 资源名称
 */
public static String[] getResourcesById(Resources resources, int id) {
    String entryName = resources.getResourceEntryName(id);
    String typeName = resources.getResourceTypeName(id);
    return new String[]{entryName, typeName};
}
- 获取对应皮肤包内的资源id(2130968664就是获取到的资源id)
int skinResId = getResourcesIdByName(context.getResources(),skinResources,skinPackageName,2130968664);
- 获取到了资源的id,但是这个值是不能直接使用的需要在进一步操作
- 上面通过
getResourcesById()这个方法知道了这个资源id是属于color类型的了,所以只要在调用一次getColor即可
int color = skinResources.getColor(skinResId);
通过上面几步就成功的拿到了皮肤包内对应的资源,最后就只要调用TextView的setTextColor(color)就可以成功的替换文字的颜色了,同理替换background也是一样的。
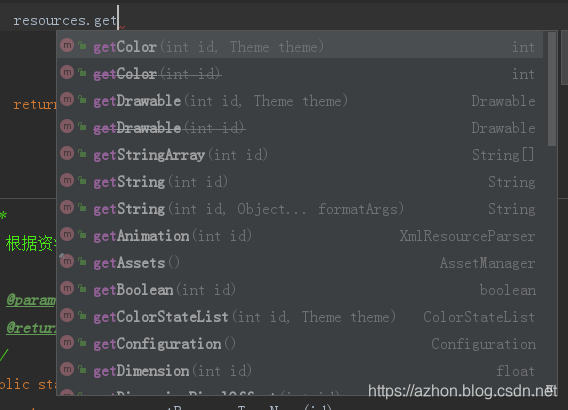
- Resources也还提供了许多其它的方法:
Demo示例下载地址
需要将项目根目录的 dark.skin 文件拷贝至/sdcard/Android/data/com.azhon.dynamicskin/cache/目录下
六、总结
- 干预View的加载创建,
Factory的原理和使用 - 对一个apk包创建对应的
Resources对象,AssetManager、PackageManager的使用 - 加载apk包内的资源,
Resources的使用
