1.常用组件
| 组件 | 作用 |
|---|---|
| Transform | 存储个处理游戏对象的位置、旋转和缩放 |
| Mesh Filter | 显示网格 |
| Rigidbody | 刚体,使物体能在物理控制下运动 |
| Collider | 碰撞器,和刚体一起来是游戏对象发生碰撞 |
| Renderer | 渲染器,使物体在屏幕上显示出来 |
| Audio Source | 音频源,在场景中可以播放音频剪辑 |
| Animation | 播放指定的动画剪辑 |
| Animator | 通过动画控制器设置角色上的行为 |
| Script | 定义自定义功能和各种交互操作 |
| Particle System | 用于创作烟雾,气流,火焰,瀑布,喷泉等效果 |
2.常用周期事件
| 事件方法 | 说明 |
|---|---|
| Awake | 唤醒事件,在脚本实例被创建时调用,只执行一次 |
| OnEnable | 启用事件,在每次激活脚本时调用 |
| Start | 开始事件,用于游戏对象或游戏场景的初始化,在场景被加载时调用,只执行一次 |
| FixedUpdate | 固定更新事件,0.02秒执行一次。所有物理组件相关的更新都在这个事件中处理。 |
| Update | 更新事件,每帧执行一次 |
| LateUpdate | 延迟更新,每帧执行一次,在Update事件之后执行。和相机有关的更新一般都放在这。 |
| OnGUI | 用来绘制交互界面,每帧会调用多次 |
| OnDisable | 禁用事件,取消脚本的激活状态后调用 |
| OnDestroy | 当前脚本被销毁时调用 |
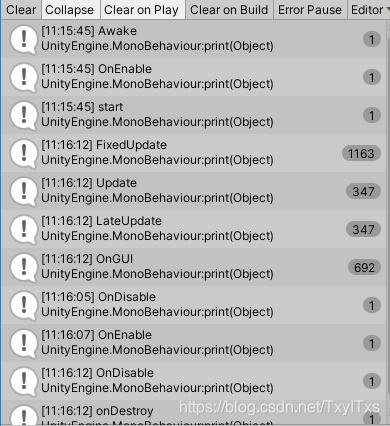
如下输出,各函数的调用次数。
3.向量
| 二维向量Vector2 | 方法 |
|---|---|
| down | Vector2(0,-1) |
| left | Vector2(-1,0) |
| one | Vector2(1,1) |
| right | Vector2(1,0) |
| up | Vector2(0,1) |
| zero | Vector2(0,0) |
| magnitude | 返回向量长度 |
| normalized | 单位化向量,长度变为 1,方向不变 |
        //静态变量.类名来调用
        print(Vector2.down);
        print(Vector2.up);
        print(Vector2.left);
        print(Vector2.right);
        print(Vector2.zero);
        print(Vector2.one);

        //创建向量
        Vector2 a = new Vector2(4,5);
        Vector2 b = new Vector2(1,3);

        //返回向量长度
        print(a.magnitude);
        print(b.magnitude);

        //返回单位化向量,原向量不变
        print(a.normalized);
        print(a.x + "," + a.y);
        print(b.normalized);
        print(b.x + "," +b.y);

        //对向量进行单位化,原向量改变
        a.Normalize();
        print(a.x + "," + a.y);

        //输出两个向量之间的距离
        print(Vector2.Distance(a, b));

        //输出两向量之间的角度
        print(Vector2.Angle(a, b));
| 三维向量Vector3 | 方法 |
|---|---|
| back | Vector3(0,0,-1) |
| down | Vector3(0,0,-1) |
| forward | Vector3(0,0,1) |
| left | Vector3(-1,0,0) |
| one | Vector3(1,1,1) |
| right | Vector3(1,0,0) |
| up | Vector3(0,1,0) |
| zero | Vector3(0,0,0) |
| Angle | 两向量的夹角 |
| Cross | 叉乘,满足左手法则,结果为一个向量 |
| Dot | 点乘,结果为一个值 |
| MoveTowards | 由当前位置匀速移动到目标位置 |
| Slerp | 对长度和角度进行插值,用于对象的转向,比较平滑 |
| +,-,*,/,!=,== | 相关运算 |
4.键盘和鼠标输入
| 相关方法 | 说明 |
|---|---|
| Input.GetKey() | 按下某键,持续返回true |
| Input.GetKeyDown | 按下某键的一瞬间,返回true |
| Input.GetKeyUp | 松开某键的一瞬间,返回true |
| Input.GetMouseButton(0) | 持续检测是否按鼠标左键(针对鼠标左中右键,三个方法同) |
| Input.GetMouseButtonDown(1) | 检测是否按下了右键,检测一次 |
| Input.GetMouseButtonUp(2) | 检测是否按下了鼠标中键[参数左键(0),右键(1),中键(2) ] |
| Input.GetButton | 持续检测 |
| Input.GetButtonDown | 检测是否按下,检测一次 |
| Input.GetButtonUp | 检测是否松开,检测一次 |
| Input.GetAxis | 获取虚拟轴,返回-1到1之间的浮点数,有渐变效果 |
| Input.GetAxisRow | 返回-1,0,1三个值,没有渐变效果 |
| OnMouseDrag | 当鼠标拖动(获取鼠标的行为事件,不针对左中右键,下同) |
| OnMuseDown | 当鼠标按下 |
| OnMouseUp | 当鼠标抬起 |
| OnMouseEnter | 当鼠标进入 |
| OnMuseExit | 当鼠标退出 |
| OnMuseOver | 当鼠标经过 |
               //获取键盘的输入,检测按下和松开。
        if(Input.GetKey(KeyCode.A))
            print("GetKey:A");
        if(Input.GetKeyDown(KeyCode.A))
            print("GetkeyDown:A");
        if(Input.GetKeyUp(KeyCode.A))
            print("GetKeyUp:A");

        //检测鼠标右键状态
        if (Input.GetMouseButton(1))
            print("Mouse right");
        if (Input.GetMouseButtonDown(1))
            print("Mouse right down");
        if (Input.GetMouseButtonUp(1))
            print("Mouse right up");
获取按钮和虚拟轴:
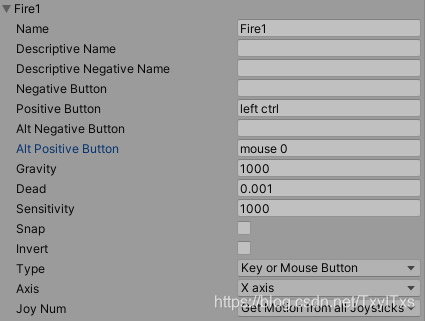
通过Edit–>Project Setting–>Input Manager–>Axes打开,可以查看相关配置信息。如Fire1的配置如下。按下鼠标左键(Mouse 0)和按下左边的Ctrl都会响应。
        //检测按钮Fire1状态
        if (Input.GetButton("Fire1"))
            print("Button Fire1");
        if (Input.GetButtonDown("Fire1"))
            print("Button Fire1 Down");
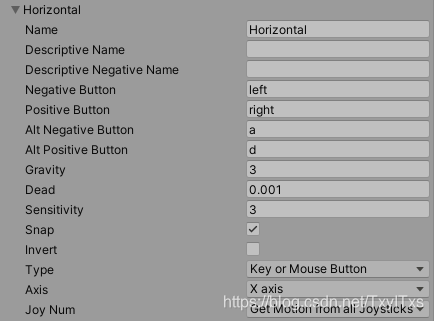
获取虚拟轴,按下左右的方向键或者a、d键,输入虚拟轴的值。
        //获取虚拟轴的状态
        //一般用来控制物体的左右,前后移动或者旋转
        float h1 = Input.GetAxis("Horizontal");
        print(h1);

        float h2= Input.GetAxisRaw("Horizontal");
        print(h2);
改变一个游戏对象的颜色。
    private void OnMouseEnter()
    {
        gameObject.GetComponent<MeshRenderer>().material.color = Color.red;
    }
    private void OnMouseExit()
    {
        gameObject.GetComponent<MeshRenderer>().material.color = Color.white;
    }
5.Time类及其成员变量
通过Time类可以获取和时间有光的信息,用来计算帧速率,调整时间流逝的速度等。
| 成员变量 | 功能 |
|---|---|
| Time | 游戏开始到现在的时间( 秒) |
| deltaTime | 上一帧消耗的时间 |
| fixedTime | 最近FixedUpdate已经开始的时间,该时间从游戏开始计算 |
| fixedDeltaTime | 物理引擎和FixedUpdate更新时间间隔 |
| timeScale | 时间流逝速度比例。可以用来制作慢动作特效 |
| frameCount | 已渲染的帧总数 |
| smoothDeltaTime | Time.deltaTime的平滑淡出 |
| timeSinceLevelLoad | 此帧的开始时间,从关卡加载完成开始计算 |
| maximumDeltaTime | 一帧的最大耗费时间 |
| realtimeSinceStartup | 游戏开始到现在经历的真实时间,该时间不会受timeScale的影响 |
| captureFramerate | 固定帧设置 |
        print("Time.time:" + Time.time);
        print("Time.deltaTime:" + Time.deltaTime);
        print("Time.fixedDeltaTime:" + Time.fixedDeltaTime);
        print("Time.fixedTime:" + Time.fixedTime);
        print("Time.timeScale:" + Time.timeScale);
    //通过计时器来控制Cube的状态
    private float time = 3.0f;

    //运行时在Unity面板上设置值
    public float speed;
    public float rotaeSpeed;

    private void Update()
    {
        time -= Time.deltaTime;
        if(time<=0)
        {
            time = 3.0f;
            //处理逻辑,该属性取反,禁用时,不渲染。
            GetComponent<MeshRenderer>().enabled = !GetComponent<MeshRenderer>().enabled;
        }

        //控制物体每秒移动多少米
        transform.Translate(Vector3.right * Time.deltaTime*speed);

        //控制物体每秒旋转的角度
        transform.Rotate(Vector3.up * Time.deltaTime * rotaeSpeed);

        //通过按键来控制时间流速的大小
        if (Input.GetKeyDown(KeyCode.Q))
            Time.timeScale = 10.0f;
        if (Input.GetKeyDown(KeyCode.P))
            Time.timeScale =0.0f;
    }
6.预制体
预制体:Perfab,预先准备好的物体,可以重复使用,是Unity中很重要的资源。
预制体的创建方法:
- 手动创建:从Hierachy面板用鼠标拖拽游戏物体到Asserts资源文件夹中;
- 脚本动态创建:Instantiate(Prefabs,transform.position,transform.rotation);
- 可以置入多个场景中,也可以多次置入一个场景中。
- 在场景中添加一个Prefab,即实例化了一个预制体对象。
- 所有的Prefab实例都是一个Prefab的原型克隆,运行中生成的对象会有Clone的标记。
- 只要原型发生变化,所有的Prefabs都会发生变化。
创建游戏对象的三种方法:
- 通过GameObject构造函数创建游戏对象,生成一个空的游戏对象。
GameObject g=new GameObject(“g”); - 通过CreatePrimitive方法创建原型的游戏模型。GameObject.CreatePrimitive(Primitive.Cube);
- 通过Instantiate方法创建游戏对象。
克隆预制体;
克隆普通的游戏对象;
Instantiate(Prefabs,transform.position,transform.rotation);
    public GameObject CubePrefab;
    private GameObject g2;
    GameObject g1;
    void Start()
    {
        g1= new GameObject("g1");

        GameObject.CreatePrimitive(PrimitiveType.Cube);

        Vector3 pos = new Vector3(-1f, 2f, 0f);
        //使用as将Instantiate的返回值转化为GameObject类型
        g2=Instantiate(CubePrefab, pos, Quaternion.identity) as GameObject;

        print(g2.name);
    }
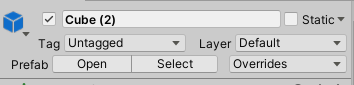
运行前将准备好的预制体赋值给CubePrefab,如下:

结果如图:

游戏对象的销毁:
- 现在销毁一个对象,GameObject.Destroy(Object);
- 延迟销毁一个对象,GameObject.Destroy(Object obj,float time);
- 销毁游戏物体时将销毁该物体所有组件和子物体。
    void Update()
    {
        if (Input.GetKeyDown(KeyCode.D))
        {
            GameObject.Destroy(g2);
            GameObject.Destroy(g1, 5f);
        }
    }
7.查找物体
若物体没激活,则通过名称和标签查不到,通过路径和和根据父物体可以查到。
| 方法 | 说明 |
|---|---|
| GameObject.Find() | 可通过名称全局查找或根据路径查找子对象 |
| GameObject.Find(“Cube”).transform.GetChild(0) | 通过父物体查找子物体 |
| FindWithTag/FindGameObjectWithTag/FindGameObjectsWithTag | 通过标签名查找 |

        GameObject go1=GameObject.Find("s");
        print(go1.name);

        Transform tf1= transform.Find("g1/s");
        print(tf1);

        Transform tf2=GameObject.Find("g1").transform.GetChild(0);
        print(tf2);

		//设置s和g2的标签为Player;
        GameObject go2=GameObject.FindGameObjectWithTag("Player");
        print(go2);

        GameObject[] gArray = GameObject.FindGameObjectsWithTag("Player");
        print(gArray.Length);
        print(gArray[0].name);
8.启用和禁用
| 函数 | 功能 |
|---|---|
| SetActive | 参数true为启用,false为禁用 |
| activeSelf | 父物体禁用,自身未禁用,则返回true |
| activeInHierarchy | 父物体禁用,则返回false |
 	public GameObject Cube;
    void Update()
    {
        if (Input.GetKeyDown(KeyCode.D))
        {
            Cube.SetActive(false);
            print(Cube.activeSelf);
            print(Cube.activeInHierarchy);
        }
        if (Input.GetKeyDown(KeyCode.A))
        {
            Cube.SetActive(true);
            print(Cube.activeSelf);
            print(Cube.activeInHierarchy);
        }
    }
获取组件信息

void Start()
    {
        BoxCollider box= gameObject.GetComponent<BoxCollider>();
        box.size *= 3;

        //获取脚本组件
        s c=gameObject.GetComponent<s>();
        c.name = "txy";
        c.print();
    }
组价的启用和禁用
	void Update()
    {
        //组件的添加和删除
        if(Input.GetKeyDown(KeyCode.A))
        {
            gameObject.AddComponent<Rigidbody>();
        }
        if (Input.GetKeyDown(KeyCode.D))
        {
            GameObject.Destroy(gameObject.GetComponent<Rigidbody>());
        }


        //组件的启用和禁用
        if (Input.GetKeyDown(KeyCode.E))
        {
            gameObject.GetComponent<BoxCollider>().enabled = true;
        }
        if (Input.GetKeyDown(KeyCode.F))
        {
            gameObject.GetComponent<BoxCollider>().enabled =false ;
        }
    }
移动物体
    void Update()
    {
        //控制物体的移动
        //1.通过改变位置信息,添加一个增量,来持续改变位置信息
        transform.position += new Vector3(Time.deltaTime * 0.5f,0, 0);

        //2.通过transform.Translate来移动,默认朝自身坐标系方向运动,可以设置为朝世界坐标系
       transform.Translate(Vector3.right * Time.deltaTime * 0.5f,Space.World);

        //3.通过Vector3.Lerp方法,通过插值,运动为先快后慢
        Vector3 target = new Vector3(4f, 3f, 2f);
        transform.position=Vector3.Lerp(transform.position, target, Time.deltaTime);

        //4.通过Vector3.MoveTowards方法,匀速移动,z增量为Time.deltaTime
        transform.position = Vector3.MoveTowards(transform.position, target, Time.deltaTime);

	    //5.通过A,S,D,W键来控制物体的移动;虚拟轴的值正负来控制移动的方向
        float h = Input.GetAxis("Horizontal");
        float v = Input.GetAxis("Vertical");
        transform.Translate(Vector3.right * h * Time.deltaTime);
        transform.Translate(Vector3.forward * v * Time.deltaTime);
    }
物体的旋转
  void Start()
    {
    	//欧拉角与四元素介绍
        //获取物体的欧拉角
        print(transform.eulerAngles);

        //获取四元数
        print(transform.rotation);

        //四元素与欧拉角的相互转换
        print(transform.rotation.eulerAngles);//四元数-->欧拉角
        print(Quaternion.Euler(transform.eulerAngles));// 欧拉角-- > 四元数
    }

    // Update is called once per frame
    void Update()
    {
        //1.使用transform.Rolate方法,y轴每秒旋转30度
        transform.Rotate(Vector3.up * Time.deltaTime * 30);

        //2.使用四元数的乘法来实现,在其基础上y轴旋转5度;
        Quaternion q1 = transform.rotation;
        Vector3 vd = new Vector3(0, 5, 0);
        Quaternion q2 = Quaternion.Euler(vd);
        if(Input.GetKeyDown(KeyCode.R))
        {
            transform.rotation=q1* q2;
        }
    }
Invoke相关方法
| 函数 | 功能 |
|---|---|
| Invoke(string funname,float time) | 调用函数。多少秒后执行函数funname,只会调用一次 |
| InvokeRepeating(string ,float,float) | 重复调用函数。多少秒后执行某个函数,并且以后每个多少秒都会执行该函数一次 |
| CancelInvoke | 取消这个脚本中的所有Invoke调用 |
| CancelInvoke(string fun) | 取消某个函数的Invoke调用 |
| IsInvokeing(string ) | 判断某个函数是否在等待调用 |
void Start()
    {
        //调用函数CreateBox,延迟两秒
       // Invoke("CreateBox", 2f);
        InvokeRepeating("CreateBox", 4f, 2f);
    }

    // Update is called once per frame
    void Update()
    {
        bool r = IsInvoking("CreateBox");
        print(r);

        if(Input.GetKeyDown(KeyCode.D))
        {
             //CancelInvoke();
            CancelInvoke("CreateBox");
        }
    }
    void CreateBox()
    {
        print("生成物体");
    }
}
9.协成
协成:协成程序,即主程序在运行的同时开启另外一段出路逻辑。
协成方法与普通方法的区别:
- 调用普通方法,会等这个普通方法执行完,然后在继续向下执行;
- 调用协成方法,可以不用等这个方法执行完就继续向下执行;
协成方法的定义:
- 返回值类型是IEnumerator,方法体中使用yield return返回,可以返回空。
- 使用yield语句可以暂停协成的执行,yield return的返回值决定了什么时候恢复协成的执行。
| 例子 | 说明 |
|---|---|
| yield return null/数字/字符串 | 暂停协成,下一帧在继续执行,用来延迟一帧执行 |
| yield return new WaitForSeconds(2f) | 暂停协成,2秒后再往下执行 |
| yield return StartCoroutine(“Funname”) | 暂停协成,启动协成Funname,执行完后再继续往下执行 |
| yeild new WaitForFixedUpdate() | 暂停协成,等下一次调用FixedUpdate方法是在继续执行下去 |
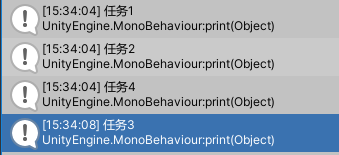
    void Start()
    {
        //普通方法
        print("任务1");
        print("任务2");
        //print("任务3");
        //开启协成
        StartCoroutine("Task3");
        print("任务4");
    }
    //定义协成
    IEnumerator Task3()
    {
        yield return new WaitForSeconds(2f);
        print("任务3");
    }
结果
    void Update()
    {
        //停止协成
        if(Input.GetKeyDown(KeyCode.Space))
        {
            StopCoroutine("Task3");
        }
    }
10.物理引擎
具有刚体组件的物体,满足物理规律,具有碰撞体的物体能进行碰撞检测。
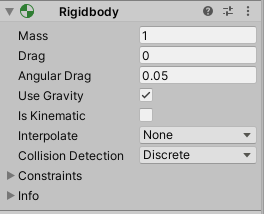
- Mass表示物体的重量
- Drag:空气阻力
- Angular Drag:角阻力,受到扭曲时的空气阻力
- Use Gravity:使用重力
    private Rigidbody r;
    // Start is called before the first frame update
    void Start()
    {
        r = gameObject.GetComponent<Rigidbody>();

    }

    // Update is called once per frame
    void Update()
    {
        //刚体移动
        float h = Input.GetAxis("Horizontal");
        float v = Input.GetAxis("Vertical");
        r.MovePosition(r.position + transform.right * h * Time.deltaTime * 2f);
        r.MovePosition(r.position + transform.forward * v * Time.deltaTime * 2f);
    }
碰撞事件检测方法
| 函数 | 功能 |
|---|---|
| OnCollisionEnter(Collision) | 当碰撞开始时,调用该方法一次 |
| OnCollisionExit(Collision) | 当碰撞结束时,调用该方法一次 |
| OnCollisionStay(Collision) | 当碰撞进行中是,持续调用该方法 |
    private void OnCollisionEnter(Collision collision)
    {
        print("Enter"+collision.gameObject.name);
    }
    private void OnCollisionExit(Collision collision)
    {
        print("Enter" + collision.gameObject.name);
    }
    private void OnCollisionStay(Collision collision)
    {
        print("Enter" + collision.gameObject.name);
    }
碰撞检测条件
- 两个物体接触并发生碰撞
- 运动物体必须带有碰撞体Collider和刚体Rigidbody
- 另一个物体必须至少带有碰撞体Collider
触发器事件
- 触发器:将碰撞组件属性面板上的“Is Trigger”勾选,当前物体的碰撞体就变成了了触发器。
- 触发器事件:当一个刚体控制的物体进入另一个物体的触发器范围内,就是触发事件。
- 用途:不与目标物体发生碰撞(接触),而是进入目标物体的触发范围,就执行特定操作。
触发器检测条件:
- 运动物体必须带有碰撞体Collider和刚体Rigidbody;
- 另一个物体至少带有碰撞体Collider;
- 其中一个物体勾选Is Trigger;
private void OnTriggerEnter(Collider other)
    {
        if(other.name !="Plane")
        {
            print(other.gameObject.name);
            print(other.name);
        }
    }
    private void OnTriggerExit(Collider other)
    {
        if (other.name != "Plane")
        {
            print(other.gameObject.name);
            print(other.name);
        }
    }

    private void OnTriggerStay(Collider other)
    {
        if (other.name != "Plane")
        {
            print(other.gameObject.name);
            print(other.name);
        }
    }
物理射线
- 从一个点往一个方向发射,该射线与场景中的物体的碰撞体组件碰撞,射线即结束。
- 由于射线可以与物理组件Collider交互,所以也称之为“物理射线”;
物理射线检测方法:
- 通过摄像机创建射线
Camera.main:指的是tag设置为MainCamera的摄像机的组件Camera的引用;
ScreenPointToRay(Vector3):摄像机组件的下的方法,屏幕点转化为射线,返回一个Ray类型的射线。
Input.mousePosition:鼠标所在的位置,Vector3类型; - 检测射线与其他物体的碰撞
RaycastHit:一个结构体,存储射线的碰撞信息;
Physics.Raycast(Ray,out RaycastHit):检测射线,碰撞返回true,否则返回false;第一个参数为需要检测的射线,第二个参数存储碰撞信息。
    private Ray ray;
    private RaycastHit hit;
    void Update()
    {
        if(Input.GetMouseButtonDown(0))
        {
            //获取摄像机,创建一条射线,方向为摄像机到鼠标点击的位置
            ray = Camera.main.ScreenPointToRay(Input.mousePosition);
        }

        //碰撞检测,通过结构体hit和返回关键字out返回碰撞信息
        if(Physics.Raycast(ray, out hit))
        {
            //把碰撞的物体销毁
            GameObject.Destroy(hit.collider.gameObject);
        }
    }
附:
学习至中国大学mooc-Unity2D游戏程序设计
