1、Spring Boot 概述
Spring 框架,作为一个非常优秀的轻量级容器,在企业级项目开发中非常受欢迎,但它在使用期间需要整合众多第三方资源,都会导致配置过于臃肿,这也是令大家非常头疼的问题。
Spring Boot 的出现,就是为了让大家更方便去使用 Spring 框架进行开发,它基于“约定优于配置(COC)”的设计理念,它实现了自动化配置解决方案,包括自动配置第三方资源,从而简化了 Spring 应用的创建、运行、调试、部署等方便的操作,让开发者更专注在应用业务的实现上。
整理了最新2020整理收集的一线互联网公司面试真题(都整理成文档),有很多干货,包含netty,spring,线程,spring cloud等详细讲解,也有详细的学习规划图,面试题整理等,我感觉在面试这块讲的非常清楚:
有需要的小伙伴可以戳这里免费领取,暗号:CSDN


其实,Spring Boot 可以想象成一个中介,它是开发者和 Spring 框架的简化沟通平台,有些“手续(应用的配置)”它直接就帮我们办理好了,这些“手续”其实就是业务流程中某些默认的流程(也就是默认的配置),刚好就是上面说的“约定优于配置”的理念。Sprint Boot 的最终目的,就是为了提升开发者在业务实现上的专注度。
2、Spring Boot 的优势
- 继承了 Spring 框架自身优秀的特性。
- 能够让配置更简单,通过自动配置快速搭建 Spring 应用项目。
- 能够以 jar 文件形式独立运行项目。
- 更强大的注解,让业务实现更简化。
- 内嵌了常见的 Web 服务器,让你随时使用 Tomcat、Jetty 等。
- 提供了企业生产级项目的服务监控方案,让监控更加简单。
- 还有一些非功能性的通用配置,适应更多的开发需求。
- 可进行分布式开发,结合 Spring Cloud 进行微服务开发。
3、搭建 Spring Boot 项目
3.1 创建 Maven 项目
第一步:菜单栏中选择 File → New → Project… 弹出下图,然后选择 Maven,再点击 Next 即可

第二步:填写组织名称、模块名称、项目版本等相关信息,如下图:

第三步:选择项目的保存位置,如下图:

创建好之后的项目具体目录,如下图:

创建好之后的项目本地文件夹具体目录,如下图:

3.2 关于项目中目录的相关解释
- src/main/java:用来存储编写好的 Java 源码文件,也就是 xxx.java 文件。
- src/main/resources:用来存储编写好的配置文件。
- src/test/java:主要用来存储测试用的 Java 源码文件。
3.3 添加配置与代码
第 1 步:编辑 pom.xml 文件
pom.xml 文件,全称项目对象模型(Project Object Model)描述文件,作为 Maven 的基础配置文件,常被用来指定项目中的依赖配置。
接着,我们需要在 pom.xml 文件中添加相关依赖,具体如下:
首先,使用 标签指定 spring-boot-starter-parent 依赖模块,单从标签名字上来看,就知道它想指定(继承)父类级别的东西。
在构建 Spring Boot 应用时设置它,也就意味着会自动包含能简化我们工作的自动配置、日志和 YAML 等大量的配置。它作为 Spring Boot 的核心启动器,提供一些 Maven 默认的配置和 dependency-management,能让你快速使用 Spring Boot 进行开发。
比如,这里指定了 parent 的版本号,当我们在引入其他依赖的时候,就不用再去关心它们的版本号了,在以前是需要考虑的,而且还很容易引起版本冲突。
<!-- Inherit defaults from Spring Boot -->
<parent>
    <groupId>org.springframework.boot</groupId>
    <artifactId>spring-boot-starter-parent</artifactId>
    <version>2.2.1.RELEASE</version>
</parent>
如果,我们需要进行 Web 开发,还需要指定 spring-boot-starter-web 依赖模块,需要在 pom.xml 文件中添加 <dependency…/> 元素来进行指定,具体如下:
<!-- 指定 web 依赖模块 -->
<dependency>
    <groupId>org.springframework.boot</groupId>
    <artifactId>spring-boot-starter-web</artifactId></dependency>
最后,还可以通过 <build …/> 元素来添加插件,比如设置 Spring Boot 的 Maven 插件 Spring Boot Maven plugin,它能够为 Spring Boot 应用提供执行 Maven 操作。此插件,能够将 Spring Boot 应用进行打包为可执行的 jar 或 war 形式的文件,然后以通常的方式来运行。具体配置如下:
<build>
    <plugins>
        <plugin>
            <groupId>org.springframework.boot</groupId>
            <artifactId>spring-boot-maven-plugin</artifactId>
        </plugin>
    </plugins>
</build>
完整的 pom.xml 文件,具体如下:
<?xml version="1.0" encoding="UTF-8"?>
<project xmlns="http://maven.apache.org/POM/4.0.0"
         xmlns:xsi="http://www.w3.org/2001/XMLSchema-instance"
         xsi:schemaLocation="http://maven.apache.org/POM/4.0.0 http://maven.apache.org/xsd/maven-4.0.0.xsd">
    <modelVersion>4.0.0</modelVersion>

    <groupId>com.nx</groupId>
    <artifactId>SpringDemo</artifactId>
    <version>1.0-SNAPSHOT</version>

    <!-- 指定 parent 版本 -->
    <parent>
        <groupId>org.springframework.boot</groupId>
        <artifactId>spring-boot-starter-parent</artifactId>
        <version>2.2.1.RELEASE</version>
    </parent>

    <!-- 指定 web 依赖模块 -->
    <dependencies>
        <dependency>
            <groupId>org.springframework.boot</groupId>
            <artifactId>spring-boot-starter-web</artifactId>
        </dependency>
    </dependencies>

    <!-- 设置 maven 插件 -->
    <build>
        <plugins>
            <plugin>
 <groupId>org.springframework.boot</groupId>
                <artifactId>spring-boot-maven-plugin</artifactId>
            </plugin>
        </plugins>
    </build>

</project>
第 2 步:添加 Controller 类
新建一个 com.nx 的 package,然后添加一个 HelloControler 类,如图位置:

HelloController 类的代码,具体如下:
package com.nx.controller;

import org.springframework.web.bind.annotation.RequestMapping;
import org.springframework.web.bind.annotation.RestController;

@RestController
public class HelloController {


    @RequestMapping("/hello")
    public String sayHello(){


        return "I Love Spring Boot.";
    }
}
@RestController 注解是一个组合注解,它包含了 @Controller 和 @ResponseBody 两个注解,说明它能以 JSON 格式进行响应数据。注解的源码如下:
@Target({

    ElementType.TYPE})
@Retention(RetentionPolicy.RUNTIME)
@Documented
@Controller
@ResponseBody
public @interface RestController {


    @AliasFor(
        annotation = Controller.class
    )
    String value() default "";
}
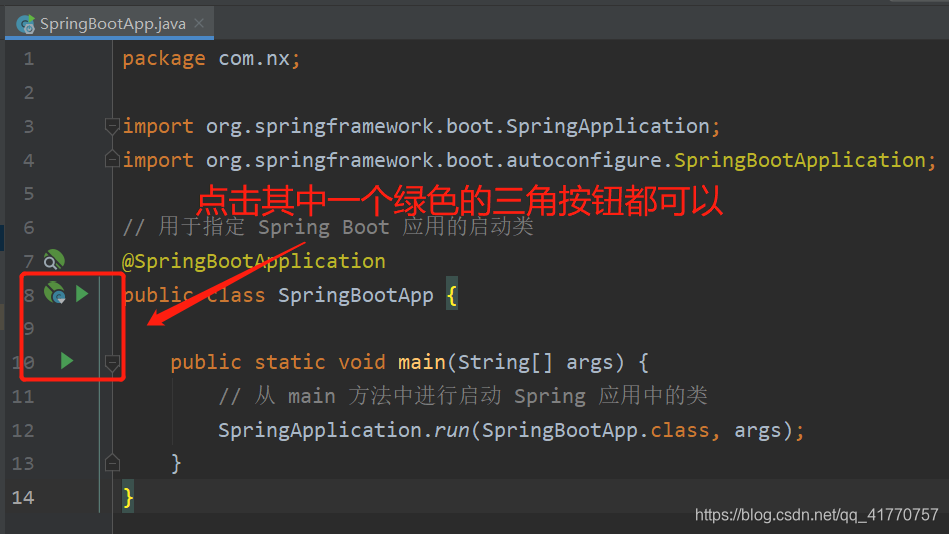
第 3 步:添加 Spring Boot 启动类
启动类的路径,需要能够让 spring boot 扫描得到其他的组件,添加位置:

SpringBootApp 启动类源码,具体如下:
package com.nx;

import org.springframework.boot.SpringApplication;
import org.springframework.boot.autoconfigure.SpringBootApplication;

// 用于指定 Spring Boot 应用的启动类
@SpringBootApplication
public class SpringBootApp {


    public static void main(String[] args) {


        // 从 main 方法中进行启动 Spring 应用中的类
        SpringApplication.run(SpringBootApp.class, args);
    }
}
3.4 启动 Spring Boot 项目
有三种启动方式,具体如下:
使用 Maven 命令启动
运行 main 方法启动
使用 Maven 打包启动
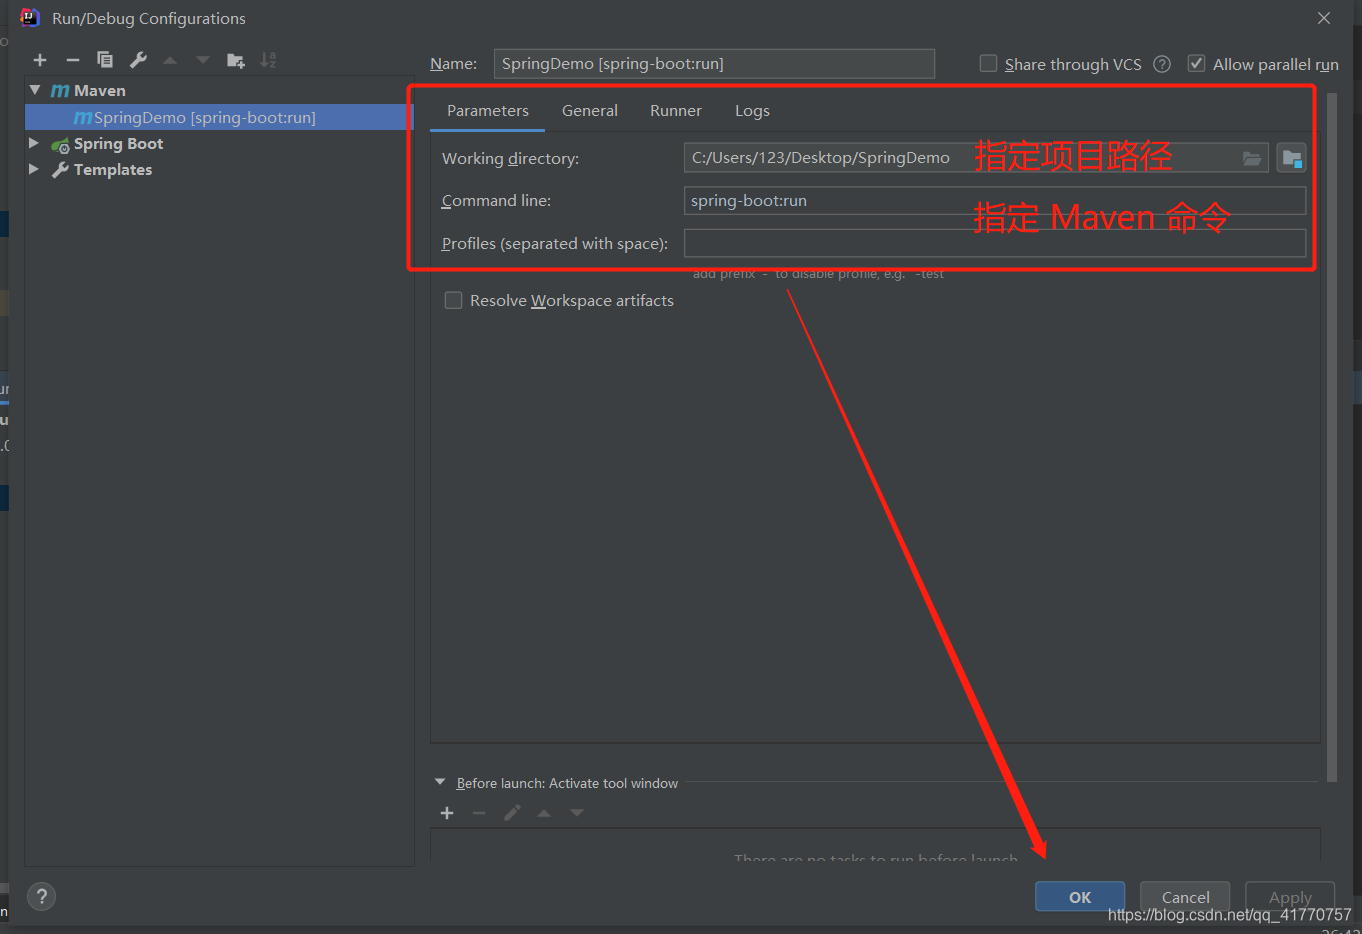
第 1 种:使用 Maven 命令启动
mvn spring-boot:run
指定项目路径和 Maven 命令,具体如下:

第 2 种:运行 main 方法启动
第 3 种:使用 Maven 打包启动
需要将 Spring Boot 应用打成一个 jar 包运行。
首先,在 IDEA 的右边栏中,打开 Maven 即可看到如下页面,双击 package 命令。
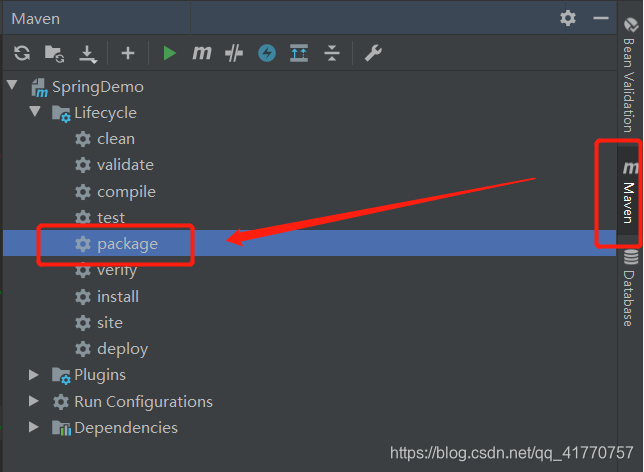
然后,找到项目所在路径下的 target 文件夹,打开即可看到生成的 jar 文件。

最后,通过命令行进入到 jar 文件所在目录下,并执行 java -jar 命令。
java -jar .\SpringDemo-1.0-SNAPSHOT.jar

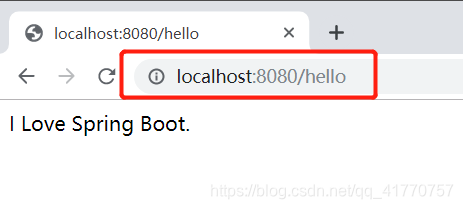
3.5 访问 Spring Boot 应用
打开浏览器,在地址栏中输入 http://localhost:8080/hello,然后回车进行访问。
4、Spring Boot 的核心配置
4.1 @SpringBootApplication 注解
Spring Boot 的启动类,也就是入口类,需要使用 @SpringBootApplication 注解来标注。在启动类中,我们的 main 方法就是 Java 应用程序的入口方法。
@SpringBootApplication 是一个组合注解,具体源码如下:
@Target({

    ElementType.TYPE})
@Retention(RetentionPolicy.RUNTIME)
@Documented
@Inherited
@SpringBootConfiguration
@EnableAutoConfiguration
@ComponentScan(
    excludeFilters = {

    @Filter(
    type = FilterType.CUSTOM,
    classes = {

    TypeExcludeFilter.class}
), @Filter(
    type = FilterType.CUSTOM,
    classes = {

    AutoConfigurationExcludeFilter.class}
)}
)
public @interface SpringBootApplication {


    @AliasFor(
        annotation = EnableAutoConfiguration.class
    )
    Class<?>[] exclude() default {

    };

    @AliasFor(
        annotation = EnableAutoConfiguration.class
    )
    String[] excludeName() default {

    };

    @AliasFor(
        annotation = ComponentScan.class,
        attribute = "basePackages"
    )
    String[] scanBasePackages() default {

    };

    @AliasFor(
        annotation = ComponentScan.class,
        attribute = "basePackageClasses"
    )
    Class<?>[] scanBasePackageClasses() default {

    };

    @AliasFor(
        annotation = Configuration.class
    )
    boolean proxyBeanMethods() default true;
}
其中,比较重要的三个注解是:@SpringBootConfiguration、@EnableAutoConfiguration、@ComponentScan。
- @SpringBootConfiguration 注解
主要是负责 Spring Boot 应用配置相关的注解,它也是组合注解,具体源码如下:
@Target({

    ElementType.TYPE})
@Retention(RetentionPolicy.RUNTIME)
@Documented
@Configuration
public @interface SpringBootConfiguration {


    @AliasFor(
        annotation = Configuration.class
    )
    boolean proxyBeanMethods() default true;
}
通过源码,可以看到它也使用了 @Configuration 注解,它们两个都是将当前类标注为配置类,能将类中使用 @Bean 注解标记的方法对应的实例注入到 Spring 容器中,那实例名就是方法名。
另外在 @Configuration 注解源码中,还看到有一个 @Component 注解,做了再次封装,主要是把普通 POJO 实例化到 Spring 容器中。具体源码如下:
@Target({

    ElementType.TYPE})
@Retention(RetentionPolicy.RUNTIME)
@Documented
@Component
public @interface Configuration {


    @AliasFor(
        annotation = Component.class
    )
    String value() default "";

    boolean proxyBeanMethods() default true;
}
所以,更推荐大家在 Spring Boot 应用中使用 @SpringBootConfiguration。
- @EnableAutoConfiguration 注解
主要用来启动自动配置,Spring Boot 就能够根据依赖信息自动实现应用的相关配置,总体分为两个部分:一是收集所有 spring.factories 中 EnableAutoConfiguration 相关 bean 的类,二是将得到的类注册到 Spring 容器中。将符合的配置都加载到 IoC 容器中。具体源码如下:
@Target({

    ElementType.TYPE})
@Retention(RetentionPolicy.RUNTIME)
@Documented
@Inherited
@AutoConfigurationPackage
@Import({

    AutoConfigurationImportSelector.class})
public @interface EnableAutoConfiguration {


    String ENABLED_OVERRIDE_PROPERTY = "spring.boot.enableautoconfiguration";

    Class<?>[] exclude() default {

    };

    String[] excludeName() default {

    };
}
组件调用关系图,具体如下

这张图,怎么去理解呢?其实是这样的,涉及到了 BeanFactory 的创建。Spring 框架中会调用 ApplicationContext 的 refresh 方法来启动 Spring 容器,然后就会创建 BeanFactory,接着扫描各种包,读取使用到了 @Configuration、@Import、@SpringBootApplication 等注解标注的类,然后生成 BeanDefinition 最终注册到 BeanFactory 中。
然后就交给 BeanFactoryPostProcessor 来执行,BeanFactory 后置处理器会处理 BeanDefinition,比如在 BeanFactoryPostProcessor 接口中,提供了 postProcessBeanFactory 方法来接收 ConfigurableListableBeanFactory 对象来处理。具体源码如下:
@FunctionalInterface
public interface BeanFactoryPostProcessor {


    void postProcessBeanFactory(ConfigurableListableBeanFactory beanFactory) throws BeansException;

}
其他类似 @Configuration 等配置性质的注解,就让 ConfigurationClassPostProcessor 来处理。
上面的 ConfigurationClassPostProcessor 主要是 BeanFactoryPostProcessor 接口的实现类,主要是想从 BeanFactory 中获取所有 BeanDefinition 列表,遍历出那些使用了 @Configuration、@Import 等配置性质注解标注的类所对应的 BeanDefintion,然后进行注册。具体源码如下:
public class ConfigurationClassPostProcessor implements BeanDefinitionRegistryPostProcessor,
        PriorityOrdered, ResourceLoaderAware, BeanClassLoaderAware, EnvironmentAware {

    ...}
public interface BeanDefinitionRegistryPostProcessor extends BeanFactoryPostProcessor {


    void postProcessBeanDefinitionRegistry(BeanDefinitionRegistry registry) throws BeansException;

}
具体,我们还可以去看看它的 parse 方法是如何处理的,它会去解析注解。
public void parse(Set<BeanDefinitionHolder> configCandidates) {


    for (BeanDefinitionHolder holder : configCandidates) {


        BeanDefinition bd = holder.getBeanDefinition();
        try {


            if (bd instanceof AnnotatedBeanDefinition) {


                parse(((AnnotatedBeanDefinition) bd).getMetadata(), holder.getBeanName());
            }
            else if (bd instanceof AbstractBeanDefinition && ((AbstractBeanDefinition) bd).hasBeanClass()) {


                parse(((AbstractBeanDefinition) bd).getBeanClass(), holder.getBeanName());
            }
            else {


                parse(bd.getBeanClassName(), holder.getBeanName());
            }
        }
        catch (BeanDefinitionStoreException ex) {


            throw ex;
        }
        catch (Throwable ex) {


            throw new BeanDefinitionStoreException(
                "Failed to parse configuration class [" + bd.getBeanClassName() + "]", ex);
        }
    }

    this.deferredImportSelectorHandler.process();
}
看到最后的 deferredImportSelectorHandler,这个内部类的里面有一个 deferredImportSelectors 集合,主要是用来添加 AutoConfigurationImportSelector。这个内部私有类,主要维护了一个类型为 DeferredImportSelectorHolder 的 deferredImportSelectors 列表。这最后一句代码,就是处理完其他 BeanDefinitions 后调用 process 方法。
再接着来看 process 方法,它负责自动配置类导入的内部实现,具体源码如下:
public void process() {


    List<DeferredImportSelectorHolder> deferredImports = this.deferredImportSelectors;
    this.deferredImportSelectors = null;
    try {


        if (deferredImports != null) {


            DeferredImportSelectorGroupingHandler handler = new DeferredImportSelectorGroupingHandler();
            deferredImports.sort(DEFERRED_IMPORT_COMPARATOR);
            deferredImports.forEach(handler::register);
            handler.processGroupImports();
        }
    }
    finally {


        this.deferredImportSelectors = new ArrayList<>();
    }
}
这个方法,需要这么来理解:
首先,DeferredImportSelector 它会去从 spring-boot-autoconfigure 包路径下的 META-INF/spring.factories 文件中找到 EnableAutoConfiguration 作为 key,然后获取对应的自动配置类列表。
第二步,在里面通过 key 即可找到对应需要自动配置的类。接着会进行遍历所有类名,加载和导入对应的配置类。
大致的思路是会先创建一个 ConfigurationClass 的对象,它会包含当前这个配置类,然后传进被调用的 doProcessConfigurationClass 方法中,然后处理该类包含的注解。如果是 @Import 注解,则会放在 processImports 方法中进行处理。
再具体讲,就是那些非 ImportSelector 接口实现类和 ImportBeanDefinitionRegistrar 接口实现类的配置类,就会调用 processConfigurationClass 方法来处理该自动配置类上面的其他注解,并将该自动配置类内部使用了 @Bean 注解的所有方法,条件化生成 bean 并注册到 Spring 容器,那最终就可以提供特定功能组件的默认实现,也就实现了 SpringBoot 的自动配置功能,在你使用的时候,比如直接通过 @Autowried 注解就可以注入某个功能组件,而不需要显示配置。
具体源码如下(这里不贴全部源码了,大家可以看看它给出的注释就明白了):
@Nullable
protected final SourceClass doProcessConfigurationClass(ConfigurationClass configClass, SourceClass sourceClass)
    throws IOException {


    if (configClass.getMetadata().isAnnotated(Component.class.getName())) {


        // Recursively process any member (nested) classes first
        processMemberClasses(configClass, sourceClass);
    }

    // Process any @PropertySource annotations
    // 省略源码...

    // Process any @ComponentScan annotations
    // 省略源码...

    // Process any @Import annotations
    // 省略源码...

    // Process any @ImportResource annotations
    // 省略源码...

    // Process individual @Bean methods
    // 省略源码...

    // Process default methods on interfaces
    // 省略源码...

    // Process superclass, if any
    // 省略源码...

    // No superclass -> processing is complete
    return null;
}
- 获取 Bean 类信息
我们可以来研究下这个注解,了解它是如何加载配置的。在源码中,可以看到 @Import({AutoConfigurationImportSelector.class}) 注解,导入的就是自动配置选择器。
AutoConfigurationImportSelector 选择器是 DeferredImportSelector 接口的实现类,会在 BeanFactory 中对所有 BeanDefinition 处理后执行来进行 SpringBoot 自动配置类的加载、导入操作等,并基于 @Conditional 条件化配置来决定是否将该配置类内部定义的 Bean 注册到 Spring 容器。具体源码如下:
public class AutoConfigurationImportSelector implements DeferredImportSelector, BeanClassLoaderAware,
        ResourceLoaderAware, BeanFactoryAware, EnvironmentAware, Ordered {

    ...}
在 AutoConfigurationImportSelector.class 中,可以看到实现了一个 selectImports 方法,用来导出 Configuration。方法中调用了 getAutoConfigurationEntry 方法,获取 bean 类信息。具体源码如下:
@Override
public String[] selectImports(AnnotationMetadata annotationMetadata) {


    if (!isEnabled(annotationMetadata)) {


        return NO_IMPORTS;
    }
    // 获取自动配置的元数据
    AutoConfigurationMetadata autoConfigurationMetadata = AutoConfigurationMetadataLoader.loadMetadata(this.beanClassLoader);
    // 获取 bean 类信息
    AutoConfigurationEntry autoConfigurationEntry = getAutoConfigurationEntry(autoConfigurationMetadata,  annotationMetadata);
    // 返回获取到的所有配置
    return StringUtils.toStringArray(autoConfigurationEntry.getConfigurations());
}
继续来看 getAutoConfigurationEntry 方法,具体源码如下:
protected AutoConfigurationEntry getAutoConfigurationEntry(AutoConfigurationMetadata autoConfigurationMetadata, AnnotationMetadata annotationMetadata) {


    if (!isEnabled(annotationMetadata)) {


        return EMPTY_ENTRY;
    }
    // 获取注解的元数据,主要有 exclude,excludeName 等
    AnnotationAttributes attributes = getAttributes(annotationMetadata);
    // 获取所有的 configurations
    List<String> configurations = getCandidateConfigurations(annotationMetadata, attributes);
    // 将获取到的 configurations 进行去重
    configurations = removeDuplicates(configurations);
    // 根据 exclusion 来删掉指定的类
    Set<String> exclusions = getExclusions(annotationMetadata, attributes);
    checkExcludedClasses(configurations, exclusions);
    configurations.removeAll(exclusions);
    configurations = filter(configurations, autoConfigurationMetadata);
    fireAutoConfigurationImportEvents(configurations, exclusions);
    return new AutoConfigurationEntry(configurations, exclusions);
}
再接着来看调用的 getCandidateConfigurations 方法,它主要是想获取所有对应的配置,它里面调用了 loadFactoryNames 方法,目的是要想加载 spring.factories 文件。它们的源码具体如下:
protected List<String> getCandidateConfigurations(AnnotationMetadata metadata, AnnotationAttributes attributes) {


    List<String> configurations = SpringFactoriesLoader.loadFactoryNames(getSpringFactoriesLoaderFactoryClass(), getBeanClassLoader());
    Assert.notEmpty(configurations, "No auto configuration classes found in META-INF/spring.factories. If you are using a custom packaging, make sure that file is correct.");
    return configurations;
}
loadFactoryNames 方法的具体源码如下:
public static List<String> loadFactoryNames(Class<?> factoryType, @Nullable ClassLoader classLoader) {


    // 这里获得的 factoryTypeName 主要就是 org.springframework.boot.autoconfigure.EnableAutoConfiguration
    String factoryTypeName = factoryType.getName();
    // 这里返回的是在 spring.factories 文件中那些 key 为 org.springframework.boot.autoconfigure.EnableAutoConfiguration 的类路径
    return loadSpringFactories(classLoader).getOrDefault(factoryTypeName, Collections.emptyList());
}
接着就在 loadSpringFactories 方法中,找到所有的 spring.factories 配置信息,然后全部返回。具体源码如下:
private static Map<String, List<String>> loadSpringFactories(@Nullable ClassLoader classLoader) {


    MultiValueMap<String, String> result = cache.get(classLoader);
    if (result != null) {


        return result;
    }

    try {


        // 获取所有 spring.factories 文件
        Enumeration<URL> urls = (classLoader != null ?
                                 classLoader.getResources(FACTORIES_RESOURCE_LOCATION) :
                                 ClassLoader.getSystemResources(FACTORIES_RESOURCE_LOCATION));
        result = new LinkedMultiValueMap<>();
        while (urls.hasMoreElements()) {


            URL url = urls.nextElement();
            UrlResource resource = new UrlResource(url);
            // 读取文件中的配置信息
            Properties properties = PropertiesLoaderUtils.loadProperties(resource);
            for (Map.Entry<?, ?> entry : properties.entrySet()) {


                String factoryTypeName = ((String) entry.getKey()).trim();
                // 分割处理
                for (String factoryImplementationName : StringUtils.commaDelimitedListToStringArray((String) entry.getValue())) {


                    result.add(factoryTypeName, factoryImplementationName.trim());
                }
            }
        }
        cache.put(classLoader, result);
        return result;
    }
    catch (IOException ex) {


        throw new IllegalArgumentException("Unable to load factories from location [" +
                                           FACTORIES_RESOURCE_LOCATION + "]", ex);
    }
}
4.2 简单配置
- 关闭指定的自动配置
通过上面的 @EnableAutoConfiguration 注解就能根据指定的依赖,自动进行配置。但如果你想关闭某一项自动配置,就需要使用 @SpringBootApplication 下的 exclude 参数来设置。比如,我想关闭 DataSource,代码具体如下:
@SpringBootApplication(exclude = {DataSourceAutoConfiguration.class})
2. 自定义启动 banner
能满足企业定制 logo 或项目启动图案。比如,可以借助如下几个网站来生成:
http://patorjk.com/software/taag
http://www.network-science.de/ascii/
http://www.kammerl.de/ascii/AsciiSignature.php

生成之后,直接将复制好的图案,放到新建的 banner.txt 文件中。运行程序之后,具体显示效果如下:

3. 全局配置文件
一般使用 application.properties 或者 application.yml 文件来当作全局配置文件。它能被添加在下面几个目录下,区别是加载的顺序是不同的,具体如下:
项目根目录的 /config 目录下
项目根目录下
类路径的 /config 目录下
类路径下
比如,可以在 application.properties 配置文件中,设置端口、请求后缀等内容。具体的配置参数可以参考官网文档第 10 章
- 配置 Web 容器
在 Spring Boot 应用中,可以内置 Tomcat、Netty、Jetty 等容器。
1)配置 Tomcat
如果添加了 spring-boot-starter-web 依赖,则项目会默认使用 Tomcat 作为 Web 容器。
针对 Tomcat 可以添加一些配置,具体如下:
# 端口
server.port
# 错误跳转路径
server.error.path
# session 失效时间
server.servlet.session.timeout
# 项目名称
server.servlet.context-path
# 编码,一般 utf-8
server.tomcat.uri-encoding
# ...
2)配置 Jetty
在 Spring Boot 应用中嵌入 Jetty 的配置很简单,把 spring-boot-starter-web 中的 Tomcat 改成 Jetty 即可,具体配置如下:
<!-- 去掉 Tomcat -->
<dependency>
    <groupId>org.springframework.boot</groupId>
    <artifactId>spring-boot-starter-web</artifactId>
    <exclusions>
        <exclusion>
            <groupId>org.springframework.boot</groupId>
            <artifactId>spring-boot-starter-tomcat</artifactId>
        </exclusion>
    </exclusions>
</dependency>

<!-- Jetty 容器 -->
<dependency>
    <groupId>org.springframework.boot</groupId>
    <artifactId>spring-boot-starter-jetty</artifactId>
</dependency>
3)配置 Undertow
Undertow 是红帽公司开发的一款基于 NIO 的高性能 Web 嵌入式服务器,拥有非常好的性能。配置方式具体如下:
<!-- 去掉 Tomcat -->
<dependency>
    <groupId>org.springframework.boot</groupId>
    <artifactId>spring-boot-starter-web</artifactId>
    <exclusions>
        <exclusion>
            <groupId>org.springframework.boot</groupId>
            <artifactId>spring-boot-starter-tomcat</artifactId>
        </exclusion>
    </exclusions>
</dependency>

<!-- undertow 容器 -->
<dependency>
    <groupId>org.springframework.boot</groupId>
    <artifactId>spring-boot-starter-undertow</artifactId>
</dependency>