文章目录
导读
数据从数据集路径读取到数据迭代器Dataset后再送入加载器DataLoader,然后通过for in 激活DataLoader,使DataLoader在内部按批分配索引,通过索引采样-index=self._next_index()函数划分索引列表,通过数据采样-data = self._dataset_fetcher.fetch(index)函数下发索引给Dataset,使得 def getitem(self, index):根据索引处理后返给DataLoader加载器,按批将索引全部下发并且返回该批的所有数据后,就可以进一步进行模型的训练。
YoloDataset类需要传入的参数解读
class YoloDataset(Dataset):
    def __init__(self, annotation_lines, input_shape, num_classes, anchors, anchors_mask, epoch_length, \
                        mosaic, mixup, mosaic_prob, mixup_prob, train, special_aug_ratio = 0.7):
        super(YoloDataset, self).__init__()
        self.annotation_lines   = annotation_lines
        self.input_shape        = input_shape
        self.num_classes        = num_classes
        self.anchors            = anchors
        self.anchors_mask       = anchors_mask
        self.epoch_length       = epoch_length
        self.mosaic             = mosaic
        self.mosaic_prob        = mosaic_prob
        self.mixup              = mixup
        self.mixup_prob         = mixup_prob
        self.train              = train
        self.special_aug_ratio  = special_aug_ratio

        self.epoch_now          = -1
        self.length             = len(self.annotation_lines)

        self.bbox_attrs         = 5 + num_classes

    def __len__(self):
        return self.length
其中:
-
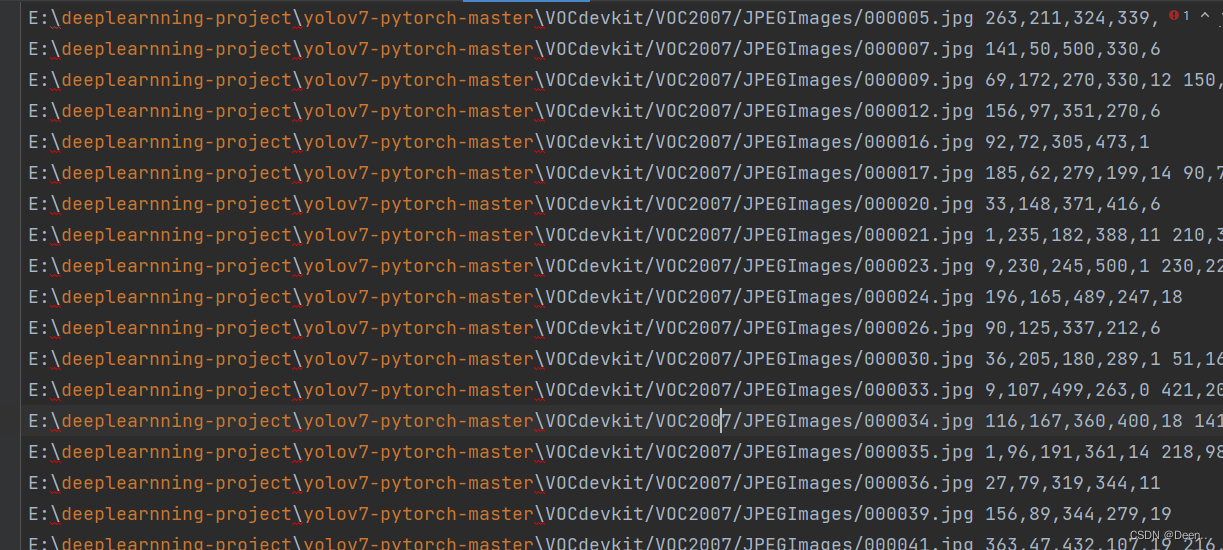
self.annotation_lines是训练集数据对应的txt文件内容,格式为 [图片绝对路径,图片所有真实框]。如图所示
-
input_shape 为设定输入模型的固定尺寸,该例设为 [300,300]
-
self.num_classes 类别数量
-
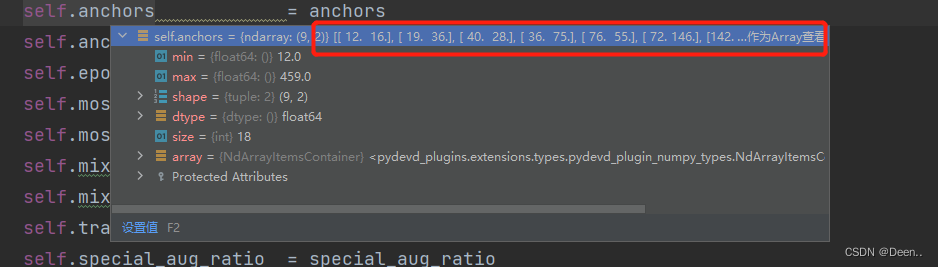
self.anchors 锚框的尺寸,这里有9个锚框
- self.epoch_length 训练总轮次
- self.mosaic 是否用mosaic技术
- self.mosaic_prob 每个step有多少概率使用mosaic数据增强,默认50%。
- self.mixup 是否用mixup技术
- self.mixup_prob 有多少概率在mosaic后使用mixup数据增强,默认50%。
- self.train 判断是否为训练阶段,非训练阶段处理与训练处理存在差异
- self.special_aug_ratio 本代码会在special_aug_ratio范围内开启mosaic。 默认为前70%个epoch,100个epoch,前70个开启mosaic。
- self.epoch_now 用来定位单前是第几个epoch。
- self.length 数据集数量
- self.bbox_attrs 输出的属性长度 5 + num_classes
根据索引开始处理单张图片-getitem()
DataLoader通过fetch()去调用YoloDataset(Dataset)中的__getitem__():
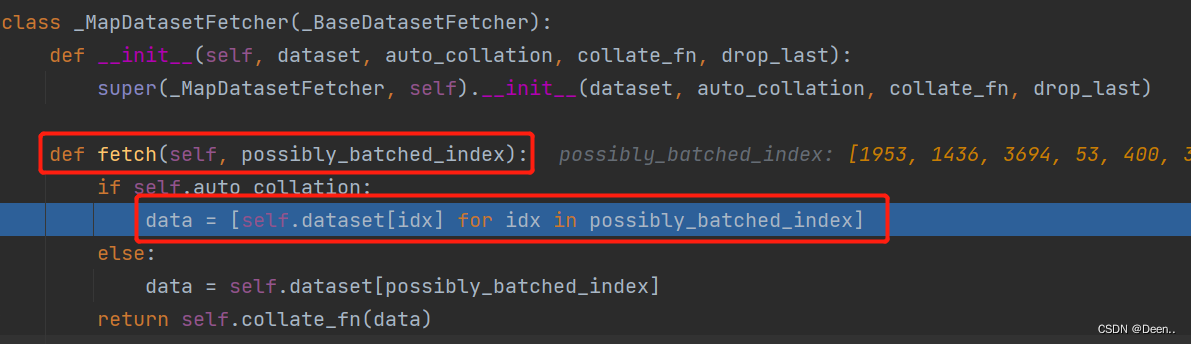
通过getitem()根据fetch下发的索引(inx)往外一张一张蹦图。
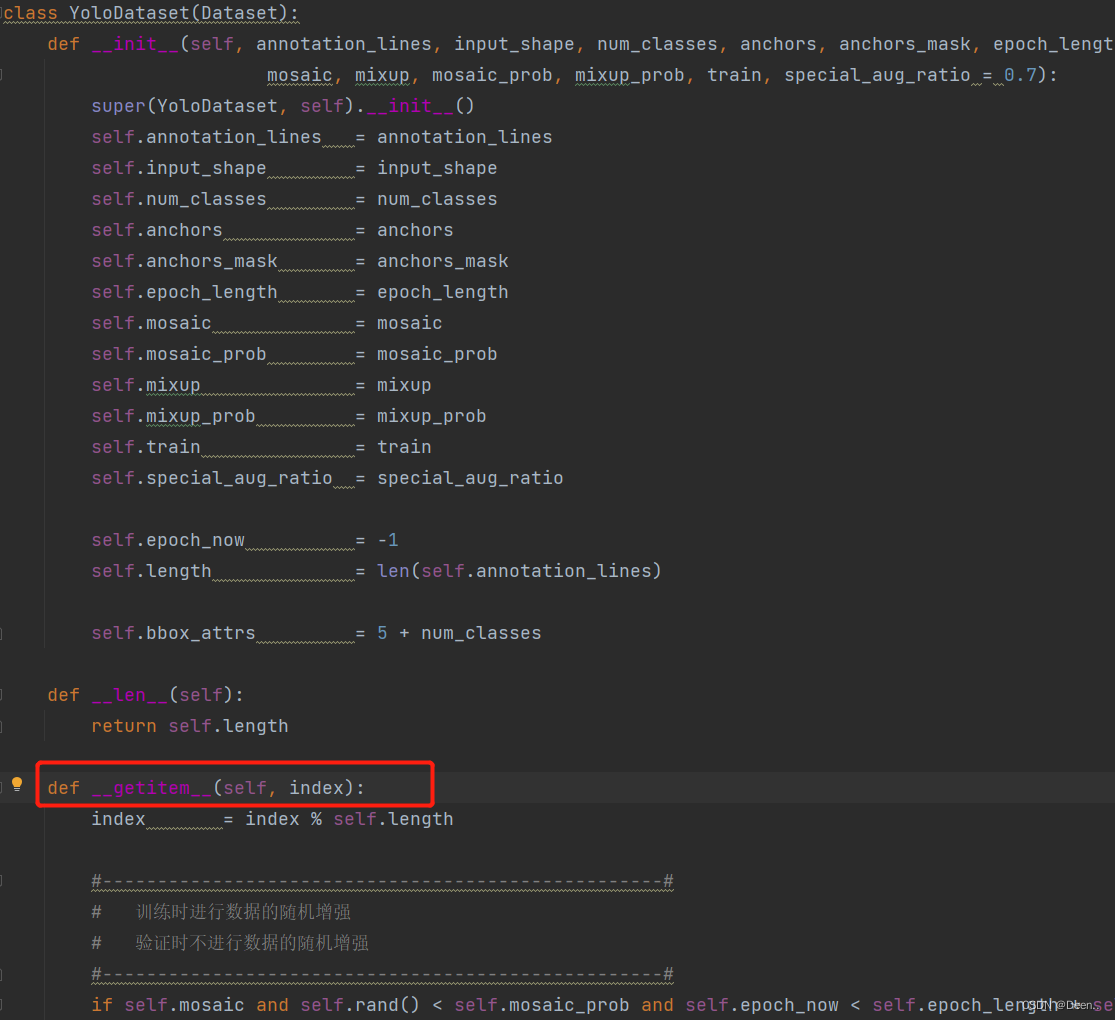
下发的index,先判断是否超出总长度
index = index % self.length
然后通过self.get_random_data()将索引的图片地址跟真实框信息读取进来进行处理。
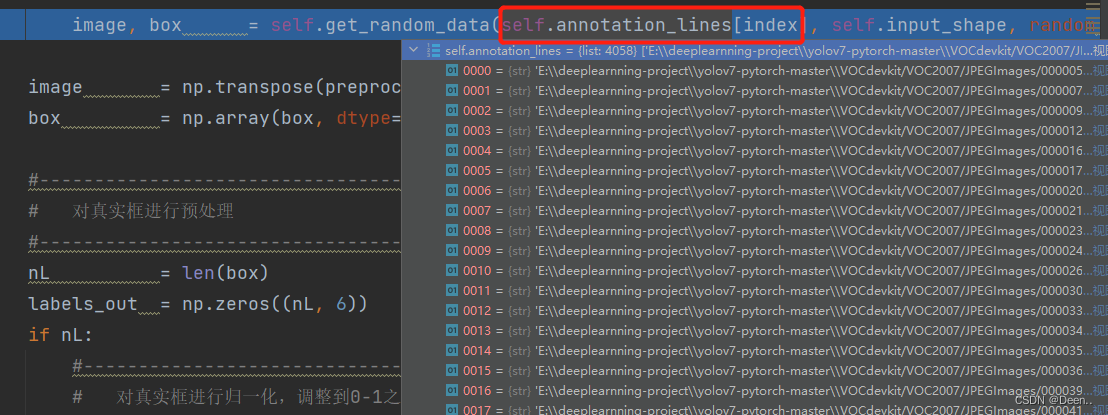
image, box = self.get_random_data(self.annotation_lines[index], self.input_shape, random = self.train)
读取完的数据如图所示:

1.数据初步处理-get_random_data()
传进该函数的annotation_line如图所示,包含了图片的地址跟真实框信息:
将图片地址加载进来获取图片,然后将图片转RGB格式,如果原来就是RGB就返回,不是的话就转RGB。然后将获取图片真实宽和高,再获取真实框。
    def get_random_data(self, annotation_line, input_shape, jitter=.3, hue=.1, sat=0.7, val=0.4, random=True):
        line = annotation_line.split()
        #------------------------------#
        #   读取图像并转换成RGB图像
        #------------------------------#
        image   = Image.open(line[0])
        image   = cvtColor(image)
        #------------------------------#
        #   获得图像的高宽与目标高宽
        #------------------------------#
        iw, ih  = image.size
        h, w    = input_shape
        #------------------------------#
        #   获得真实框
        #------------------------------#
        box     = np.array([np.array(list(map(int,box.split(',')))) for box in line[1:]])
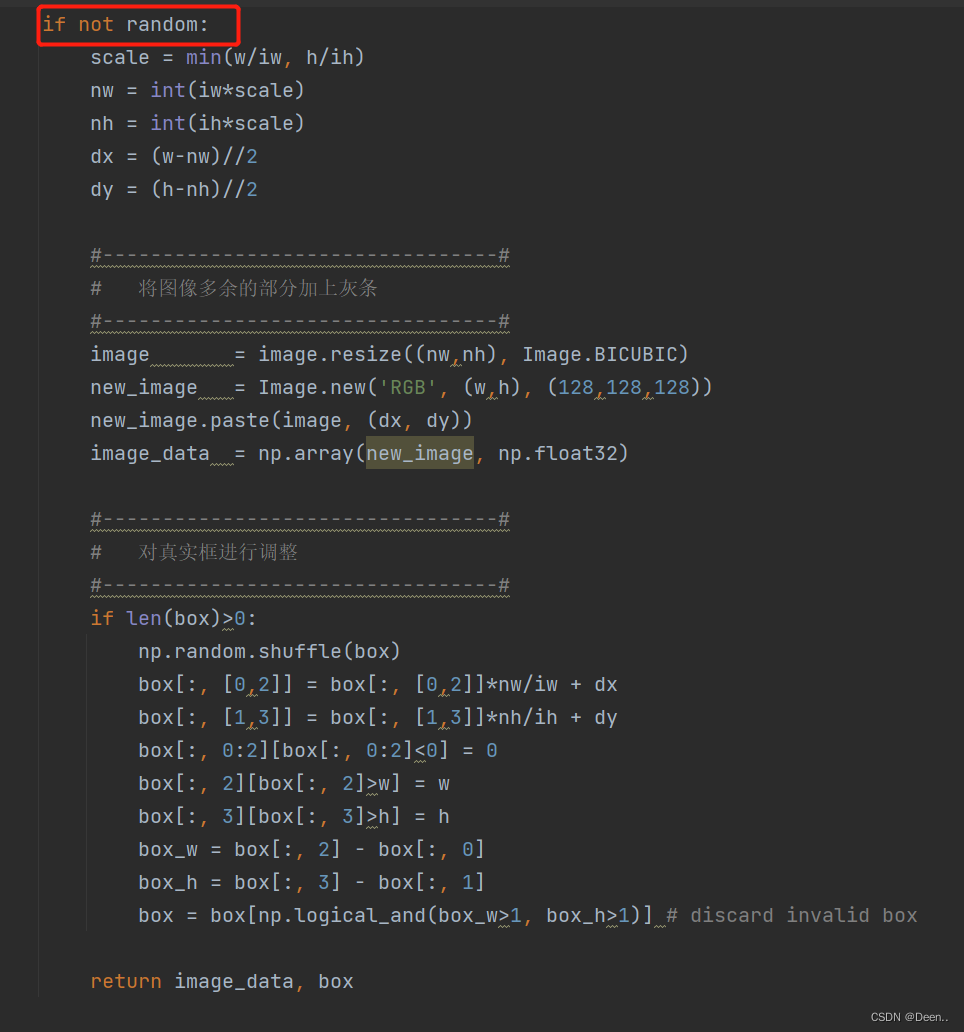
判断是不是训练模式,random=True时,是训练模式,下图是非训练模式,我们留一会再说,先看训练模式下,怎么处理数据。
- 图片预处理
获取完图片后,判断是训练模式还是验证模式,如果是训练模式就对图像先进行预处理
图片缩放
        new_ar = iw/ih * self.rand(1-jitter,1+jitter) / self.rand(1-jitter,1+jitter)
        scale = self.rand(.25, 2)
        if new_ar < 1:
            nh = int(scale*h)
            nw = int(nh*new_ar)
        else:
            nw = int(scale*w)
            nh = int(nw/new_ar)
        image = image.resize((nw,nh), Image.BICUBIC)
将图片多余部分设置成灰条
        dx = int(self.rand(0, w-nw))
        dy = int(self.rand(0, h-nh))
        new_image = Image.new('RGB', (w,h), (128,128,128))
        new_image.paste(image, (dx, dy))
        image = new_image
翻转图片
        flip = self.rand()<.5
        if flip: image = image.transpose(Image.FLIP_LEFT_RIGHT)

        image_data      = np.array(image, np.uint8)
色域变换 这里用的是HSV变换
        r               = np.random.uniform(-1, 1, 3) * [hue, sat, val] + 1
        hue, sat, val   = cv2.split(cv2.cvtColor(image_data, cv2.COLOR_RGB2HSV))
        dtype           = image_data.dtype
                x       = np.arange(0, 256, dtype=r.dtype)
        lut_hue = ((x * r[0]) % 180).astype(dtype)
        lut_sat = np.clip(x * r[1], 0, 255).astype(dtype)
        lut_val = np.clip(x * r[2], 0, 255).astype(dtype)

        image_data = cv2.merge((cv2.LUT(hue, lut_hue), cv2.LUT(sat, lut_sat), cv2.LUT(val, lut_val)))
        image_data = cv2.cvtColor(image_data, cv2.COLOR_HSV2RGB)
以上就完成了对图像的预处理,非训练的验证模式没有图片预处理部分,它只做真实框调整。
- 真实框按比例调整
真实框格式如下图所示,真实框的内容是左上角右下角坐标,将真实框送入模型进行预测,需要将真实框转换为相对锚框的偏移量,然后预测处理的预测框也是相对锚框偏移量的格式来表示。转换成[x,y,w,h]格式,中心坐标为(x,y),w为框的宽度,h为高度。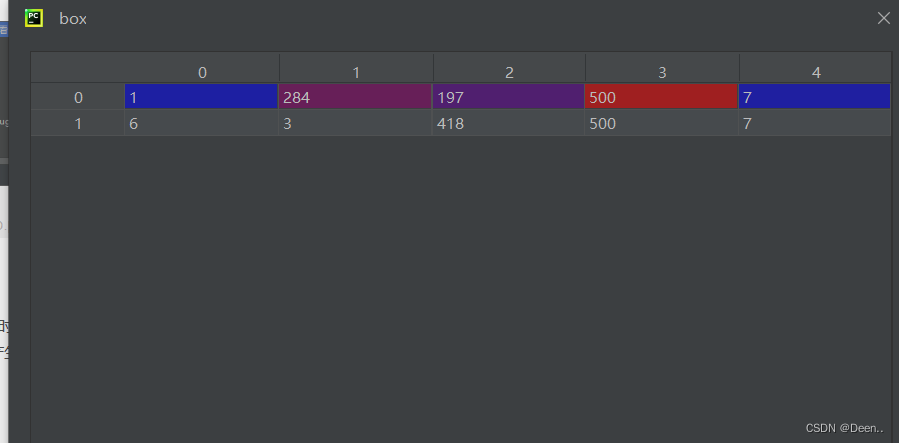
- 因为将图片从原来本身的尺寸压缩到要输入图片的尺寸时,按比例压缩,当真实图片的尺寸跟输入模型图片的尺寸不等比例时,就产生灰边。下列代码将获取图片按输入模型尺寸缩放后的尺寸。
        if len(box)>0:
            np.random.shuffle(box)
            box[:, [0,2]] = box[:, [0,2]]*nw/iw + dx
            box[:, [1,3]] = box[:, [1,3]]*nh/ih + dy
            if flip: box[:, [0,2]] = w - box[:, [2,0]]
            box[:, 0:2][box[:, 0:2]<0] = 0
            box[:, 2][box[:, 2]>w] = w
            box[:, 3][box[:, 3]>h] = h
            box_w = box[:, 2] - box[:, 0]
            box_h = box[:, 3] - box[:, 1]
            box = box[np.logical_and(box_w>1, box_h>1)]

        return image_data, box
调整完后,将图片跟真实框返给image, box 。

如果是验证模式,就不进行图像预处理,直接调整真实框。
将数据转为numpy格式的32位浮点数:
        image       = np.transpose(preprocess_input(np.array(image, dtype=np.float32)), (2, 0, 1))
        box         = np.array(box, dtype=np.float32)
Mosaic
通过self.mosaic、self.mosaic_prob、self.epoch_now、self.special_aug_ratio、self.mixup 、self.mixup_prob来控制是否要对图像进行Mosaic处理,具体为:
self.rand()随机生成一个0-1的数,如果这个数小于self.mosaic_prob的值,也就是百分50的概率打开Mosaci,且在训练的前70%epoch才能打开Mosaci,在同时满足这些的条件下,进行Mosaic训练,Mixup是在Mosiac的基础上,有50%的概率取用。
如代码所示:
        if self.mosaic and self.rand() < self.mosaic_prob and self.epoch_now < self.epoch_length * self.special_aug_ratio:
            lines = sample(self.annotation_lines, 3)
            lines.append(self.annotation_lines[index])
            shuffle(lines)
            image, box  = self.get_random_data_with_Mosaic(lines, self.input_shape)

            if self.mixup and self.rand() < self.mixup_prob:
                lines           = sample(self.annotation_lines, 1)
                image_2, box_2  = self.get_random_data(lines[0], self.input_shape, random = self.train)
                image, box      = self.get_random_data_with_MixUp(image, box, image_2, box_2)
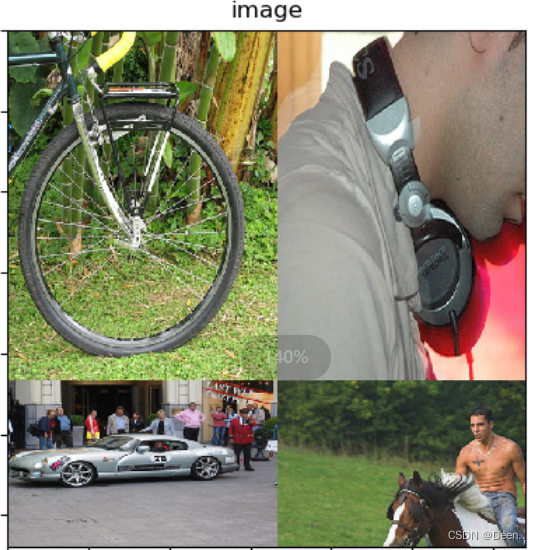
Mosaic具体为,先对数据集进行随机抽样3张图,然后跟要处理的图混在一起打乱。再取一张图片,对其进行以下处理:
- 翻转,翻转的概率为50%
            flip = self.rand()<.5
            if flip and len(box)>0:
                image = image.transpose(Image.FLIP_LEFT_RIGHT)
                box[:, [0,2]] = iw - box[:, [2,0]]
- 对图像进行缩放并且进行长和宽的扭曲,这个缩放的大小的是随机的
            new_ar = iw/ih * self.rand(1-jitter,1+jitter) / self.rand(1-jitter,1+jitter)
            scale = self.rand(.4, 1)
            if new_ar < 1:
                nh = int(scale*h)
                nw = int(nh*new_ar)
            else:
                nw = int(scale*w)
                nh = int(nw/new_ar)
            image = image.resize((nw, nh), Image.BICUBIC)
- 将图片进行放置,分别对应四张分割图片的位置
            if index == 0:
                dx = int(w*min_offset_x) - nw
                dy = int(h*min_offset_y) - nh
            elif index == 1:
                dx = int(w*min_offset_x) - nw
                dy = int(h*min_offset_y)
            elif index == 2:
                dx = int(w*min_offset_x)
                dy = int(h*min_offset_y)
            elif index == 3:
                dx = int(w*min_offset_x)
                dy = int(h*min_offset_y) - nh

            new_image = Image.new('RGB', (w,h), (128,128,128))
            new_image.paste(image, (dx, dy))
            image_data = np.array(new_image)
假设四张图的随机缩放大小都一样,且x,y的偏置都一样,如下图所示,四张图拼成一张,划斜线的部分为最后展示的内容,重叠的部分重叠展示。
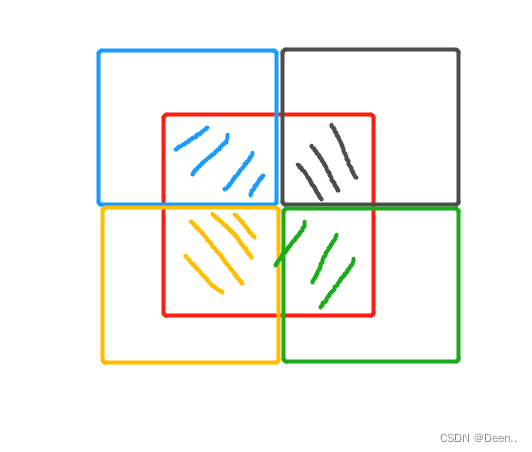
- 图片处理好后,对真实框做处理,具体为按着x,y的偏置,以及图像的缩放比例,将真实框重新调整为合成图片的真实框。如果真实框不在要展示的图里,就丢掉这个真实框。
            if len(box)>0:
                np.random.shuffle(box)
                box[:, [0,2]] = box[:, [0,2]]*nw/iw + dx
                box[:, [1,3]] = box[:, [1,3]]*nh/ih + dy
                box[:, 0:2][box[:, 0:2]<0] = 0
                box[:, 2][box[:, 2]>w] = w
                box[:, 3][box[:, 3]>h] = h
                box_w = box[:, 2] - box[:, 0]
                box_h = box[:, 3] - box[:, 1]
                box = box[np.logical_and(box_w>1, box_h>1)]
                box_data = np.zeros((len(box),5))
                box_data[:len(box)] = box
- 然后将图片分割放在一起
        cutx = int(w * min_offset_x)
        cuty = int(h * min_offset_y)

        new_image = np.zeros([h, w, 3])
        new_image[:cuty, :cutx, :] = image_datas[0][:cuty, :cutx, :]
        new_image[cuty:, :cutx, :] = image_datas[1][cuty:, :cutx, :]
        new_image[cuty:, cutx:, :] = image_datas[2][cuty:, cutx:, :]
        new_image[:cuty, cutx:, :] = image_datas[3][:cuty, cutx:, :]
        new_image       = np.array(new_image, np.uint8)
剩下的内容就是色域转换,然后把真实框调整到合成的图里
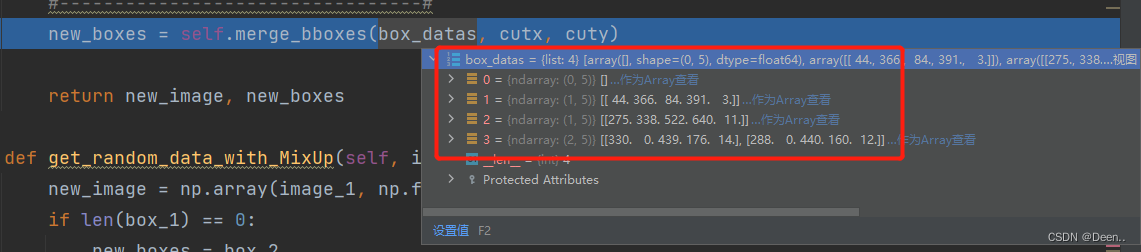
- 调整真实框到合成图中:
4个切割的图片的真实框如图所示,具体操作就是,判断真实框有没有超过其原本图像合成后所在图内的范围,并对其做出相应的调整。
    def merge_bboxes(self, bboxes, cutx, cuty):
        merge_bbox = []
        for i in range(len(bboxes)):
            for box in bboxes[i]:
                tmp_box = []
                x1, y1, x2, y2 = box[0], box[1], box[2], box[3]

                if i == 0:
                    if y1 > cuty or x1 > cutx:
                        continue
                    if y2 >= cuty and y1 <= cuty:
                        y2 = cuty
                    if x2 >= cutx and x1 <= cutx:
                        x2 = cutx

                if i == 1:
                    if y2 < cuty or x1 > cutx:
                        continue
                    if y2 >= cuty and y1 <= cuty:
                        y1 = cuty
                    if x2 >= cutx and x1 <= cutx:
                        x2 = cutx

                if i == 2:
                    if y2 < cuty or x2 < cutx:
                        continue
                    if y2 >= cuty and y1 <= cuty:
                        y1 = cuty
                    if x2 >= cutx and x1 <= cutx:
                        x1 = cutx

                if i == 3:
                    if y1 > cuty or x2 < cutx:
                        continue
                    if y2 >= cuty and y1 <= cuty:
                        y2 = cuty
                    if x2 >= cutx and x1 <= cutx:
                        x1 = cutx
                tmp_box.append(x1)
                tmp_box.append(y1)
                tmp_box.append(x2)
                tmp_box.append(y2)
                tmp_box.append(box[-1])
                merge_bbox.append(tmp_box)
        return merge_bbox
mixup
在做完Mosiac后,有50%的概率决定是否要开启Mixup
if self.mixup and self.rand() < self.mixup_prob:
如果开启,就随机从数据集中再抽一张图片,然后对这张图片进行预处理,处理步骤跟最上面介绍的图像处理方法相同,通过self.get_random_data()函数。
            if self.mixup and self.rand() < self.mixup_prob:
                lines           = sample(self.annotation_lines, 1)
                image_2, box_2  = self.get_random_data(lines[0], self.input_shape, random = self.train)
                image, box      = self.get_random_data_with_MixUp(image, box, image_2, box_2)
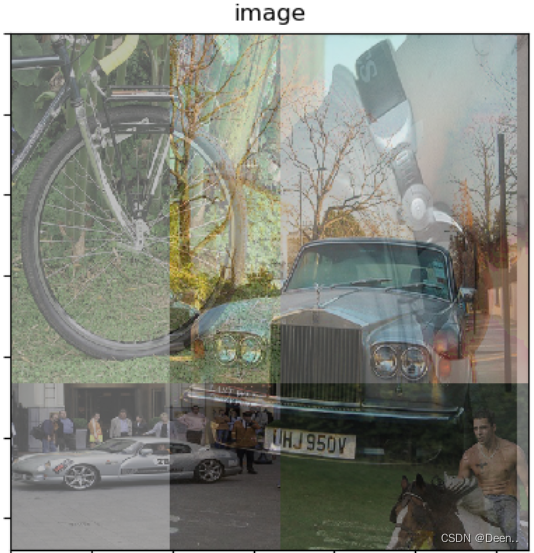
image, box = self.get_random_data_with_MixUp(image, box, image_2, box_2),这个函数将Mosaic处理完的图片,与随机抽取的图片进行Mixup操作。
具体为,将图片各通道灰度值取对半相加,然后将真实框和到一起。
    def get_random_data_with_MixUp(self, image_1, box_1, image_2, box_2):
        new_image = np.array(image_1, np.float32) * 0.5 + np.array(image_2, np.float32) * 0.5
        if len(box_1) == 0:
            new_boxes = box_2
        elif len(box_2) == 0:
            new_boxes = box_1
        else:
            new_boxes = np.concatenate([box_1, box_2], axis=0)
        return new_image, new_boxes
真实框调整
对真实框进行预处理,将真实框归一化,调整到0-1之间
,并且将真实框的格式从[x,y,x,y]调整[x,y,w,h]
        nL          = len(box)
        labels_out  = np.zeros((nL, 6))
        if nL:
            #---------------------------------------------------#
            #   对真实框进行归一化,调整到0-1之间
            #---------------------------------------------------#
            box[:, [0, 2]] = box[:, [0, 2]] / self.input_shape[1]
            box[:, [1, 3]] = box[:, [1, 3]] / self.input_shape[0]
            #---------------------------------------------------#
            #   序号为0、1的部分,为真实框的中心
            #   序号为2、3的部分,为真实框的宽高
            #   序号为4的部分,为真实框的种类
            #---------------------------------------------------#
            box[:, 2:4] = box[:, 2:4] - box[:, 0:2]
            box[:, 0:2] = box[:, 0:2] + box[:, 2:4] / 2
真实框也调整为训练所需的格式[类别,坐标]
            #---------------------------------------------------#
            #   调整顺序,符合训练的格式
            #   labels_out中序号为0的部分在collect时处理
            #---------------------------------------------------#
            labels_out[:, 1] = box[:, -1]
            labels_out[:, 2:] = box[:, :4]
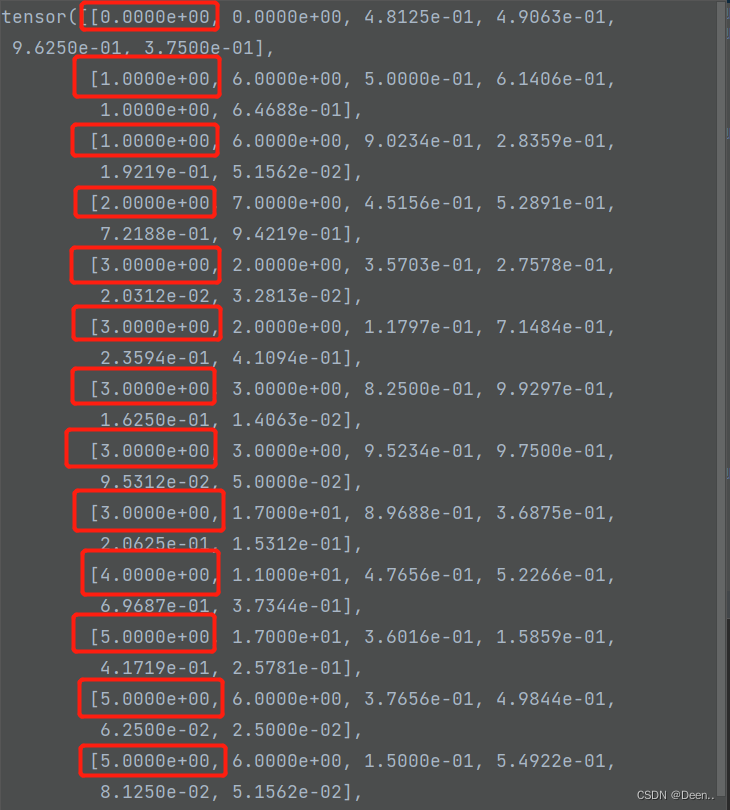
labels_out的第一位用来登记这是这个真实框是这一批图片中的哪张图片的。
def yolo_dataset_collate(batch):
    images  = []
    bboxes  = []
    for i, (img, box) in enumerate(batch):
        images.append(img)
        box[:, 0] = i
        bboxes.append(box)

    images  = torch.from_numpy(np.array(images)).type(torch.FloatTensor)
    bboxes  = torch.from_numpy(np.concatenate(bboxes, 0)).type(torch.FloatTensor)
    return images, bboxes
加载完毕后,将图片跟真是框取出,进行训练。
真实框格式【属于哪张图片,类别,坐标】
    for iteration, batch in enumerate(gen):
        if iteration >= epoch_step:
            break

        images, targets = batch[0], batch[1]
        with torch.no_grad():
            if cuda:
                images  = images.cuda(local_rank)
                targets = targets.cuda(local_rank)
全部代码:
class YoloDataset(Dataset):
    def __init__(self, annotation_lines, input_shape, num_classes, anchors, anchors_mask, epoch_length, \
                        mosaic, mixup, mosaic_prob, mixup_prob, train, special_aug_ratio = 0.7):
        super(YoloDataset, self).__init__()
        self.annotation_lines   = annotation_lines
        self.input_shape        = input_shape
        self.num_classes        = num_classes
        self.anchors            = anchors
        self.anchors_mask       = anchors_mask
        self.epoch_length       = epoch_length
        self.mosaic             = mosaic
        self.mosaic_prob        = mosaic_prob
        self.mixup              = mixup
        self.mixup_prob         = mixup_prob
        self.train              = train
        self.special_aug_ratio  = special_aug_ratio

        self.epoch_now          = -1
        self.length             = len(self.annotation_lines)

        self.bbox_attrs         = 5 + num_classes

    def __len__(self):
        return self.length

    def __getitem__(self, index):
        index       = index % self.length

        #---------------------------------------------------#
        #   训练时进行数据的随机增强
        #   验证时不进行数据的随机增强
        #---------------------------------------------------#
        if self.mosaic and self.rand() < self.mosaic_prob and self.epoch_now < self.epoch_length * self.special_aug_ratio:
            #DataFrame.sample方法主要是用来对DataFrame进行简单随机抽样的
            lines = sample(self.annotation_lines, 3)
            lines.append(self.annotation_lines[index])
            shuffle(lines)
            image, box  = self.get_random_data_with_Mosaic(lines, self.input_shape)

            if self.mixup and self.rand() < self.mixup_prob:
                lines           = sample(self.annotation_lines, 1)
                image_2, box_2  = self.get_random_data(lines[0], self.input_shape, random = self.train)
                image, box      = self.get_random_data_with_MixUp(image, box, image_2, box_2)
        else:
            image, box      = self.get_random_data(self.annotation_lines[index], self.input_shape, random = self.train)

        image       = np.transpose(preprocess_input(np.array(image, dtype=np.float32)), (2, 0, 1))
        box         = np.array(box, dtype=np.float32)

        #---------------------------------------------------#
        #   对真实框进行预处理
        #---------------------------------------------------#
        nL          = len(box)
        labels_out  = np.zeros((nL, 6))
        if nL:
            #---------------------------------------------------#
            #   对真实框进行归一化,调整到0-1之间
            #---------------------------------------------------#
            box[:, [0, 2]] = box[:, [0, 2]] / self.input_shape[1]
            box[:, [1, 3]] = box[:, [1, 3]] / self.input_shape[0]
            #---------------------------------------------------#
            #   序号为0、1的部分,为真实框的中心
            #   序号为2、3的部分,为真实框的宽高
            #   序号为4的部分,为真实框的种类
            #---------------------------------------------------#
            box[:, 2:4] = box[:, 2:4] - box[:, 0:2]
            box[:, 0:2] = box[:, 0:2] + box[:, 2:4] / 2

            #---------------------------------------------------#
            #   调整顺序,符合训练的格式
            #   labels_out中序号为0的部分在collect时处理
            #---------------------------------------------------#
            labels_out[:, 1] = box[:, -1]
            labels_out[:, 2:] = box[:, :4]

        return image, labels_out

    def rand(self, a=0, b=1):
        return np.random.rand()*(b-a) + a

    def get_random_data(self, annotation_line, input_shape, jitter=.3, hue=.1, sat=0.7, val=0.4, random=True):
        line    = annotation_line.split()
        #------------------------------#
        #   读取图像并转换成RGB图像
        #------------------------------#
        image   = Image.open(line[0])
        image   = cvtColor(image)
        #------------------------------#
        #   获得图像的高宽与目标高宽
        #------------------------------#
        iw, ih  = image.size
        h, w    = input_shape
        #------------------------------#
        #   获得预测框
        #------------------------------#
        box     = np.array([np.array(list(map(int,box.split(',')))) for box in line[1:]])

        if not random:
            scale = min(w/iw, h/ih)
            nw = int(iw*scale)
            nh = int(ih*scale)
            dx = (w-nw)//2
            dy = (h-nh)//2

            #---------------------------------#
            #   将图像多余的部分加上灰条
            #---------------------------------#
            image       = image.resize((nw,nh), Image.BICUBIC)
            new_image   = Image.new('RGB', (w,h), (128,128,128))
            new_image.paste(image, (dx, dy))
            image_data  = np.array(new_image, np.float32)

            #---------------------------------#
            #   对真实框进行调整
            #---------------------------------#
            if len(box)>0:
                np.random.shuffle(box)
                box[:, [0,2]] = box[:, [0,2]]*nw/iw + dx
                box[:, [1,3]] = box[:, [1,3]]*nh/ih + dy
                box[:, 0:2][box[:, 0:2]<0] = 0
                box[:, 2][box[:, 2]>w] = w
                box[:, 3][box[:, 3]>h] = h
                box_w = box[:, 2] - box[:, 0]
                box_h = box[:, 3] - box[:, 1]
                box = box[np.logical_and(box_w>1, box_h>1)] # discard invalid box

            return image_data, box

        #------------------------------------------#
        #   对图像进行缩放并且进行长和宽的扭曲
        #------------------------------------------#
        new_ar = iw/ih * self.rand(1-jitter,1+jitter) / self.rand(1-jitter,1+jitter)
        scale = self.rand(.25, 2)
        if new_ar < 1:
            nh = int(scale*h)
            nw = int(nh*new_ar)
        else:
            nw = int(scale*w)
            nh = int(nw/new_ar)
        image = image.resize((nw,nh), Image.BICUBIC)

        #------------------------------------------#
        #   将图像多余的部分加上灰条
        #------------------------------------------#
        dx = int(self.rand(0, w-nw))
        dy = int(self.rand(0, h-nh))
        new_image = Image.new('RGB', (w,h), (128,128,128))
        new_image.paste(image, (dx, dy))
        image = new_image

        #------------------------------------------#
        #   翻转图像
        #------------------------------------------#
        flip = self.rand()<.5
        if flip: image = image.transpose(Image.FLIP_LEFT_RIGHT)

        image_data      = np.array(image, np.uint8)
        #---------------------------------#
        #   对图像进行色域变换
        #   计算色域变换的参数
        #---------------------------------#
        r               = np.random.uniform(-1, 1, 3) * [hue, sat, val] + 1
        #---------------------------------#
        #   将图像转到HSV上
        #---------------------------------#
        hue, sat, val   = cv2.split(cv2.cvtColor(image_data, cv2.COLOR_RGB2HSV))
        dtype           = image_data.dtype
        #---------------------------------#
        #   应用变换
        #---------------------------------#
        x       = np.arange(0, 256, dtype=r.dtype)
        lut_hue = ((x * r[0]) % 180).astype(dtype)
        lut_sat = np.clip(x * r[1], 0, 255).astype(dtype)
        lut_val = np.clip(x * r[2], 0, 255).astype(dtype)

        image_data = cv2.merge((cv2.LUT(hue, lut_hue), cv2.LUT(sat, lut_sat), cv2.LUT(val, lut_val)))
        image_data = cv2.cvtColor(image_data, cv2.COLOR_HSV2RGB)

        #---------------------------------#
        #   对真实框进行调整
        #---------------------------------#
        if len(box)>0:
            np.random.shuffle(box)
            box[:, [0,2]] = box[:, [0,2]]*nw/iw + dx
            box[:, [1,3]] = box[:, [1,3]]*nh/ih + dy
            if flip: box[:, [0,2]] = w - box[:, [2,0]]
            box[:, 0:2][box[:, 0:2]<0] = 0
            box[:, 2][box[:, 2]>w] = w
            box[:, 3][box[:, 3]>h] = h
            box_w = box[:, 2] - box[:, 0]
            box_h = box[:, 3] - box[:, 1]
            box = box[np.logical_and(box_w>1, box_h>1)]

        return image_data, box

    def merge_bboxes(self, bboxes, cutx, cuty):
        merge_bbox = []
        for i in range(len(bboxes)):
            for box in bboxes[i]:
                tmp_box = []
                x1, y1, x2, y2 = box[0], box[1], box[2], box[3]

                if i == 0:
                    if y1 > cuty or x1 > cutx:
                        continue
                    if y2 >= cuty and y1 <= cuty:
                        y2 = cuty
                    if x2 >= cutx and x1 <= cutx:
                        x2 = cutx

                if i == 1:
                    if y2 < cuty or x1 > cutx:
                        continue
                    if y2 >= cuty and y1 <= cuty:
                        y1 = cuty
                    if x2 >= cutx and x1 <= cutx:
                        x2 = cutx

                if i == 2:
                    if y2 < cuty or x2 < cutx:
                        continue
                    if y2 >= cuty and y1 <= cuty:
                        y1 = cuty
                    if x2 >= cutx and x1 <= cutx:
                        x1 = cutx

                if i == 3:
                    if y1 > cuty or x2 < cutx:
                        continue
                    if y2 >= cuty and y1 <= cuty:
                        y2 = cuty
                    if x2 >= cutx and x1 <= cutx:
                        x1 = cutx
                tmp_box.append(x1)
                tmp_box.append(y1)
                tmp_box.append(x2)
                tmp_box.append(y2)
                tmp_box.append(box[-1])
                merge_bbox.append(tmp_box)
        return merge_bbox

    def get_random_data_with_Mosaic(self, annotation_line, input_shape, jitter=0.3, hue=.1, sat=0.7, val=0.4):
        h, w = input_shape
        min_offset_x = self.rand(0.3, 0.7)
        min_offset_y = self.rand(0.3, 0.7)

        image_datas = []
        box_datas   = []
        index       = 0
        for line in annotation_line:
            #---------------------------------#
            #   每一行进行分割
            #---------------------------------#
            line_content = line.split()
            #---------------------------------#
            #   打开图片
            #---------------------------------#
            image = Image.open(line_content[0])
            image = cvtColor(image)

            #---------------------------------#
            #   图片的大小
            #---------------------------------#
            iw, ih = image.size
            #---------------------------------#
            #   保存框的位置
            #---------------------------------#
            box = np.array([np.array(list(map(int,box.split(',')))) for box in line_content[1:]])

            #---------------------------------#
            #   是否翻转图片
            #---------------------------------#
            flip = self.rand()<.5
            if flip and len(box)>0:
                image = image.transpose(Image.FLIP_LEFT_RIGHT)
                box[:, [0,2]] = iw - box[:, [2,0]]

            #------------------------------------------#
            #   对图像进行缩放并且进行长和宽的扭曲
            #------------------------------------------#
            new_ar = iw/ih * self.rand(1-jitter,1+jitter) / self.rand(1-jitter,1+jitter)
            scale = self.rand(.4, 1)
            if new_ar < 1:
                nh = int(scale*h)
                nw = int(nh*new_ar)
            else:
                nw = int(scale*w)
                nh = int(nw/new_ar)
            image = image.resize((nw, nh), Image.BICUBIC)

            #-----------------------------------------------#
            #   将图片进行放置,分别对应四张分割图片的位置
            #-----------------------------------------------#
            if index == 0:
                dx = int(w*min_offset_x) - nw
                dy = int(h*min_offset_y) - nh
            elif index == 1:
                dx = int(w*min_offset_x) - nw
                dy = int(h*min_offset_y)
            elif index == 2:
                dx = int(w*min_offset_x)
                dy = int(h*min_offset_y)
            elif index == 3:
                dx = int(w*min_offset_x)
                dy = int(h*min_offset_y) - nh

            new_image = Image.new('RGB', (w,h), (128,128,128))
            new_image.paste(image, (dx, dy))
            image_data = np.array(new_image)

            index = index + 1
            box_data = []
            #---------------------------------#
            #   对box进行重新处理
            #---------------------------------#
            if len(box)>0:
                np.random.shuffle(box)
                box[:, [0,2]] = box[:, [0,2]]*nw/iw + dx
                box[:, [1,3]] = box[:, [1,3]]*nh/ih + dy
                box[:, 0:2][box[:, 0:2]<0] = 0
                box[:, 2][box[:, 2]>w] = w
                box[:, 3][box[:, 3]>h] = h
                box_w = box[:, 2] - box[:, 0]
                box_h = box[:, 3] - box[:, 1]
                box = box[np.logical_and(box_w>1, box_h>1)]
                box_data = np.zeros((len(box),5))
                box_data[:len(box)] = box

            image_datas.append(image_data)
            box_datas.append(box_data)

        #---------------------------------#
        #   将图片分割,放在一起
        #---------------------------------#
        cutx = int(w * min_offset_x)
        cuty = int(h * min_offset_y)

        new_image = np.zeros([h, w, 3])
        new_image[:cuty, :cutx, :] = image_datas[0][:cuty, :cutx, :]
        new_image[cuty:, :cutx, :] = image_datas[1][cuty:, :cutx, :]
        new_image[cuty:, cutx:, :] = image_datas[2][cuty:, cutx:, :]
        new_image[:cuty, cutx:, :] = image_datas[3][:cuty, cutx:, :]

        new_image       = np.array(new_image, np.uint8)


        #看mosiac的图片
        # plt.figure("Image")  # 图像窗口名称
        # plt.imshow(new_image)
        # plt.axis('on')  # 关掉坐标轴为 off
        # plt.title('image')  # 图像题目
        # plt.savefig(r'C:\Users\Administrator\Desktop\a.png')
        # plt.close()

        #---------------------------------#
        #   对图像进行色域变换
        #   计算色域变换的参数
        #---------------------------------#
        r               = np.random.uniform(-1, 1, 3) * [hue, sat, val] + 1
        #---------------------------------#
        #   将图像转到HSV上
        #---------------------------------#
        hue, sat, val   = cv2.split(cv2.cvtColor(new_image, cv2.COLOR_RGB2HSV))
        dtype           = new_image.dtype
        #---------------------------------#
        #   应用变换
        #---------------------------------#
        x       = np.arange(0, 256, dtype=r.dtype)
        lut_hue = ((x * r[0]) % 180).astype(dtype)
        lut_sat = np.clip(x * r[1], 0, 255).astype(dtype)
        lut_val = np.clip(x * r[2], 0, 255).astype(dtype)

        new_image = cv2.merge((cv2.LUT(hue, lut_hue), cv2.LUT(sat, lut_sat), cv2.LUT(val, lut_val)))
        new_image = cv2.cvtColor(new_image, cv2.COLOR_HSV2RGB)

        #---------------------------------#
        #   对框进行进一步的处理
        #---------------------------------#
        new_boxes = self.merge_bboxes(box_datas, cutx, cuty)

        return new_image, new_boxes

    def get_random_data_with_MixUp(self, image_1, box_1, image_2, box_2):
        new_image = np.array(image_1, np.float32) * 0.5 + np.array(image_2, np.float32) * 0.5
        if len(box_1) == 0:
            new_boxes = box_2
        elif len(box_2) == 0:
            new_boxes = box_1
        else:
            new_boxes = np.concatenate([box_1, box_2], axis=0)

        #  看图片
        # plt.figure("Image")  # 图像窗口名称
        # plt.imshow(new_image.astype('uint8'))
        # plt.axis('on')  # 关掉坐标轴为 off
        # plt.title('image')  # 图像题目
        # plt.savefig(r'C:\Users\Administrator\Desktop\b.png')
        # plt.close()

        return new_image, new_boxes


# DataLoader中collate_fn使用
def yolo_dataset_collate(batch):
    images  = []
    bboxes  = []
    for i, (img, box) in enumerate(batch):
        images.append(img)
        box[:, 0] = i
        bboxes.append(box)

    images  = torch.from_numpy(np.array(images)).type(torch.FloatTensor)
    bboxes  = torch.from_numpy(np.concatenate(bboxes, 0)).type(torch.FloatTensor)
    return images, bboxes