处理函数

在DataStream的更底层,我们可以不定义任何具体的算子(如map(),filter()等)二只提炼出一个统一的“处理”(process)操作 。它是所有转换算子的概括性的表达。可以自定义处理逻辑。
所以这一层接口就被叫做“处理函数”(process function)
一、基本处理函数
处理函数主要定义数据流的转换操作,它所对应的函数类叫做ProcessFunction。
1.1 处理函数的功能和使用
——抽象方法processElement():用于处理元素
i:input value,当前输入的数据
context:上下文
collector:收集器,返回输出的值
——非抽象方法onTimer():用于定义定时触发的操作
对于flink而言,只有按键分区流keyedStream才支持定时器的使用。
timestamp:时间戳
context:上下文
collector:收集器
stream.process(new ProcessFunction[Event,String] {
      override def onTimer(timestamp: Long,
                           ctx: ProcessFunction[Event, String]#OnTimerContext,
                           out: Collector[String]): Unit =
           super.onTimer(timestamp, ctx, out)


      override def processElement(i: Event,
                                  context: ProcessFunction[Event, String]#Context,
                                  collector: Collector[String]): Unit = {}
    })
实例演示:
定义一个简易定时器,监控实时温度的变化。当温度开始下降,触发一个10s的定时器。 当温度回升的时候,定时器取消。
package org.example.cp1.apitest

import org.apache.flink.api.common.state.{ValueState, ValueStateDescriptor}
import org.apache.flink.streaming.api.functions.KeyedProcessFunction
import org.apache.flink.streaming.api.scala.{DataStream, StreamExecutionEnvironment}
import org.apache.flink.util.Collector
import org.example.cp1.source.SourceTest.SensorReading

object ProcessFunctionTest {
  def main(args: Array[String]): Unit = {
    val env: StreamExecutionEnvironment = StreamExecutionEnvironment.getExecutionEnvironment
    env.setParallelism(1)
    env.getConfig.setAutoWatermarkInterval(500)
    val inputStream = env.socketTextStream("192.168.136.20",7777)

    val dataStream: DataStream[SensorReading] = inputStream.map(data => {
      val arr: Array[String] = data.split(",")
      SensorReading(arr(0).trim, arr(1).trim.toLong, arr(2).trim.toDouble)
    })
    // 当温度开始下降,注册报警时间 10秒后报警
    val warningStream: DataStream[String] = dataStream.keyBy(_.id).process(new TempIncWarning(10L))
    warningStream.print()
    env.execute("key process function")
  }

}

class TempIncWarning(num: Long) extends KeyedProcessFunction[String, SensorReading, String]{
  // 定时器
  lazy val timerTsState: ValueState[Long] = getRuntimeContext.getState(new ValueStateDescriptor[Long]("timer-ts", classOf[Long]))
  // 温度监控器
  lazy val lastTempState: ValueState[Double] = getRuntimeContext.getState(new ValueStateDescriptor[Double]("last_temp",classOf[Double]))
  lazy val firstTagState: ValueState[Boolean] = getRuntimeContext.getState(new ValueStateDescriptor[Boolean]("firstTag",classOf[Boolean]))

  override def processElement(value: SensorReading,
                              context: KeyedProcessFunction[String, SensorReading, String]#Context,
                              collector: Collector[String]): Unit = {

    val lastTemp: Double = lastTempState.value()
    val timerTS: Long = timerTsState.value()
    val tag: Boolean = firstTagState.value()

    // 更新最新的事件的温度
    lastTempState.update(value.temperature)
    // 第一次tag为默认值false,修改状态值为true。以后一直为true,表示不是第一次
    if(!tag){
      firstTagState.update(true)
    }else {
      if(value.temperature < lastTemp && timerTS==0){ // 当前温度小于上一次的值 && 当前没有定时器
        val currentTime: Long = context.timerService().currentProcessingTime()
        val ts = currentTime + num*1000 // 处理时间
        timerTsState.update(ts)

        context.timerService().registerProcessingTimeTimer(ts)
      }else if(value.temperature>=lastTemp){  // 温度开始回升
        context.timerService().deleteProcessingTimeTimer(timerTS)
        timerTsState.clear()
      }
    }
  }

  override def onTimer(timestamp: Long,
                       ctx: KeyedProcessFunction[String, SensorReading, String]#OnTimerContext,
                       out: Collector[String]): Unit ={
    out.collect("传感器"+ctx.getCurrentKey+"的温度连续"+num+"秒下降,请注意")
    timerTsState.clear()
  }
}
1.2 处理函数的分类
(1)ProcessFunction
最基本的处理函数,基于DataStream直接调用process()时作为参数传入。
(2)KeyedProcessFunction
对流按键分区后的处理函数,基于KeyedStream调用process()时作为参数传入。要想使用定时器,比如基于KeyedStream
(3)ProcessWindowFunction
开窗之后的处理函数。基于WindowedStream调用process()时作为参数传入。
(4)ProcessAllWindowFunction
开窗之后的处理函数。基于AllWindowedStream调用process()时作为参数传入。
(5)CoProcessFunction
合并connect两条流之后的处理函数,基于ConnectedStreams调用process()时作为参数传入。
(6)ProcessJoinFunction
间隔联结interval join两条流之后的处理函数,基于IntervalJoined调用process()时作为参数传入。
(7)BroadcastProcessFunction
广播连接流处理函数,基于BroadcasConnectedStream调用process()时作为参数传入。
(8)KeyedBroadcastProcessFunction
按键分区的广播连接流处理函数。
二、按键分区处理函数 KeyedProcessFunction
2.1 定时器Timer和定时服务TimerService
注册处理时间的定时器 registerProcessingTimeTimer
object ProcessingTimeTimerTest {
def main(args: Array[String]): Unit = {
val env = StreamExecutionEnvironment.getExecutionEnvironment
env.setParallelism(1)
val stream = env.addSource(new ClickSource)
.assignAscendingTimestamps(_.timestamp)
stream.keyBy(data=>true)
.process(new KeyedProcessFunction[Boolean, Event, String] {
override def processElement(i: Event, context: KeyedProcessFunction[Boolean, Event, String]#Context, collector: Collector[String]): Unit = {
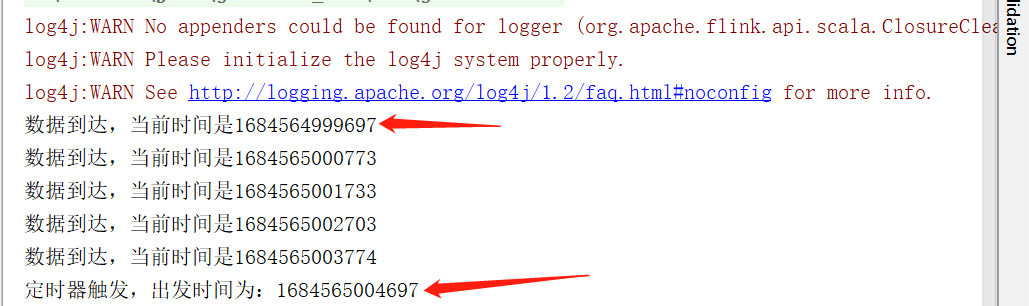
val currentTime = context.timerService().currentProcessingTime()
collector.collect("数据到达,当前时间是"+currentTime)
// 注册一个5秒之后的定时器
context.timerService().registerProcessingTimeTimer(currentTime+5*1000)
}
// 定义定时器出发时的执行逻辑
override def onTimer(timestamp: Long, ctx: KeyedProcessFunction[Boolean, Event, String]#OnTimerContext, out: Collector[String]): Unit =
out.collect("定时器触发,触发时间为:"+timestamp)
}).print()
env.execute()
}
}
事件时间的定时器 registerEventTimeTimer
object EventTimeTimerTest {
def main(args: Array[String]): Unit = {
val env = StreamExecutionEnvironment.getExecutionEnvironment
env.setParallelism(1)
val stream = env.addSource(new ClickSource)
.assignAscendingTimestamps(_.timestamp)
stream.keyBy(data=>true)
.process(new KeyedProcessFunction[Boolean, Event, String] {
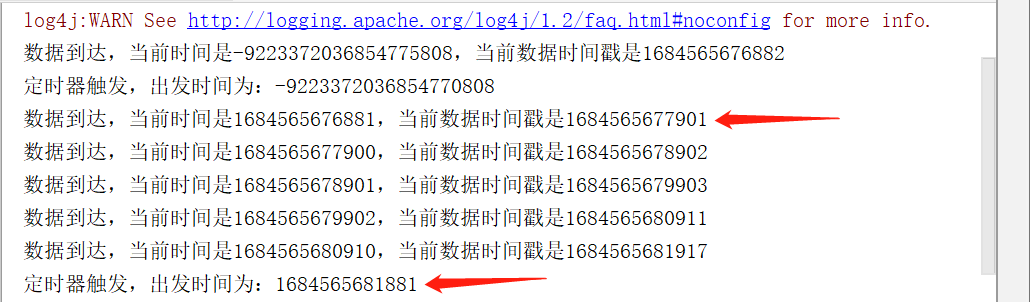
override def processElement(i: Event, context: KeyedProcessFunction[Boolean, Event, String]#Context, collector: Collector[String]): Unit = {
val currentTime = context.timerService().currentWatermark()
collector.collect("数据到达,当前时间是"+currentTime+",当前数据时间戳是"+i.timestamp)
// 注册一个5秒之后的定时器
context.timerService().registerEventTimeTimer(currentTime+5*1000)
}
// 定义定时器出发时的执行逻辑
override def onTimer(timestamp: Long, ctx: KeyedProcessFunction[Boolean, Event, String]#OnTimerContext, out: Collector[String]): Unit =
out.collect("定时器触发,出发时间为:"+timestamp)
}).print()
env.execute()
}
}
四、应用案例 Top N
对于一些比较复杂的需求,增量聚合函数无法满足,我们可以考虑窗口处理函数。比如统计一段时间内的热门url:需要统计最近10秒内最热门的两个url联结,并且每5秒更新一次。
我们可以用一个滑动窗口来实现,而“热门度”一般可以直接用访问量来表示。于是需要开滑动窗口收集url的访问数据,按照不同的url进行统计,汇总排序后最终输出前两名。这就是“Top N”问题。
4.1 使用ProcessAllWindowFunction
package org.example.cp7
import org.apache.flink.streaming.api.scala._
import org.apache.flink.streaming.api.scala.StreamExecutionEnvironment
import org.apache.flink.streaming.api.scala.function.ProcessAllWindowFunction
import org.apache.flink.streaming.api.windowing.assigners.SlidingEventTimeWindows
import org.apache.flink.streaming.api.windowing.time.Time
import org.apache.flink.streaming.api.windowing.windows.TimeWindow
import org.apache.flink.util.Collector
import org.example.ClickSource
import scala.collection.mutable
object TopNProcessAllWindowExam {
def main(args: Array[String]): Unit = {
val env = StreamExecutionEnvironment.getExecutionEnvironment
env.setParallelism(1)
val stream = env.addSource(new ClickSource)
.assignAscendingTimestamps(_.timestamp)
// 直接开窗统计
stream.map(_.url)
.windowAll(SlidingEventTimeWindows.of(Time.seconds(10),Time.seconds(5)))
.process(new ProcessAllWindowFunction[String, String, TimeWindow] {
override def process(context: Context, elements: Iterable[String], out: Collector[String]): Unit = {
// 1. 统计每个url的访问次数
// 初始化一个map,以url作为key,以count作为value
val urlCountMap = mutable.Map[String, Long]()
for (elem <- elements) {
urlCountMap.get(elem) match {
case Some(count) => urlCountMap.put(elem, count+1)
case None => urlCountMap.put(elem, 1L)
}
}
// 2. 对数据进行排序提取
val urlCountList = urlCountMap.toList.sortBy(-_._2).take(2)
// 3. 包装信息,打印输出
val result = new StringBuilder()
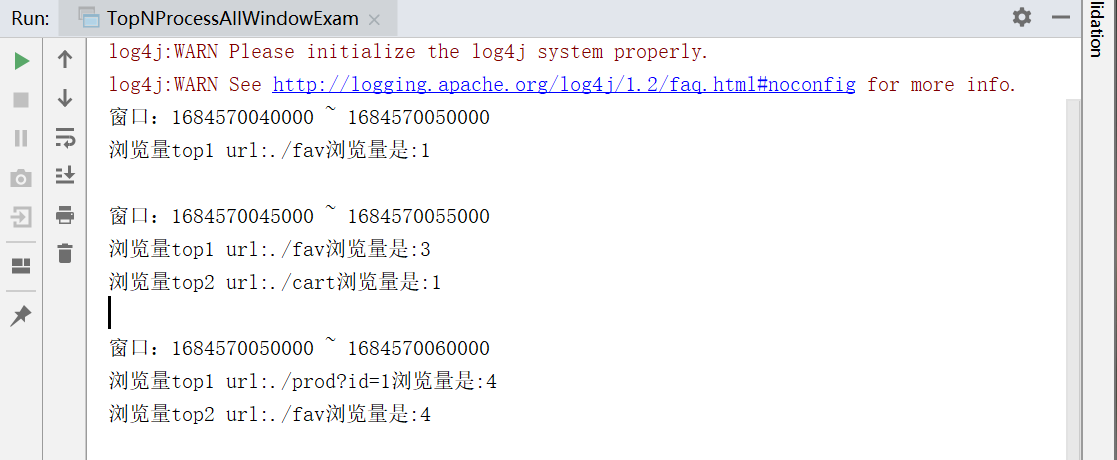
result.append(s"窗口:${context.window.getStart} ~ ${context.window.getEnd}\n")
for (i <- urlCountList.indices){
val tuple = urlCountList(i)
result.append(s"浏览量top${i+1} ")
.append(s"url:${tuple._1}")
.append(s"浏览量是:${tuple._2}\n")
}
out.collect(result.toString())
}
}).print()
env.execute()
}
}
4.2 使用 KeyedProcessFunction
使用AllWindowedStream处理相当于将并行度强行设置为1,这种做法并不推荐。我们可以利用增量聚合的特性,每来一条数据就更新一次对应url的浏览量,到窗口触发计算时只需要做排序输出就可以了。
基于这种想法,我们可以对数据进行增量聚合,得到结果最后再做排序输出。
具体实现:我们可以分为两步:先对每个url链接统计出浏览量,然后再将统计结果收集起来,排序输出最终结果。而为了同一窗口的所有url统计结果收集齐,我们需要设置一个延迟出发的事件时间定时器来进行等待。我们只需要基于窗口结束时间设置1ms的延迟,就可以保证所有数据都已到齐了。而再等待过程中,之前已经到达的数据应该缓存起来,我们可以通过自定义的“列表状态”(ListState)来进行存储。

import org.apache.flink.api.common.functions.AggregateFunction
import org.apache.flink.api.common.state.{ListState, ListStateDescriptor}
import org.apache.flink.streaming.api.functions.KeyedProcessFunction
import org.apache.flink.streaming.api.scala._
import org.apache.flink.streaming.api.scala.function.ProcessWindowFunction
import org.apache.flink.streaming.api.windowing.assigners.SlidingEventTimeWindows
import org.apache.flink.streaming.api.windowing.time.Time
import org.apache.flink.streaming.api.windowing.windows.TimeWindow
import org.apache.flink.util.Collector
import java.sql.Timestamp
import com.atguigu.chapter05.{ClickSource, Event}
import org.apache.flink.configuration.Configuration

object KeyedProcessTopNExample {
  def main(args: Array[String]): Unit = {
    val env = StreamExecutionEnvironment.getExecutionEnvironment
    env.setParallelism(1)

    val eventStream = env
      .addSource(new ClickSource)
      .assignAscendingTimestamps(_.timestamp)

    // 1. 结合使用增量聚合函数和全窗口函数,统计每个url的访问频次
    val urlCountStream = eventStream
      .keyBy(_.url)
      .window(SlidingEventTimeWindows.of(Time.seconds(10), Time.seconds(5)))
      .aggregate(new UrlViewCountAgg, new UrlViewCountResult)

    // 2. 按照窗口信息进行分组提起,排序输出
    val result = urlCountStream
      .keyBy(_.windowEnd)
      .process(new TopN(2))
    result.print()

    env.execute()
  }

  // 实现自定义keyedProcessFunction
  class TopN(n: Int) extends KeyedProcessFunction[Long, UrlViewCount, String] {
    // 声明列表状态
    var urlViewCountListState: ListState[UrlViewCount] = _

    override def open(parameters: Configuration): Unit = {
      urlViewCountListState = getRuntimeContext.getListState(
        new ListStateDescriptor[UrlViewCount]("list-state", classOf[UrlViewCount]))
    }

    override def processElement(i: UrlViewCount, context: KeyedProcessFunction[Long, UrlViewCount, String]#Context, collector:Collector[String]): Unit = {
      // 每来一条数据就添加到列表状态变量中
      urlViewCountListState.add(i)
      // 注册一个定时器,由于来的数据的 windowEnd 是相同的,所以只会注册一个定时器
      context.timerService.registerEventTimeTimer(i.windowEnd + 1)
    }

    override def onTimer(timestamp: Long, ctx: KeyedProcessFunction[Long, UrlViewCount, String]#OnTimerContext, out: Collector[String]): Unit = {
     // 导入隐式类型转换
     import scala.collection.JavaConversions._
     // 下面的代码将列表状态变量里的元素取出,然后放入 List 中,方便排序
     val urlViewCountList = urlViewCountListState.get().toList
    // 由于数据已经放入 List 中,所以可以将状态变量手动清空了
    urlViewCountListState.clear()
    // 按照浏览次数降序排列
    urlViewCountList.sortBy(-_.count)
    // 拼接要输出的字符串
    val result = new StringBuilder
    result.append("=========================\n")
    for (i <- 0 until n) {
      val urlViewCount = urlViewCountList(i)
      result
       .append("浏览量 No." + (i + 1) + " ")
       .append("url: " + urlViewCount.url + " ")
       .append("浏览量:" + urlViewCount.count + " ")
       .append("窗口结束时间:" + new Timestamp(timestamp - 1L) + "\n")
    }

    result.append("=========================\n")
    out.collect(result.toString())
    }
  }

  class UrlViewCountAgg extends AggregateFunction[Event, Long, Long] {
    override def createAccumulator(): Long = 0L
    override def add(value: Event, accumulator: Long): Long = accumulator + 1L
    override def getResult(accumulator: Long): Long = accumulator
    override def merge(a: Long, b: Long): Long = ???
  }

  class UrlViewCountResult extends ProcessWindowFunction[Long, UrlViewCount, String, TimeWindow] {
    override def process(key: String, context: Context, elements: Iterable[Long],
out: Collector[UrlViewCount]): Unit = {
      // 迭代器中只有一条元素,就是增量聚合函数发送过来的聚合结果
      out.collect(UrlViewCount(key, elements.iterator.next(), context.window.getStart, context.window.getEnd
      ))
    }
  }

 case class UrlViewCount(url: String, count: Long, windowStart: Long, windowEnd: Long)
}
多流转换
无论是简单的转换聚合,还是基于窗口的 计算,我们都是针对一条流上的数据进行的处理。在实际应用中,可能需要将不同来源的数据连接合并在一起处理,也有可能需要将一条流拆分开。如果进行划分,多流转换可以分为“分流”和“合流”两大类。分流一般通过侧输出流(side output)来实现,而合流的算子比较丰富,根据不同的需求可以调用union()、connect()、join()和coGroup()等接口进行连接合并操作。
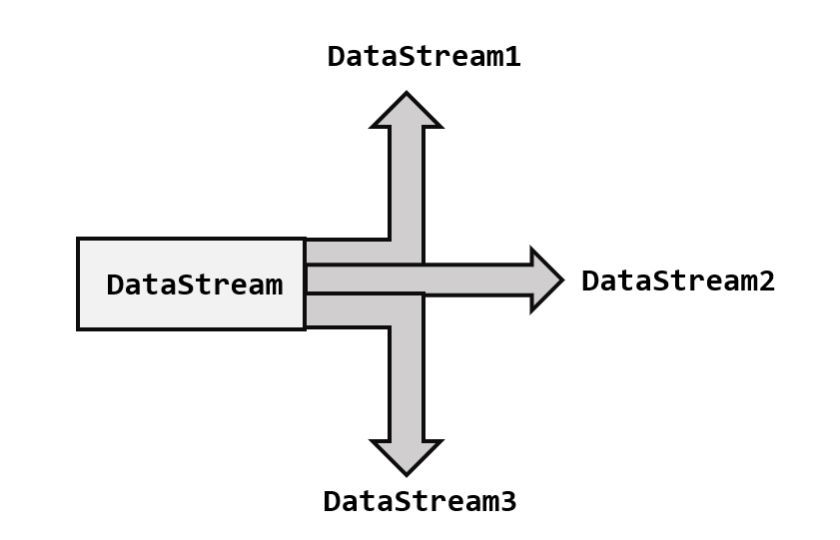
一、分流
所谓分流,就是将一条数据流拆分成完全独立的多条流。即基于一个DataStream,得到完全平等的多个子DataStream。一般会定义一些筛选条件,将符合条件的数据筛选出来放到对应的流中。如下图所示。
1.1 简单实现
针对同一条流多次独立调用filter()方法进行筛选,就可以得到拆分之后的流了。
将电商网络收集到的用户行为进行拆分,根据类型type的不同,分为“mary”的浏览数据、“bob”的浏览数据等。
def main(args: Array[String]): Unit = {
    val env = StreamExecutionEnvironment.getExecutionEnvironment
    env.setParallelism(1)
    val stream = env.addSource(new ClickSource)

    val maryStream = stream.filter(_.user == "Mary")
    val bobStream = stream.filter(_.user == "Bob")
    val elseStream = stream.filter(r => !(r.user == "Mary") && !(r.user == "Bob"))

    maryStream.print("Mary pv")
    bobStream.print("Bob pv")
    elseStream.print("else pv")

    env.execute()
 }
}
1.2 使用侧输出流
侧输出流定义:
侧输出流中放置的是不符合主要数据流处理逻辑的数据。具体而言,侧输出流中包含的是通过侧输出标签(
OutputTag)指定的类型的数据。在 Flink 中,当延迟数据无法按照正常流程处理时(例如,事件时间晚于当前水位线),这些数据会被发送到侧输出流中。因此,侧输出流中的数据通常是延迟的、迟到的或无法正常处理的数据。
通过使用侧输出流,可以将这些特殊数据从主数据流中分离出来,并进行专门的处理。开发人员可以根据自己的需求定义不同的侧输出标签,并使用相应的类型来指定侧输出流中的数据类型。
我们可以直接用处理函数(process function)的侧输出流(side output)。只需要调用上下文context的output()方法,就可以输出任意类型的数据了。而侧输出流的标记和提取,都需要“输出标签”(OutputTag),就相当于split()分流时的“戳”,指定侧输出流的 id和类型 。
分流代码可以改写如下:
def main(args: Array[String]): Unit = {
    val env = StreamExecutionEnvironment.getExecutionEnvironment
    env.setParallelism(1)
    val stream = env.addSource(new ClickSource)

    val tempStream: DataStream[Event] = stream.process(new MySplitProcess)
    tmepStream.print()
    val stream1: DataStream[Event] = stream.getSideOutput(new OutputTag[(String,String,Long)]("MaryTag"))
    stream1.print("mary tag")
    val stream2: DataStream[Event] = stream.getSideOutput(new OutputTag[(String,String,Long)]("BobTag"))
    stream2.print("bob tag")

    env.execute()
 }
}


// 将不同的数据发送到不同的侧输出流
class MySplitProcess extends ProcessFunction[Event, Event]{
    override def processElement(
                               value: Event,
                               context: ProcessFunction[Event, Event]#Context,
                               collector: Collector[Event]): Unit = {
        // 分流操作
        if (value.user=="Mary"){
            context.output(
                new OutputTag[(String,String,Long)]("MaryTag"),
                (value.user, value.url, value.timestamp))
        }else if(value.user=="Bob"){
            new OutputTag[(String,String,Long)]("BobTag"),
                (value.user, value.url, value.timestamp))
        }else{
            collector.collect(value)
    }
  }

}
二、基本合流操作
既然一条流可以分开,那么多条流也就可以合并。
2.1 联合 Union
只要基于DataStream直接调用union()方法,传入其他DataStream作为参数,就可以实现流的联合了。
val unionStream: DataStream[(String, Long, Double)] = stream1.union(stream2)
unionStream.print("union")
2.2 连接 Connect
union流的联合只能用于相同的数据类型。如果stream1和stream2的类型不统一,那么使用union合流会报错。除了union,我们还有更方便的合流操作——连接connect。
1. 连接流 ConnedtedStreams
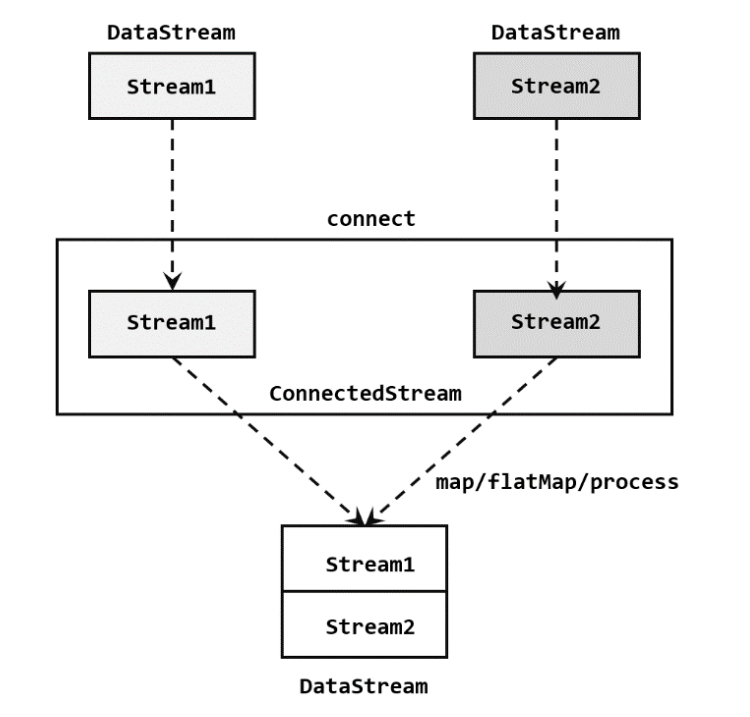
在代码是实现上,需要分为两步:
1、基于一条DataStream调用connect()方法,传入另一条DataStream作为参数,将两条六连接起来,得到一个ConnectedStreams
2、调用同处理方法得到DataStream。如map()、flatMap()、process()
// 第一步:stream1.connect(stream2),得到ConnectedStreams
val connectedStream: ConnectedStreams[SensorReading, (String, Long, Double)] =
    tempStream.connect(stream1)

// 第二步:同处理方法
-- map方法1:
val connectedMapStream = connectedStream.map(
  // 处理第一条流的事件
  data1 => {
    (data1.id, data1.timestamp, data1.temperature)
  },
  // 处理第一条流的事件
  data2 => {
    (data2._1, data2._2, data2._3)
  }
)

-- map方法2:进行类型转换
val connectedStream01: DataStream[(String, Double)] = connectedStream.map(
  data1 => (data1.id, data1.temperature),
  data2 => (data2._1, data2._3)
)

-- new CoMapFunction类型转换
val connectedMapStream2 = connectedStream.map(new CoMapFunction[SensorReading, (String, Long, Double), (String, Long, Double)] {
  override def map1(in1: SensorReading): (String, Long, Double) = {
    (in1.id, in1.timestamp, in1.temperature)
  }
  override def map2(in2: (String, Long, Double)): (String, Long, Double) = {
    (in2._1, in2._2, in2._3)
  }
})
connect()与union()相比,最大的优势就是可以处理不同类型的流的合并。但是合并流的数量只能是2,union()则可以同时进行多条流的合并。
2. 协同处理函数 CoProcessFunction
与CoMapFunction()类似,当我们调用process()时,传入的是一个CoProcessFunction,也是一种“处理函数”,数据到来时,也会根据来源的流调用其中的一个方法进行处理。
如:实现一个实时对账的需求。要求app的支付操作和第三方的支付操作的双流join。app的支付事件和第三方的支付时间互相等5s,如果等不来对应的支付事件,那么输出报警信息。
object BillCheckExample {
  def main(args: Array[String]): Unit = {
    val env = StreamExecutionEnvironment.getExecutionEnvironment
    env.setParallelism(1)

    // 1. 来自app的支付日志(order-id, statue, timestamp)
    val appStream = env.fromElements(
      ("order-1","app",1000L),
      ("order-2","app",2000L)
    ).assignAscendingTimestamps(_._3)

    // 2. 来自第三方支付平台的支付日志(order-id, statue, platform-id, timestamp)
    val thirdPartyStream = env.fromElements(
      ("order-1","third-party","wechat",3000L),
      ("order-3","third-party","wechat",4000L)
    ).assignAscendingTimestamps(_._4)

    // 连接两条流进行匹配数据检测
    appStream.connect(thridPartyStream)
      .keyBy(_._1, _._1)
      .process(new CoProcessFunction[(String, String, Long), (String, String, String, Long), String]{

        // 定义状态变量,用来保存已经到达的事件
        lazy var appEvent: ValueState[(String, String, Long)] = _
        lazy var thirdpartyEvent: ValueState[(String, String, String, Long)] = _

        override def open(parameters: Configuration): Unit = {
          appEvent = getRuntimeContext.getState(new ValueStateDescriptor[(String, String, Long)]("app-event", classOf[(String, String, Long)]))
          thirdpartyEvent = getRuntimeContext.getState(new ValueStateDescriptor[(String, String, String, Long)]("thirdparty-event", classOf[(String, String, String, Long)]))
        }

        override def processElement1(
            value: (String, String, Long),
            ctx: CoProcessFunction[(String, String, Long), (String, String, String, Long)]#Context,
            out: Collector[String]){
              if (thirdpartyEvent.value != null){
                out.collect(value._1 + "对账成功")
                // 清空状态
                thirdpartyEvent.clear()
              } else {
                // 如果另一条流中的数据没有到达,注册定时器,开始等待5s
                ctx.timeService().registerEventTimeTimer(value._3 + 5000L)
                // 保存当前事件的状态
                appEvent.update(value)
              }
        }

        override def processElement2(
            value: (String, String, String, Long),
            ctx: CoProcessFunction[(String, String, Long), (String, String, String, Long)]#Context,
            out: Collector[String]){
              if (appEvent.value != null){
                out.collect(value._1 + "对账成功")
                // 清空状态
                appEvent.clear()
              } else {
                // 如果另一条流中的数据没有到达,注册定时器,开始等待5s
                ctx.timeService().registerEventTimeTimer(value._4 + 5000L)
                // 保存当前事件的状态
                thirdpartyEvent.update(value)
              }
        }

        override def onTimer(timestamp: Long, ctx: CoProcessFunction[(String, String, Long), (String, String, String, Long), String]#OnTimerContext, out: Collector[String]): Unit = {

          // 判断状态是否为空。如果不为空,说明另一条流中对应的事件没来
          if(appEvent.value()!=null){
            out.collect(appEvent.value()._1+"对账失败")
            appEvent.clear()
          }
          if(thirdPartyEvent.value()!=null){
            out.collect(thirdPartyEvent.value()._1+"对账失败")
            thirdPartyEvent.clear()
          }
        }
        appEvent.clear()
        thirdPartyEvent.clear()
      )
      .print()

    env.execute()
    }
}
3. 广播连接流 BroadcastConnectedStream
DataStream调用.connect()的时候,传入的一个参数是广播流(BroadcastStream),这是合并两条流得到的就变成了一个“广播连接流”
源码:
  def broadcast : org.apache.flink.streaming.api.scala.DataStream[T] = { /* compiled code */ }

  def broadcast(broadcastStateDescriptors : org.apache.flink.api.common.state.MapStateDescriptor[_, _]*) :
    org.apache.flink.streaming.api.datastream.BroadcastStream[T] = { /* compiled code */ }
简易代码实现:
val broadcastStream: BroadcastStream[SensorReading] = tempStream.broadcast()
val value: BroadcastConnectedStream[(String, Long, Double), SensorReading] = stream2.connect(broadcastStream)
三、基于事件的合流——双流联结 join
连接connect与联结join都是用于组合多个数据流的操作。
连接connect:将两个类型不同但相关的数据流连接在一起。保留每个数据流的独立性,并使用ConnectedStreams表示连接后的结果。连接后的数据仍保持两个独立的流。
联结join:将两个或多个数据流基于某种关联条件进行合并。根据指定的关联条件将具有相同键的元素组合在一起,生成一个新的联结后的数据流。
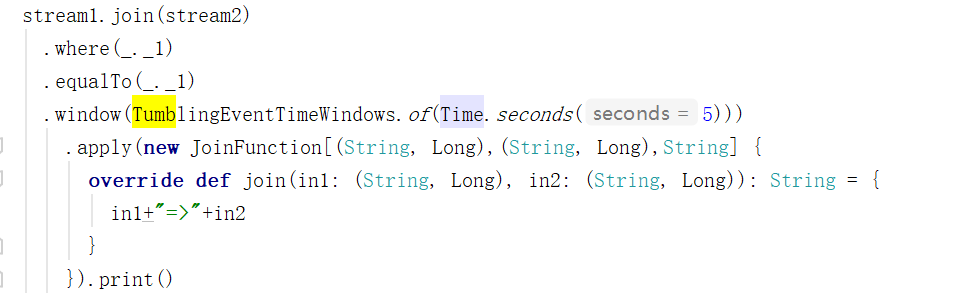
3.1 窗口联结 Window Join
通用调用形式:stream1.join(stream2).where(<KeySelector>).equalTo(<KeySelector>).window(<WindowAssigner>).apply(<JoinFunction>)
object WindowJoinExample {
  def main(args: Array[String]): Unit = {
    val env = StreamExecutionEnvironment.getExecutionEnvironment
    env.setParallelism(1)

    val stream1 = env.fromElements(
      ("a", 1000L),
      ("b", 1000L),
      ("a", 2000L),
      ("b", 2000L)
    ).assignAscendingTimestamps(_._2)

    val stream2 = env.fromElements(
      ("a", 3000L),
      ("b", 3000L),
      ("a", 4000L),
      ("b", 4000L)
    ).assignAscendingTimestamps(_._2)

    stream1.join(stream2)
      .where(_._1)    // 指定第一条流中元素的 key
      .equalTo(_._1)    // 指定第二条流中元素的 key
      .window(TumblingEventTimeWindows.of(Time.seconds(5)))
      .apply(new JoinFunction[(String, Long), (String, Long), String]{
        // 处理来自两条流的相同key的事件
        override def join(first: (String, Long), second: (String, Long)): String = {
          first + "=>" + second
        }
    }).print()

    env.execute()

  }
}
输出:

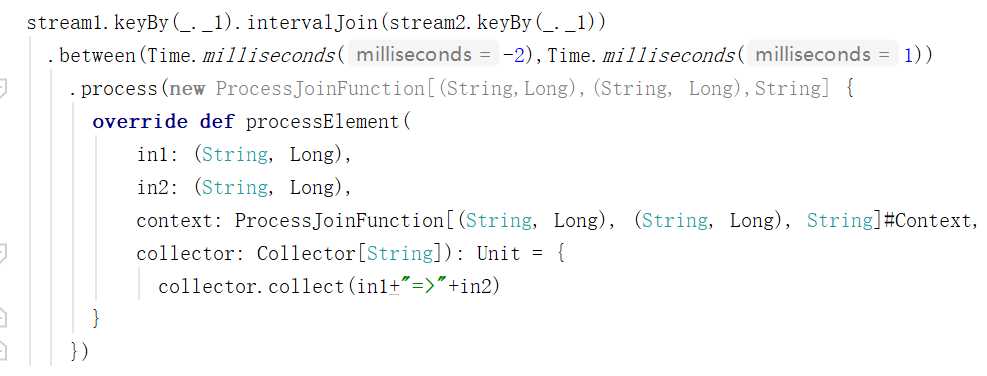
3.2 间隔联结 Interval Join
针对一条流中的每个数据,开辟出其时间戳前后的一段时间间隔,看这期间是否有来自另一条流的数据匹配。
1. 原理
间隔联结具体的定义方式是,给定两个时间点,分别称为间隔的“上界”和“下界”。那么对于一条流中的任意一个数据元素,就可以开辟一段闭区间。

下方的流A去间隔联结上方的流B,所以基于A的每个数据元素,都可以开辟一个间隔区间。我们设置下界-2ms,上界1ms。于是对于流B,有时间戳为0、1两个元素落在该范围内,所以可以匹配到数据(2,0),(2,1)。我们可以看到,间隔联结同样是一种内连接。
2. 调用
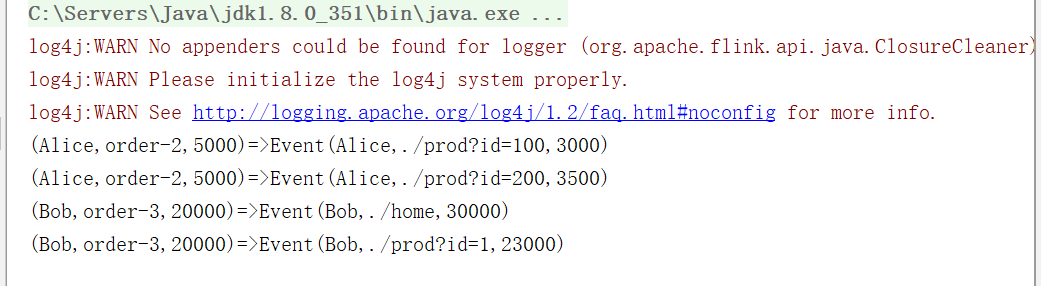
3. 实例
object IntervalJoinExample {
  def main(args: Array[String]): Unit = {
    val env = StreamExecutionEnvironment.getExecutionEnvironment
    env.setParallelism(1)

    // 订单事件流
    val orderStream: DataStream[(String, String, Long)] = env
    .fromElements(
      ("Mary", "order-1", 5000L),
      ("Alice", "order-2", 5000L),
      ("Bob", "order-3", 20000L),
      ("Alice", "order-4", 20000L),
      ("Cary", "order-5", 51000L)
    ).assignAscendingTimestamps(_._3)

    // 点击事件流
    val pvStream: DataStream[Event] = env
    .fromElements(
      Event("Bob", "./cart", 2000L),
      Event("Alice", "./prod?id=100", 3000L),
      Event("Alice", "./prod?id=200", 3500L),
      Event("Bob", "./prod?id=2", 2500L),
      Event("Alice", "./prod?id=300", 36000L),
      Event("Bob", "./home", 30000L),
      Event("Bob", "./prod?id=1", 23000L),
      Event("Bob", "./prod?id=3", 33000L)
    ).assignAscendingTimestamps(_.timestamp)

    // 两条流进行间隔联结,输出匹配结果
    orderStream.keyBy(_._1).intervalJoin(pvStream.keyBy(_.user))
      .betweem(Time.seconds(-5),Time.seconds(10))
      .process(new ProcessJoinFunction[(String, String, Long),Event,String] {
        override def processElement(
           in1: (String, String, Long),
           in2: Event,
           context: ProcessJoinFunction[(String, String, Long), Event, String]#Context,
           collector: Collector[String]): Unit = {
              collector.collect(in1+"=>"+in2)
      }
      }).print()


  }
}
3.3 窗口同组联结 Window CoGroup
于window join几乎一样。调用时只需要将join()替换成coGroup()就可以了。
区别在于:调用apply()方法定义具体操作时,传入的是一个CoGroupFunction。
通用调用形式:stream1.coGroup(stream2).where(<KeySelector>).equalTo(<KeySelector>).window(<WindowAssigner>).apply(<JoinFunction>)
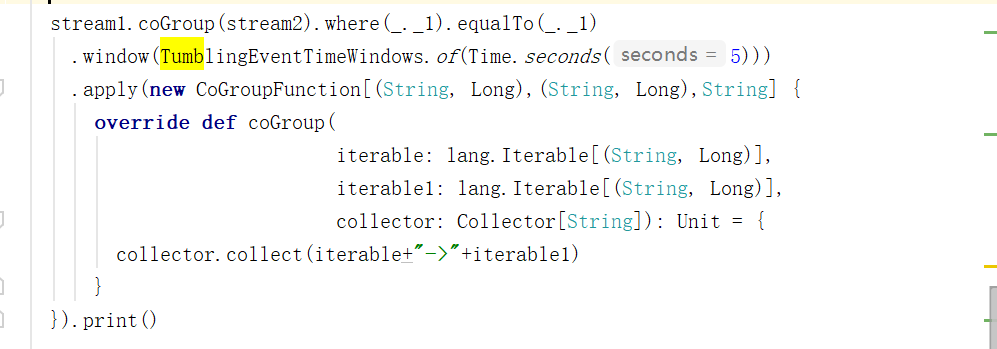
输出: