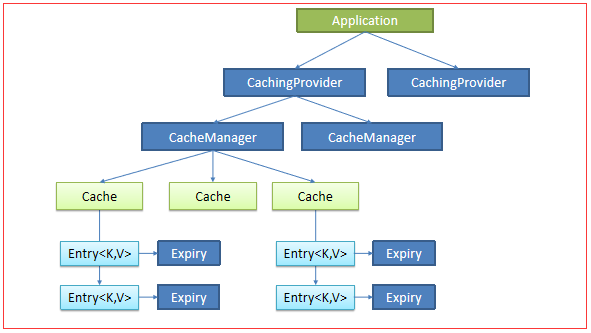
一、JSR107
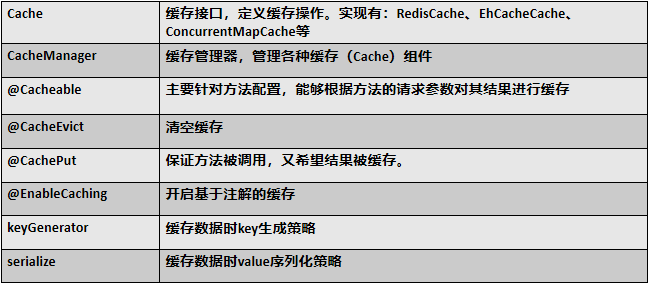
Java Caching定义了5个核心接口,分别是CachingProvider, CacheManager, Cache, Entry 和 Expiry。
1、CachingProvider定义了创建、配置、获取、管理和控制多个CacheManager。
一个应用可以在运行期访问多个CachingProvider。
2、CacheManager定义了创建、配置、获取、管理和控制多个唯一命名的Cache,
这些Cache存在于CacheManager的上下文中。一个CacheManager仅被一个CachingProvider所拥有。
3、Cache是一个类似Map的数据结构并临时存储以Key为索引的值。一个Cache仅被一个CacheManager所拥有。
4、Entry是一个存储在Cache中的key-value对。
5、 Expiry 每一个存储在Cache中的条目有一个定义的有效期。一旦超过这个时间,条目为过期的状态。
一旦过期,条目将不可访问、更新和删除。缓存有效期可以通过ExpiryPolicy设置。
使用比较麻烦
二、Spring缓存抽象
Spring从3.1开始定义了
org.springframework.cache.Cache
和org.springframework.cache.
CacheManager接口来统一不同的缓存技术;
并支持使用
JCache(JSR-107)注解简化我们开发;
Cache接口为缓存的组件规范定义,包含缓存的各种操作集合;
Cache接口下Spring提供了各种xxxCache的实现;
如RedisCache,EhCacheCache , ConcurrentMapCache等;
每次调用需要缓存功能的方法时,Spring会检查检查指定参数的指定的目标方法是否已经被调用过;
如果有就直接从缓存中获取方法调用后的结果,如果没有就调用方法并缓存结果后返回给用户。
下次调用直接从缓存中获取。
使用Spring缓存抽象时我们需要关注以下两点;
1、确定方法需要被缓存以及他们的缓存策略
2、从缓存中读取之前缓存存储的数据
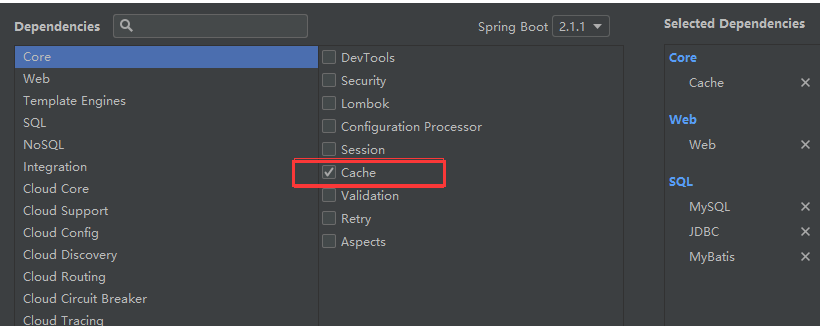
基本环境搭建:
代码实践讲解:
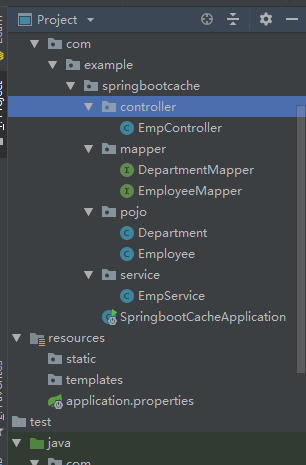
新建工程:
public class Department {
   private Integer id;
   private String departmentName;
   ...}
public class Employee {
   private Integer id;
   private String lastName;
   private String email;
   private Integer gender; //性别 1男  0女
   private Integer dId;
...}
public interface EmployeeMapper {

    @Select("SELECT * FROM employee WHERE id = #{id}")
    Employee getEmpById(Integer id);

    @Update("UPDATE employee SET lastName=#{lastName},email=#{email},gender=#{gender},d_id=#{dId} WHERE id=#{id}")
    public void updateEmp(Employee employee);

    @Delete("DELETE FROM employee WHERE id=#{id}")
    public void deleteEmpById(Integer id);

    @Insert("INSERT INTO employee(lastName,email,gender,d_id) VALUES(#{lastName},#{email},#{gender},#{dId})")
    public void insertEmployee(Employee employee);

    @Select("SELECT * FROM employee WHERE lastName = #{lastName}")
    Employee getEmpByLastName(String lastName);
}
@Service
public class EmpService {
    @Autowired
    EmployeeMapper employeeMapper;

    public Employee getEmp(Integer id){
        System.out.println("查询:" + id +"员工");
        Employee emp = employeeMapper.getEmpById(id);
        return emp;
    }
}
@Controller
public class EmpController {

    @Autowired
    EmpService empService;

    @ResponseBody
    @RequestMapping("/emp/{id}")
    public Employee getEmp(@PathVariable("id")Integer id){
        Employee emp = empService.getEmp(id);
        return emp;
    }
}
测试:
使用缓存:
1.开启基于注解的缓存 @EnableCaching
2.标注缓存即可
在主程序中:开启缓存
@MapperScan("com.example.springbootcache.mapper")
@SpringBootApplication
@EnableCaching
public class SpringbootCacheApplication {
    public static void main(String[] args) {
        SpringApplication.run(SpringbootCacheApplication.class, args);
    }

}
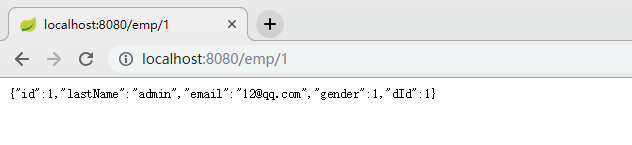
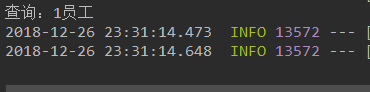
此时页面连续请求两次:
控制台会打印两次,具体看EmpService类的查询方法

@Cacheable
public Employee getEmp(Integer id){
    System.out.println("查询:" + id +"员工");
    Employee emp = employeeMapper.getEmpById(id);
    return emp;
}
@Cacheable:将方法运行的结果进行缓存,之后在要相同的数据,直接从缓存中取,不在调用方法
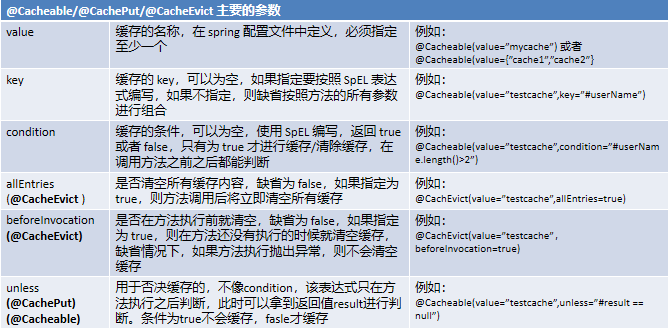
属性:
CacheManager管理多個Cache組件的,對緩存的真正CRUD操作在Cache組件中,每一個緩存組件有自己唯一一個名字;
幾個屬性:
cacheName/value:指定緩存組件的名字;將方法的返回結果放在哪個緩存中是數組的方式,可以指定多個緩存
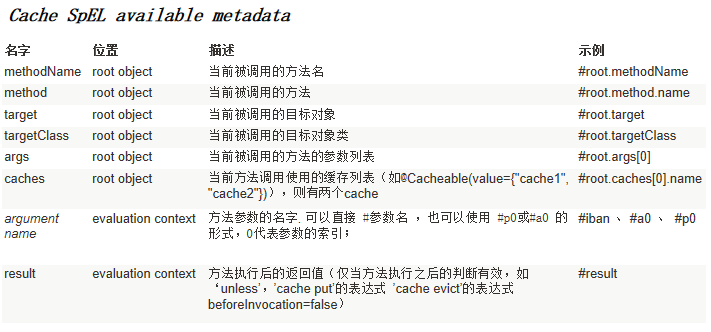
key:緩存數據使用的key;可以用它來指定。默認是使用方法的參數 1-方法的返回值
編寫SpEl; #id;參數id的值 #a0 #p0 #root.args[0]
keyGenerator: key的生成器: 可以指定key的生成器的組件id
key/keyGenerator: 二選一使用
key = "#root.methodName + '['+id+']'"
cacheManager: 指定緩存管理器;或者cacheResolver指定獲取解析器
condition: 指定符合條件的情況下才緩存
condition = "#id>0"
condition = "#a0>1" 第一個參數>1的情況下進行緩存
unless: 否定緩存;當ubless指定的條件爲true,方法的返回值就不會被緩存;可以獲取到結果進行判斷
unless = "#result == null"
#result爲方法的返回值
sync:是否使用異步緩存
@Cacheable(cacheNames ="e" )
public Employee getEmp(Integer id){
    System.out.println("查询:" + id +"员工");
    Employee emp = employeeMapper.getEmpById(id);
    return emp;
}
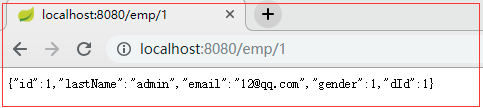
此时刷新很多遍依然只打印一次
三、缓存原理

@Configuration
@ConditionalOnClass({CacheManager.class})
@ConditionalOnBean({CacheAspectSupport.class})
@ConditionalOnMissingBean(
    value = {CacheManager.class},
    name = {"cacheResolver"}
)
@EnableConfigurationProperties({CacheProperties.class})
@AutoConfigureAfter({CouchbaseAutoConfiguration.class, HazelcastAutoConfiguration.class, HibernateJpaAutoConfiguration.class, RedisAutoConfiguration.class})

//给容器导入一些组件
@Import({CacheAutoConfiguration.CacheConfigurationImportSelector.class})
public class CacheAutoConfiguration {
...


    public String[] selectImports(AnnotationMetadata importingClassMetadata) {
        CacheType[] types = CacheType.values();
        String[] imports = new String[types.length];

        for(int i = 0; i < types.length; ++i) {
            imports[i] = CacheConfigurations.getConfigurationClass(types[i]);
        }

        return imports;
    }
}
}
public String[] selectImports(AnnotationMetadata importingClassMetadata)中的return imports;
会给容器导入10个配置类

在配置文件中:判断那个缓存是生效的
debug=true

由图可知是SimpleCacheConfiguration 缓存类

@Configuration
@ConditionalOnMissingBean({CacheManager.class})
@Conditional({CacheCondition.class})
class SimpleCacheConfiguration {
    private final CacheProperties cacheProperties;
    private final CacheManagerCustomizers customizerInvoker;

    SimpleCacheConfiguration(CacheProperties cacheProperties, CacheManagerCustomizers customizerInvoker) {
        this.cacheProperties = cacheProperties;
        this.customizerInvoker = customizerInvoker;
    }

    @Bean
    public ConcurrentMapCacheManager cacheManager() {
        ConcurrentMapCacheManager cacheManager = new ConcurrentMapCacheManager();
        List<String> cacheNames = this.cacheProperties.getCacheNames();
        if (!cacheNames.isEmpty()) {
            cacheManager.setCacheNames(cacheNames);
        }

        return (ConcurrentMapCacheManager)this.customizerInvoker.customize(cacheManager);
    }
}
给容器中注册了一个缓存管理器
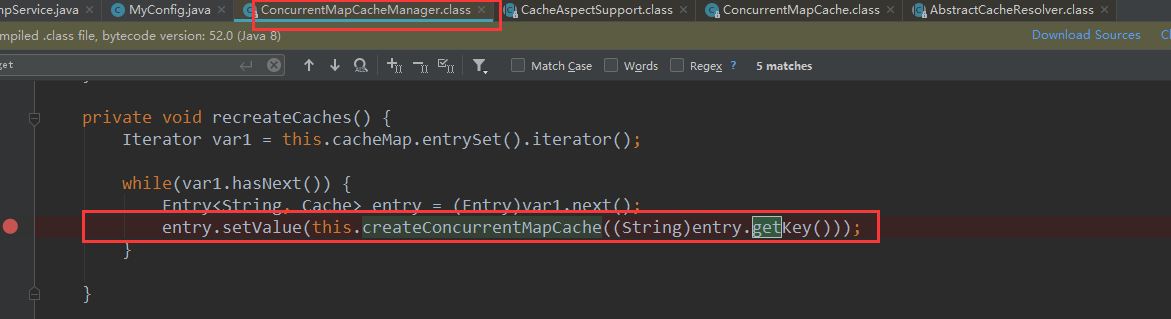
ConcurrentMapCacheManager可以获取和创建

@Nullable
public Cache getCache(String name) {
    Cache cache = (Cache)this.cacheMap.get(name);
    if (cache == null && this.dynamic) {
        ConcurrentMap var3 = this.cacheMap;
        synchronized(this.cacheMap) {
        cache = (Cache)this.cacheMap.get(name);
            if (cache == null) {
                cache = this.createConcurrentMapCache(name);
                this.cacheMap.put(name, cache);
            }
        }
    }
        return cache;
}
按照名字取获取,如果为空则会创建一个缓存
运行流程:
@Cacheable
1.方法运行之前先去查询缓存组件,按照Cache的name取获取(CacheManager先获取相应的缓存)
第一次获取缓存没有则会自动创建
2.取Cache中查找缓存,使用以可key,默认就是方法的参数
key是按照某种策略生成的,默认使用keyGenerator,默认使用SimpleKeyGenerator

3.没有查到缓存就调用目标方法
4.将目标方法返回的结果放入缓存中
@Cacheable标注的方法执行之前先来检查缓存中有没有这个数据,
默认按照参数的值作为key取查询缓存
如果没有就运行方法并且将结果放入缓存

其属性的使用:
key:数据库使用的key

此时的key就是 方法名+id; 即 getEmp[1]
keyGenerator:
指定key
@Configuration
public class MyConfig {
    @Bean("MyKeyGenerator")
    public KeyGenerator keyGenerator(){
        return  new KeyGenerator() {
            @Override
            public Object generate(Object o, Method method, Object... objects) {
               //Objects事获得其输入的cache中的属性值
                return method.getName() +"[" + Arrays.asList(objects).toString()+"]";
            }
        };
    }
}

断点位置:
可以看到debug进入时的值: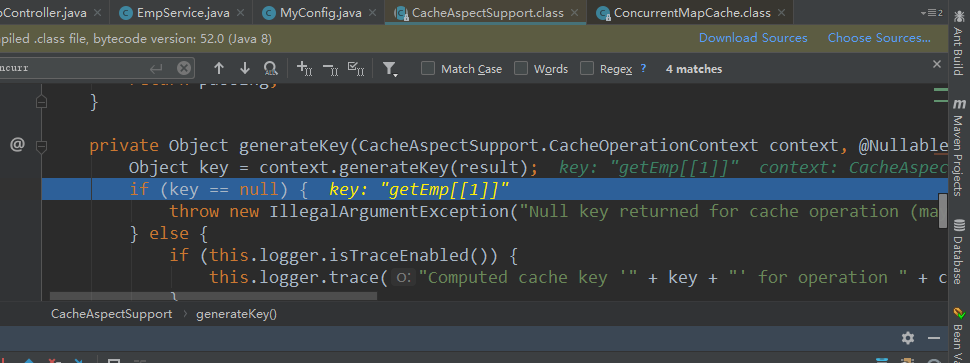
cacheManager:指定缓存管理器
condition:

@Cacheable(cacheNames ="e", keyGenerator = "MyKeyGenerator",condition = "#a0>1")
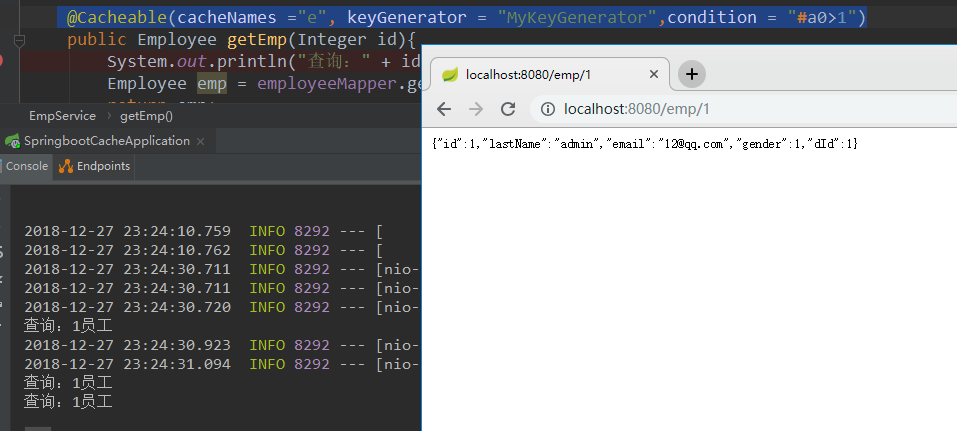
此时查询一次打印一次
