1.下载Inception V3模型
Download-Link 在tensorflow官网中可以直接下载,下载完压缩包以后解压,注意不要删除这个压缩包,后面可能会用到,然后在同目录下创建一个log文件夹,这些步骤可以手动完成,也可以用下面的python语句执行。
# coding: utf-8

import tensorflow as tf
import os
import tarfile
import requests

#inception模型下载地址
inception_pretrain_model_url = 'http://download.tensorflow.org/models/image/imagenet/inception-2015-12-05.tgz'

#模型存放地址
inception_pretrain_model_dir = "inception_model"
if not os.path.exists(inception_pretrain_model_dir):
    os.makedirs(inception_pretrain_model_dir)

#获取地址中文件名
filename = inception_pretrain_model_url.split('/')[-1]
#构建模型下载地址
filepath = os.path.join(inception_pretrain_model_dir, filename)

#下开始下载载模型
if not os.path.exists(filepath):
    print("download: ", filename)
    r = requests.get(inception_pretrain_model_url, stream=True)
    with open(filepath, 'wb') as f:
        for chunk in r.iter_content(chunk_size=1024):
            if chunk:
                f.write(chunk)

print("finish: ", filename)

#解压文件
tarfile.open(filepath, 'r:gz').extractall(inception_pretrain_model_dir)

#创建一个log文件夹 保存日志
log_dir = 'inception_log'
if not os.path.exists(log_dir):
    os.makedirs(log_dir)
运行结束以后,应该有两个文件夹分别为model和log,其中model下的
classify_image_graph_def.pb 文件就是下载好的模型。
为了方便理解,这里多说两句,下载的这个模型其实可以看做是google已经花大量时间用大量数据训练好的参数,可以让我们拿来直接用,在这个基础上进行自己的训练,得到自己的图片分类器。这个其实就是一个迁移学习的过程。
我们可以看一下inception V3的图结构:
#获取到这个模型
inception_graph_def_file = os.path.join(inception_pretrain_model_dir, 'classify_image_graph_def.pb')
with tf.Session() as sess:
    #创建一个图来存放google训练好的模型
    with tf.gfile.FastGFile(inception_graph_def_file, 'rb') as f:
        graph_def = tf.GraphDef()
        graph_def.ParseFromString(f.read())
        tf.import_graph_def(graph_def, name='')
    #保存图的结构
    writer = tf.summary.FileWriter(log_dir, sess.graph)
    writer.close()
运行结束以后就可以通过tensorboard查看图结构,在命令行输入
tensorboard --logdir=path to inception_log
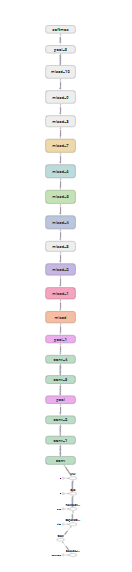
这里看不清,大概是这个结构,有个直观印象吧,总之是个较大的网络,我们需要关注的是在顶端部分

进行retrain的时候,需要在第三个池化层后面加入新的节点,不再让它通过原本的softmax进行输出,这里的softmax是为1000个类别的分类器。在训练自己的分类器的过程中,使用自定义的数据集,经过原本inceptionV3的所有节点(除最后一个softmax)得到的结果称之为bottleneck,瓶颈,这些计算得到的结果就是训练自己模型的输出。
那么这些直接使用图片作为输入和使用经过计算结果作为输入的区别在哪呢?
前者的图片可以理解为是生肉,难消化,数据特征不明显,没有经过处理计算,后者可以理解为是熟肉,更好笑话,经过计算以后数据特征更加明显,我们可以使用很少的迭代次数,较短的训练时间就能获得可观的训练结果。
回到上面所说的瓶颈这个概念,如果将整个模型抽象的看做一个花瓶,那么自己训练的这个过程就是插花的过程。我觉得bottleneck的提出真的很微妙,这个词就能更好的理解这个过程。自定义的数据集经过模型的计算,这个过程其实可以理解为前馈神经网络的向前传播,得到的结果只作为自己训练的输入值。如果觉得这部分不好理解,可以先了解一下迁移学习的基本概念。
2.如何使用Inception V3
在说retrain之前,先说说怎么直接使用下载好的模型作为分类器,要知道这个分类器可以识别1000种东西,可用性还是很强的。
# coding: utf-8
# inception 有1000个分类

import tensorflow as tf
import os
import numpy as np
import re
from PIL import Image
import matplotlib.pyplot as plt


class NodeLookup(object):
    def __init__(self):
        #读入这两个文件 下载模型后得到的文件 1000个分类对应的标识
        label_lookup_path = 'inception_model/imagenet_2012_challenge_label_map_proto.pbtxt'
        uid_lookup_path = 'inception_model/imagenet_synset_to_human_label_map.txt'
        self.node_lookup = self.load(label_lookup_path, uid_lookup_path)


    #加载这两个文件
    def load(self, label_lookup_path, uid_lookup_path):
        # 加载分类字符串n********对应分类名称的文件 用tf一方法读入字符串
        proto_as_ascii_lines = tf.gfile.GFile(uid_lookup_path).readlines()
        uid_to_human = {}
        #一行一行读取数据
        for line in proto_as_ascii_lines :
            #去掉换行符
            line=line.strip('\n')
            #按照'\t'分割 也就是tab键
            parsed_items = line.split('\t')
            #获取分类编号
            uid = parsed_items[0]
            #获取分类名称
            human_string = parsed_items[1]
            #建立映射
            uid_to_human[uid] = human_string

        # 加载分类字符串n********对应分类编号1-1000的文件
        proto_as_ascii = tf.gfile.GFile(label_lookup_path).readlines()
        node_id_to_uid = {}
        for line in proto_as_ascii:
            if line.startswith('  target_class:'):
                #获取分类编号1-1000
                target_class = int(line.split(': ')[1])
            if line.startswith('  target_class_string:'):
                #获取编号字符串n********
                target_class_string = line.split(': ')[1]
                #保存分类编号1-1000与编号字符串n********映射关系
                #注意这里的[1:-2]是去掉了引号,第0个位置和第-1个位置分别为左引号和右引号
                node_id_to_uid[target_class] = target_class_string[1:-2]

        #建立分类编号1-1000对应分类名称的映射关系
        node_id_to_name = {}
        for key, val in node_id_to_uid.items():
            #获取分类名称
            name = uid_to_human[val]
            #建立分类编号1-1000到分类名称的映射关系
            node_id_to_name[key] = name
        return node_id_to_name

    #传入分类编号1-1000返回分类名称
    def id_to_string(self, node_id):
        if node_id not in self.node_lookup:
            return ''
        return self.node_lookup[node_id]


#创建一个图来存放google训练好的模型
with tf.gfile.FastGFile('inception_model/classify_image_graph_def.pb', 'rb') as f:
    graph_def = tf.GraphDef()
    graph_def.ParseFromString(f.read())
    tf.import_graph_def(graph_def, name='')


with tf.Session() as sess:
    #给图起名字
    softmax_tensor = sess.graph.get_tensor_by_name('softmax:0')

    #遍历目录
    for root,dirs,files in os.walk('images/'):
        for file in files:
            #载入图片
            image_data = tf.gfile.FastGFile(os.path.join(root,file), 'rb').read()
            predictions = sess.run(softmax_tensor,{'DecodeJpeg/contents:0': image_data})#图片格式是jpg格式
            predictions = np.squeeze(predictions)#把结果转为1维数据

            #打印图片路径及名称
            image_path = os.path.join(root,file)
            print(image_path)
            #显示图片
            img=Image.open(image_path)
            plt.imshow(img)
            plt.axis('off')
            plt.show()

            #排序 prediction有一千个值 因为有一千种结果 但这里不打印所有的值 只打印前五种
            #argsort 实现从小到大排序 但是返回结果放的是索引而不是数据
            #[-5:]得到概率最大五个值 从小到大
            #[::-1]进行倒序 从大到小
            top_k = predictions.argsort()[-5:][::-1]
            node_lookup = NodeLookup()
            for node_id in top_k:
                #获取分类名称
                human_string = node_lookup.id_to_string(node_id)
                #获取该分类的置信度
                score = predictions[node_id]
                print('%s (score = %.5f)' % (human_string, score))
            print()
images文件下放了几张测试图片,分别是狗,猫和松鼠,输出结果是选出分类器认为最可能的五种情况,从大到小排列,可以看到它不仅仅只识别的种类详细到猫狗的品种。
images/1.jpg

<Figure size 640x480 with 1 Axes>

Samoyed, Samoyede (score = 0.92626)
keeshond (score = 0.00209)
Eskimo dog, husky (score = 0.00172)
white wolf, Arctic wolf, Canis lupus tundrarum (score = 0.00093)
kuvasz (score = 0.00081)

images/2.jpg

<Figure size 640x480 with 1 Axes>

Egyptian cat (score = 0.60850)
tabby, tabby cat (score = 0.10163)
tiger cat (score = 0.03881)
Siamese cat, Siamese (score = 0.01642)
paper towel (score = 0.01025)

images/3.jpg

<Figure size 640x480 with 1 Axes>

fox squirrel, eastern fox squirrel, Sciurus niger (score = 0.95429)
throne (score = 0.00334)
squirrel monkey, Saimiri sciureus (score = 0.00180)
studio couch, day bed (score = 0.00059)
ear, spike, capitulum (score = 0.00045)
3. Google Retrain
首先在link下载tensorflow-master,它包含了很多examples,重新训练需要用到里面的文件。这个训练是官方给出的例子,以后可以试试直接写自己的训练方法。
特别要说明的是,下载的时候要查自己tensorflow的版本,下载对应版本的文件,我这里的1.11.0,然鹅这个版本的retrain重新整合到了hub-master,在给出的链接下载hub-master就可以了。
在hub-master\examples\image_retraining下有一个retrain.py文件,使用这个文件进行重新训练,如果使用较老版本的tensorflow,没有hub的话,可以在tersorflow\examples\image_retraining下找到retrain.py
新建一个文件夹,比如retrain,然后创建一个.bat文件,里面写下面代码:
为了方便解释我加了注释“#开头”但实际运行的时候要把这些注释删掉!!
#运行一个python文件,后面的都是文件参数,^符号代表不要换行
python [your path]/hub-master/examples/image_retraining/retrain.py ^
#bottleneck_dir 瓶颈目录,这里写的是文件名,和bat文件在同一目录下,提前新建好
--bottleneck_dir bottleneck ^
#迭代次数,尽管才200次,但效果还是可观的
--how_many_training_steps 200 ^
#模型目录,它会这这里找开始下载的那个压缩包
--model_dir [your path]/inception_model/ ^
#输出模型,重新训练结束以后也要把模型和标签保存下来,同样是放在当前目录下
--output_graph output_graph.pb ^
--output_labels output_labels.txt ^
#这是自定义数据集目录
--image_dir data/
pause
数据集可以在下载,注意数据集一定要按照这种格式
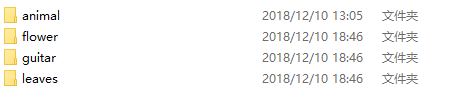
每一种类别创建一个文件夹,里面存放的是属于该类别的图片,可以有多个类别,我这里是下载了这四种图片,文件名就是图片的标签!!不可以是中文,为避免出错建议是小写英文!!
准备工作做完以后就可以运行bat文件了,运行结束以后会发现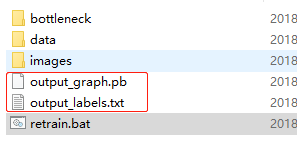
多了这两个文件,并且bottleneck文件夹下也多了很多内容,这些都是图片经过向前传播得到的计算结果,在运行bat文件中窗口中会最后会得到随着迭代次数增加,准确率不断上升的结果,运行的时候没截图,这儿就不贴了。
现在就得到了重新训练以后的模型!接下来就是检验结果的时候了。
4. 使用retrain 分类器进行分类
在tensorflow-master下有一个label_image.py文件,hub_master里没有这个文件,但也可以使用,根据官网给出的Guide,现在拿一张图片,喂给分类器。
新建一个bat文件:
python [your-path]/tensorflow-master/tensorflow/examples/label_image/label_image.py ^
--graph=[your-path]/retrain/output_graph.pb --labels=[your-path]/retrain/output_labels.txt ^
--input_layer=Placeholder ^
--output_layer=final_result ^
--image=[your-path]/retrain/images/flower1.jpg
pause
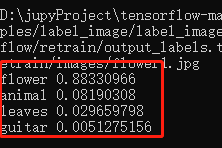
可以得到如下结果:
官网只给出判断一张图片类型的示例,怎么样判断多张图片呢?
和前面使用Google模型的代码类似,特别要注意的是!之前我们使用google训练好的1000中分类器时,我们是这样做的predictions = sess.run(softmax_tensor,{'DecodeJpeg/contents:0': image_data})
注意这里的DecodeJpeg/contents:0 如果你也用hub_master进行retrain的话,在这里使用同样的操作是会报错的,我查了一下原因,似乎是新版的tensorflow把DecodeJpeg删掉了,所以不支持这种写法了。
将DecodeJpeg直接改为Placeholder以后会报错,因为数据格式不匹配。
在label_image.py中我找到了官方的处理办法,也就是下面代码中read_tensor_from_image_file方法。
import tensorflow as tf
import os
import numpy as np
import re
from PIL import Image
import matplotlib.pyplot as plt

def read_tensor_from_image_file(file_name,
                input_height=299,
                input_width=299,
                input_mean=0,
                input_std=255):
    input_name = "file_reader"
    output_name = "normalized"
    file_reader = tf.read_file(file_name, input_name)
    if file_name.endswith(".png"):
        image_reader = tf.image.decode_png(
        file_reader, channels=3, name="png_reader")
    elif file_name.endswith(".gif"):
        image_reader = tf.squeeze(
        tf.image.decode_gif(file_reader, name="gif_reader"))
    elif file_name.endswith(".bmp"):
        image_reader = tf.image.decode_bmp(file_reader, name="bmp_reader")
    else:
        image_reader = tf.image.decode_jpeg(
        file_reader, channels=3, name="jpeg_reader")
    float_caster = tf.cast(image_reader, tf.float32)
    dims_expander = tf.expand_dims(float_caster, 0)
    resized = tf.image.resize_bilinear(dims_expander, [input_height, input_width])
    normalized = tf.divide(tf.subtract(resized, [input_mean]), [input_std])
    sess = tf.Session()
    result = sess.run(normalized)

    return result

#读入labels文件
lines = tf.gfile.GFile('retrain/output_labels.txt').readlines()
uid_to_human = {}
#一行一行读取数据
for uid,line in enumerate(lines) :
    #去掉换行符
    line=line.strip('\n')
    uid_to_human[uid] = line

#根据id对应标签
def id_to_string(node_id):
    if node_id not in uid_to_human:
        return ''
    return uid_to_human[node_id]


#创建一个图来存放google训练好的模型
with tf.gfile.FastGFile('retrain/output_graph.pb', 'rb') as f:
    graph_def = tf.GraphDef()
    graph_def.ParseFromString(f.read())
    #del(graph_def.node[1].attr['DecodeJpeg/contents'])
    tf.import_graph_def(graph_def, name='')

with tf.Session() as sess:
    softmax_tensor = sess.graph.get_tensor_by_name('final_result:0')
    #遍历目录
    for root,dirs,files in os.walk('retrain/images/'):
        for file in files:
            #载入图片
            t = read_tensor_from_image_file(os.path.join(root,file))

            predictions = sess.run(softmax_tensor,{'Placeholder:0': t})#图片格式是jpg格式
            predictions = np.squeeze(predictions)#把结果转为1维数据

            #打印图片路径及名称
            image_path = os.path.join(root,file)
            print(image_path)
            #显示图片
            img=Image.open(image_path)
            plt.imshow(img)
            plt.axis('off')
            plt.show()

            #排序
            top_k = predictions.argsort()[::-1]
            print(top_k)
            for node_id in top_k:
                #获取分类名称
                human_string = id_to_string(node_id)
                #获取该分类的置信度
                score = predictions[node_id]
                print('%s (score = %.5f)' % (human_string, score))
            print()
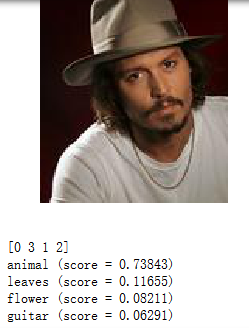
结果示例:

特意选了一张有叶子的花,分类器认为这是花也符合人为分类规则

这是纯属娱乐了,普子的照片放上去结果是animal,识别的还挺对啊,尽管我的训练数据里没有一张人像,是不是说明了人类和动物对于计算机而言也没多大区别啊!
完。