如何在vue项目中使用md5.js及base64.js
一、在项目根目录下安装
npm install --save js-base64
npm install --save js-md5
二、在项目文件中引入
import md5 from 'js-md5';
let Base64 = require('js-base64').Base64;
三、在项目文件中使用
base64
Base64.encode('dankogai');  // ZGFua29nYWk=
Base64.encode('小飼弾');    // 5bCP6aO85by+
Base64.encodeURI('小飼弾'); // 5bCP6aO85by-

Base64.decode('ZGFua29nYWk=');  // dankogai
Base64.decode('5bCP6aO85by+');  // 小飼弾
// note .decodeURI() is unnecessary since it accepts both flavors
Base64.decode('5bCP6aO85by-');  // 小飼弾
md5
md5(''); // d41d8cd98f00b204e9800998ecf8427e
md5('The quick brown fox jumps over the lazy dog'); // 9e107d9d372bb6826bd81d3542a419d6
md5('The quick brown fox jumps over the lazy dog.'); // e4d909c290d0fb1ca068ffaddf22cbd0

// It also supports UTF-8 encoding
md5('中文'); // a7bac2239fcdcb3a067903d8077c4a07

// It also supports byte `Array`, `Uint8Array`, `ArrayBuffer`
md5([]); // d41d8cd98f00b204e9800998ecf8427e
md5(new Uint8Array([])); // d41d8cd98f00b204e9800998ecf8427e

// Different output
md5(''); // d41d8cd98f00b204e9800998ecf8427e
md5.hex(''); // d41d8cd98f00b204e9800998ecf8427e
md5.array(''); // [212, 29, 140, 217, 143, 0, 178, 4, 233, 128, 9, 152, 236, 248, 66, 126]
md5.digest(''); // [212, 29, 140, 217, 143, 0, 178, 4, 233, 128, 9, 152, 236, 248, 66, 126]
md5.arrayBuffer(''); // ArrayBuffer
md5.buffer(''); // ArrayBuffer, deprecated, This maybe confuse with Buffer in node.js. Please use arrayBuffer instead.
Js获取当前系统时间
var myDate = new Date();
myDate.getYear();        //获取当前年份(2位)
myDate.getFullYear();    //获取完整的年份(4位,1970-????)
myDate.getMonth();       //获取当前月份(0-11,0代表1月)
myDate.getDate();        //获取当前日(1-31)
myDate.getDay();         //获取当前星期X(0-6,0代表星期天)
myDate.getTime();        //获取当前时间(从1970.1.1开始的毫秒数)
myDate.getHours();       //获取当前小时数(0-23)
myDate.getMinutes();     //获取当前分钟数(0-59)
myDate.getSeconds();     //获取当前秒数(0-59)
myDate.getMilliseconds();    //获取当前毫秒数(0-999)
myDate.toLocaleDateString();     //获取当前日期
var mytime=myDate.toLocaleTimeString();     //获取当前时间
myDate.toLocaleString( );        //获取日期与时间
vue2.0 父子组件通信 兄弟组件通信
父组件是通过props属性给子组件通信的来看下代码:
父组件:
<parent>
    <child :child-com="content"></child> //注意这里用驼峰写法哦
</parent>

data(){
    return {
        content:'sichaoyun'
    };
}
子组件通过props来接受数据
第一种方法
props: ['childCom']
第二种方法
props: {
    childCom: String //这里指定了字符串类型,如果类型不一致会警告的哦
}
第三种方法
props: {
    childCom: {
        type: String,
        default: 'sichaoyun'
    }
}
子组件与父组件通信
vue2.0只允许单向数据传递,我们通过出发事件来改变组件的数据,废话少说,上干货
子组件代码
<template>
    <div @click="open"></div>
</template>

methods: {
   open() {
        this.$emit('showbox','the msg'); //触发showbox方法,'the msg'为向父组件传递的数据
    }
}
父组件
<child @showbox="toshow" :msg="msg"></child> //监听子组件触发的showbox事件,然后调用toshow方法

methods: {
    toshow(msg) {
        this.msg = msg;
    }
}
兄弟组件通信
借助于一个公共的Vue的实例对象,不同的组件可以通过该对象完成事件的绑定和触发
建立一个bus.js,代码为
import Vue from 'vue';
const bus = new Vue();
export default bus;
熊大想要发消息给熊二,
接收方(熊二):事件绑定
bus.$on('customEvent',function(msg){
  //msg就是通过事件 传递来的数据
 })
发送方(熊大):触发事件
bus.$emit('customEvent',123);
qs库的使用
1.npm安装
https://www.npmjs.com/package/qs
npm install qs
2、概述
将url中的参数转为对象;
将对象转为url参数形式
3、示例
import qs from 'qs';
const url = 'method=query_sql_dataset_data&projectId=85&appToken=7d22e38e-5717-11e7-907b-a6006ad3dba0';
// 转为对象
console.log(qs.parse(url));
const a = {name:'hehe',age:10};
// 转为url参数形式
console.log(qs.stringify(a))

vue router.push(),router.replace(),router.go()
1.router.push(location)=====window.history.pushState
想要导航到不同的 URL,则使用 router.push 方法。这个方法会向 history 栈添加一个新的记录,所以,当用户点击浏览器后退按钮时,则回到之前的 URL。
// 字符串
router.push('home')
// 对象
router.push({ path: 'home' })
// 命名的路由
router.push({ name: 'user', params: { userId: 123 }})
// 带查询参数,变成 /register?plan=private
router.push({ path: 'register', query: { plan: 'private' }})
2.router.replace(location)=====window.history.replaceState
跟 router.push 很像,唯一的不同就是,它不会向 history 添加新记录,而是跟它的方法名一样 —— 替换掉当前的 history 记录
3.router.go(n)====window.history.go
// 在浏览器记录中前进一步,等同于 history.forward()
router.go(1)
// 后退一步记录,等同于 history.back()
router.go(-1)
// 前进 3 步记录
router.go(3)
// 如果 history 记录不够用,那就默默地失败呗
router.go(-100)
router.go(100)
window.history的跳转
window.history是用来保存用户在一个会话期间的网站访问记录,并提供相应的方法进行追溯。其对应的成员如下:
方法:back()、forward()、go(num)、pushState(stateData, title, url)、replaceState(stateData, title, url)
属性:length、state
事件:window.onpopstate
以上红色标注的为HTML5新增特性。
方法说明:
back():返回到上一个访问记录
forward():前进到下一个访问记录;
go(num):跳转到相应的访问记录;其中num大于0,则前进;小于0,则后退;
pushState(stateData, title, url):在history中创建一个新的访问记录,不能跨域,且不造成页面刷新;
replaceState(stateData, title, url):修改当前的访问记录,不能跨域,且不造成页面刷新;
另,HTML5新增了可以监听history和hash访问变化的全局方法:
window.onpopstate:当调用history.go()、history.back()、history.forward()时触发;pushState()\replaceState()方法不触发。
window.onhashchange:当前 URL 的锚部分(以 ‘#’ 号为开始) 发生改变时触发。触发的情况如下:
a、通过设置Location 对象 的 location.hash 或 location.href 属性修改锚部分;
b、使用不同history操作方法到带hash的页面;
c、点击链接跳转到锚点。
vue.js路由怎么刷新时回到首页
在app.vue里写以下代码:
mounted(){
     this.$router.push('/')
}
Vue2.0 $set()的正确使用方式
如下代码,给 student对象新增 age 属性
data () {
    return {
        student: {
            name: '',
            sex: ''
        }
    }
}
众所周知,直接给student赋值操作,虽然可以新增属性,但是不会触发视图更新
mounted () {
    this.student.age = 24
}
原因是:受 ES5 的限制,Vue.js 不能检测到对象属性的添加或删除。因为 Vue.js 在初始化实例时将属性转为 getter/setter,所以属性必须在 data 对象上才能让 Vue.js 转换它,才能让它是响应的
要处理这种情况,我们可以使用$set()方法,既可以新增属性,又可以触发视图更新
mounted () {
    this.$set(this.student,"age", 24)
}
vue+moment的使用
安装:npm install moment
按需调用:
const moment = require('moment');
const mydate = moment(this.listQuery.date).format('YYYY-MM-DD')
全局注册与使用
//在 main.js 中
import moment from 'moment'
Vue.prototype.$moment = moment
moment.locale('zh-cn'); //汉化
//在 index.vue 中
const mydata = this.$moment(this.listQuery.date).format('YYYY-MM-DD') //2018-12-10
其他使用方法请见http://momentjs.cn/
vue路由嵌套,配置children嵌套路由
嵌套路由就是路由里面嵌套他的子路由,可以有自己的路由导航和路由容器(router-link、router-view),通过配置children可实现多层嵌套
//mine组件
<template>
    <div class="content">
        在mine的组件里面嵌套路由
        <router-link to="/mine/c">去到Cpage</router-link>
        <router-link to="/mine/d">去到Dpage</router-link>
        <div class="child">
            <router-view></router-view>
        </div>
    </div>
</template>
//router.js
//引入需要的组件,下是我的路径
import Vue from 'vue'
import Router from 'vue-router'
import Home from '@/components/home'
import Mine from '@/components/mine'
import Cpage from '@/page/mine/c'
import Dpage from '@/page/mine/d'
Vue.use(Router)
export default new Router({
  routes: [
    {
        path: '/',
        redirect: 'home'
    },
    {
      path: '/home',
      name: 'home',
      component: Home
    },
    {
      path: '/mine',
      name: 'Mine',
      component:Mine,
      children:[
        {
            path:'/',
            component:Cpage,
        },
        {
            path:'/mine/c',
            component:Cpage,
        },
        {
            path:'/mine/d',
            component:Dpage,
        }
      ]
      //children这是嵌套的部分
    },
vue-router的钩子函数
vue路由钩子大致可以分为三类:
1.全局钩子主要包括beforeEach和aftrEach,
beforeEach函数有三个参数:
to:router即将进入的路由对象
from:当前导航即将离开的路由
next:Function,进行管道中的一个钩子,如果执行完了,则导航的状态就是 confirmed (确认的);否则为false,终止导航。 afterEach函数不用传next()函数这类钩子主要作用于全局,一般用来判断权限,以及以及页面丢失时候需要执行的操作,例如:
/使用钩子函数对路由进行权限跳转
router.beforeEach((to, from, next) => {
const role = localStorage.getItem('ms_username');
 if(!role && to.path !== '/login'){
 next('/login');
 }else if(to.meta.permission){        // 如果是管理员权限则可进入,这里只是简单的模拟管理员权限而已
  role === 'admin' ? next() : next('/403');
   }else{        // 简单的判断IE10及以下不进入富文本编辑器,该组件不兼容
   if(navigator.userAgent.indexOf('MSIE') > -1 && to.path === '/editor'){
   Vue.prototype.$alert('vue-quill-editor组件不兼容IE10及以下浏览器,请使用更高版本的浏            览器查看', '浏览器不兼容通知', {                confirmButtonText: '确定'            });        }else{            next();        }    }})
2.单个路由里面的钩子
主要用于写某个指定路由跳转时需要执行的逻辑
beforeEnter和 beforeLeave
{
    path: '/dashboard',
    component: resolve => require(['../components/page/Dashboard.vue'], resolve),
    meta: { title: '系统首页' },
     beforeEnter: (to, from, next) => {
     },
      beforeLeave: (to, from, next) => {
      }
 },
3.组件路由 主要包括 beforeRouteEnter和beforeRouteUpdate ,beforeRouteLeave,这几个钩子都是写在组件里面也可以传三个参数(to,from,next),作用与前面类似.
beforeRouteEnter(to, from, next) {
 next(vm => {
 if (
 vm.$route.meta.hasOwnProperty('auth_key') &&        vm.$route.meta.auth_key != ''
 ){
 if (!vm.hasPermission(vm.$route.meta.auth_key)) {          vm.$router.replace('/admin/noPermission')
  }
   }
    })
    },
vue中fullPath和path的区别
fullPath匹配路由,path匹配路径。
例如:
路由是:/path/one
真正路径是:/path/true
那么此时path为/path/true,而fullPath为/path/one
vue-router版本的问题
当点击elemen-ui跳转时,遇到以下的问题
这个时候,是因为vue-router的版本超过3.0了,可以重新安装一下
npm install [email protected] --save
就可以解决了
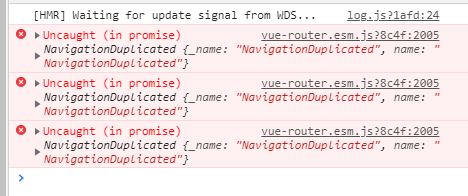
vue-router少写路由的问题
如下图,浏览器报出这个错误
vue.runtime.esm.js?2b0e:619 [Vue warn]: Error in render: “RangeError: Maximum call stack size exceeded”
found in
—>
at packages/dropdown/src/dropdown-menu.vue
at packages/dropdown/src/dropdown.vue
at src/views/layout/components/Navbar.vue
at src/views/layout/Layout.vue
at src/App.vue

分析
这个错误从报错信息上面看,和vue-route有关系,可能是堆栈溢出。
可是我查看了相关代码,没有发现有递归调用的代码块
最后查看了项目里面拦截器,发现拦截器如果捕获到不存在的页面跳转到/404这个页面,如下图

可是/404在路由里面没有配置 就引发了报错了!!!
解决方法
在使用路由的时候,把这个路径注册进去(PS:根据实际情况)
{
path: ‘/404’,
component: () => import(’@/views/errorPage/404’),
hidden: true
}
Vue项目中实现用户登录及token验证
在前后端完全分离的情况下,Vue项目中实现token验证大致思路如下:
1、第一次登录的时候,前端调后端的登陆接口,发送用户名和密码
2、后端收到请求,验证用户名和密码,验证成功,就给前端返回一个token
3、前端拿到token,将token存储到localStorage和vuex中,并跳转路由页面
4、前端每次跳转路由,就判断 localStroage 中有无 token ,没有就跳转到登录页面,有则跳转到对应路由页面
5、每次调后端接口,都要在请求头中加token
6、后端判断请求头中有无token,有token,就拿到token并验证token,验证成功就返回数据,验证失败(例如:token过期)就返回401,请求头中没有token也返回401
7、如果前端拿到状态码为401,就清除token信息并跳转到登录页面
elementui把上传的图片转为base64
使用组件,然后on-change绑定一个方法来获取文件信息,auto-upload设置为false即可
<el-upload
action=''
 :on-change="getFile"
 :limit="1"
 list-type="picture"
  :auto-upload="false">
        <el-button size="small" type="primary">选择图片上传,最多上传一张图片</el-button>
 </el-upload>
定义methods方法,当上传文件就会触发绑定的函数,然后文件的内容就会绑定到函数的参数里面,这样用file.raw就可以获取文件的内容了
getFile(file, fileList) {
   console.log(file.raw)
},
然后自定义一个方法,用来把图片内容转为base64格式,imgResult就是base64格式的内容了。转为base64字符串要调用h5特性中的FileReader这个api,但是这个api不能return,所以用promise封装一下。
getBase64(file) {
     return new Promise(function(resolve, reject) {
      let reader = new FileReader();
      let imgResult = "";
      reader.readAsDataURL(file);
       reader.onload = function() {
        imgResult = reader.result;
        };
       reader.onerror = function(error) {
       reject(error);
       };
       reader.onloadend = function() {
       resolve(imgResult);
       };
     });
   },
最后调用一下
getFile(file, fileList) {
    this.getBase64(file.raw)
    .then(res => {
    console.log(res)
     });
  },
Axios 各种请求方式传递参数
Axios的get方法和put方法用法相同,第一个参数是路径,第二个参数是对象,里面存放请求参数。
Get方法中第二个参数里面,用params对象存放传递的参数
Post方法的第二个参数里面,直接存放传递的参数
get delete 方法较为不同
get传递参数格式为params
delete传递参数格式为data
get
Axios.get('demo/url', {
     params: {
         id: 123,
         name: 'Henry',
         sex: 1,
         phone: 13333333
     }
})
delete
Axios.delete('demo/url', {
    data: {
        id: 123,
        name: 'Henry',
        sex: 1,
        phone: 13333333
     }
 })
post
Axios.post('demo/url',
     {
       id: 123,
       name: 'Henry',
       sex: 1,
       phone: 13333333
     }
)
put
Axios.put('demo/url',
     {
        id: 123,
        name: 'Henry',
        sex: 1,
        phone: 13333333
      }
)
patch
Axios.patch('demo/url',
     {
      id: 123,
      name: 'Henry',
      sex: 1,
      phone: 13333333
     }
)
element-ui里el-form的lable颜色怎么修改?
写成全局的css,外面用一个标签包起来,这样可以单独修改其中一个的样式,比如
.login_body .el-form-item__label {
     color:white;
}
登陆完以后跳到哪个页面
当我们登陆完以后,有可能跳到首页,也有可能跳转到别的页面
let redirect = decodeURIComponent(
    this.$route.query.redirect || '/'
);
this.$router.push({
   path:redirect
})
增删改查的记录

用vuex里边的state与mutations实现对token的处理
首先在store.js的state里添加一个count状态
src/store.js
state:{
   token:null,
   userId:''
}
mutations里面添加2个操作count的方法,一个用来登录,一个用来退出
src/store.js
mutations:{
 Login(state,data){
    window.localStorage.setItem('token',data.token);
    widnow.localStorage.setItem('userId',userId);
    state.token=data.token;
    state.userId=data.userId;
 },
 Logout(state,data){
    window.localStorage.removeItem('token');
    state.token=null;
 }
}
在methods里添加两个方法唤醒mutations
index.vue
methods:{
 getData(){
      axios
      .post('/api/Login/Loginuser')
      .then(function(res){
          if(res.Data.ResultType==0){
              if(this.token){
                  store.commit('Login',{
                     token:res.token,
                     userId:res.Data.UserModel.Id
                  })
              }
          }
      })
 }
}
以上步骤中state定义状态,mutations用来同步的改变state的状态值。
解决刷新页面vuex store中数据丢失的问题
解决思路:
在项目中,登录后,通过登录接口会获取到很多用户信息,首先将用户信息保存在vuex的store中,同时将这些信息也保存在sessionStorage中。这里需要注意的是vuex中的变量是响应式的,而sessionStorage不是,当你改变vuex中的状态,组件会检测到改变,而sessionStorage就不会了,页面要重新刷新才可以看到改变,所以应让vuex中的状态从sessionStorage中得到,这样组件就可以响应式的变化.
补充:
在客户端存储数据:HTML5提供了2种在客户端存储数据的新方法:localStorage没有时间期限,除非将它移除,sessionStorage即会话,当浏览器关闭时会话结束,有时间期限。
之前,这些都是由cookie完成的,但是cookie不适合大量数据的存储,因为它们由每个对服务器的请求来传递,这使得cookie速度很慢,而且效率不高.
代码如下:
const store = new Vuex.Store({
     token:window.localStorage.getItem('token') || null,
     userId:widow.localStorage.getItem('userId') || ''
})
localStorage.setItem存起来的数据类型都是字符串string
今天使用localStorage.setItem存值的时候发现。我存的是个boolean值但是最后获取的时候判断了一下类型竟然是string类型的。

难怪我页面上判断localStorage.getItem(“aaa”)==true一直是false。原来是存起来的数据都会变成字符串的类型
最后把localStorage.getItem(“aaa”)==‘true’ 结果就是true。

