1物理环境
| IP | CPU | 内存 | 硬盘 |
|---|---|---|---|
| 192.168.193.47 | E5-2650v2 | 48G | 1TB |
| 192.168.193.147 | E5-2650v2 | 48G | 1TB |
| 192.168.193.48 | E5-2640v3 | 64G | 1TB |
| 192.168.193.148 | E5-2640v3 | 64G | 1TB |
因为强调elk比较吃机器,所以网络部门同事给了不错的机器。应该可以运行elk。
[superuser@ft3q-app47 elk]$ top
top - 16:59:37 up 87 days, 22:55,  1 user,  load average: 27.89, 24.80, 24.19
Tasks: 622 total,   2 running, 620 sleeping,   0 stopped,   0 zombie
Cpu(s):  3.5%us,  3.0%sy,  0.0%ni, 92.7%id,  0.8%wa,  0.0%hi,  0.0%si,  0.0%st
Mem:  49397260k total, 48563720k used,   833540k free,   253412k buffers
Swap: 16777212k total,  3753420k used, 13023792k free, 15169808k cached

  PID USER      PR  NI  VIRT  RES  SHR S %CPU %MEM    TIME+  COMMAND
30512 superuse  20   0 86.3g  20g 460m S 176.5 44.3   9889:16 java
 1086 root      20   0     0    0    0 S  2.6  0.0 271:20.94 jbd2/dm-1-8
 2707 root      20   0     0    0    0 S  2.0  0.0  28:19.76 kondemand/2
 2713 root      20   0     0    0    0 S  2.0  0.0  37:24.09 kondemand/8
规划一下,在前3台安装ES集群。最后一台安装filebeat,packagebeat等小东西。
2安装java
因为是java写的,所以首先需要安装java。安装方法我就不写了。
[superuser@ft3q-app47 logs]$ java -version
java version "1.8.0_91"
Java(TM) SE Runtime Environment (build 1.8.0_91-b14)
Java HotSpot(TM) 64-Bit Server VM (build 25.91-b14, mixed mode)3官网找到最新版下载地址,下载。目前是6.2.2
[superuser@ft3q-app47 elk]$ pwd
/home/superuser/elk
[superuser@ft3q-app47 elk]$ ll
总用量 28
drwxr-xr-x  6 superuser superuser 4096 3月  22 13:25 cerebro-0.7.2
drwxr-xr-x  9 superuser superuser 4096 3月  14 16:01 es
drwxr-xr-x  5 superuser superuser 4096 3月  20 10:11 filebeat
drwxrwxr-x 12 superuser superuser 4096 3月  14 17:22 kibana
drwxrwxr-x 11 superuser superuser 4096 3月  22 10:18 logstash
drwxrwxr-x 14 superuser superuser 4096 3月  22 17:10 logstash_bank
drwxr-xr-x  4 superuser superuser 4096 3月  19 14:26 packetbeat
[superuser@ft3q-app47 elk]$ wget https://artifacts.elastic.co/downloads/elasticsearch/elasticsearch-6.2.2.tar.gz
4解压并改名
[superuser@ft3q-app47 elk]$ tar -zxvf elasticsearch-6.2.2.tar.gz
[superuser@ft3q-app47 elk]$ mv elasticsearch-6.2.2 es
5修改config/elasticsearch.yml配置文件
[superuser@ft3q-app47 es]$ vim config/elasticsearch.yml
#集群名称
cluster.name: ft3q
#节点名称
node.name: node-47
#如果是master节点设置成true 如果是
node.master: true
#如果是data节点设置成true
node.data: true
#数据储存路径
path.data: /home/superuser/elk/es/data
#日志储存路径
path.logs: /home/superuser/elk/es/logs
#监听地址
network.host: 192.168.193.47
#交互端口
http.port: 9200
#集群的三个节点
discovery.zen.ping.unicast.hosts: ["192.168.193.47", "192.168.193.147","192.168.193.48"]
#至少要发现集群可做master的节点数
discovery.zen.minimum_master_nodes: 2
#不锁内存
bootstrap.memory_lock: false
#Centos6不支持SecComp
bootstrap.system_call_filter: false
#如果启用了 HTTP 端口,那么此属性会指定是否允许跨源 REST 请求。
http.cors.enabled: true
#如果 http.cors.enabled 的值为 true,那么该属性会指定允许 REST 请求来自何处。
http.cors.allow-origin: "*"
#增大bulk队列大小
thread_pool.bulk.queue_size: 20000
#设置恢复时的吞吐量(例如:100mb,默认为0无限制.如果机器还有其他业务在跑的话还是限制一下的好)
indices.recovery.max_bytes_per_sec: 100mb
#可以使用值:eg:50mb 或者 30%(节点 node heap内存量),默认是:unbounded
indices.fielddata.cache.size: 50mb
#集群发现超时时间
discovery.zen.ping_timeout: 200s
#集群ping间隔
discovery.zen.fd.ping_interval: 30s
#超时
discovery.zen.fd.ping_timeout: 200s
6修改config/jvm.options配置文件
-Xms20g
-Xmx20g
主要就是这两个值,根据自己的机器来配置。
7修改系统参数
扫描二维码关注公众号,回复:
94934 查看本文章

如果现在启动es,仍然会报一些错,根据错误信息,修改系统参数。切换到root。
7.1max file descriptors [65535] for elasticsearch process is too low, increase to at least [65536]
方案:vi /etc/sysctl.conf
fs.file-max=655350
保存之后sysctl -p使设置生效
vi /etc/security/limits.conf 新增
* soft nofile 655350
* hard nofile 655350
保存之后sysctl -p使设置生效
7.2max virtual memory areas vm.max_map_count [65530] is too low, increase to at least [262144]
方案:vi /etc/sysctl.conf
vm.max_map_count=655360
保存之后sysctl -p使设置生效
8终于可以启动
以后台方式启动
[superuser@ft3q-app47 es]$ ./bin/elasticsearch -d9验证一下
[superuser@ft3q-app47 es]$ curl 192.168.193.47:9200
{
  "name" : "node-47",
  "cluster_name" : "ft3q",
  "cluster_uuid" : "vAUZvtDIQoWGReAgGu19Vw",
  "version" : {
    "number" : "6.2.2",
    "build_hash" : "10b1edd",
    "build_date" : "2018-02-16T19:01:30.685723Z",
    "build_snapshot" : false,
    "lucene_version" : "7.2.1",
    "minimum_wire_compatibility_version" : "5.6.0",
    "minimum_index_compatibility_version" : "5.0.0"
  },
  "tagline" : "You Know, for Search"
}
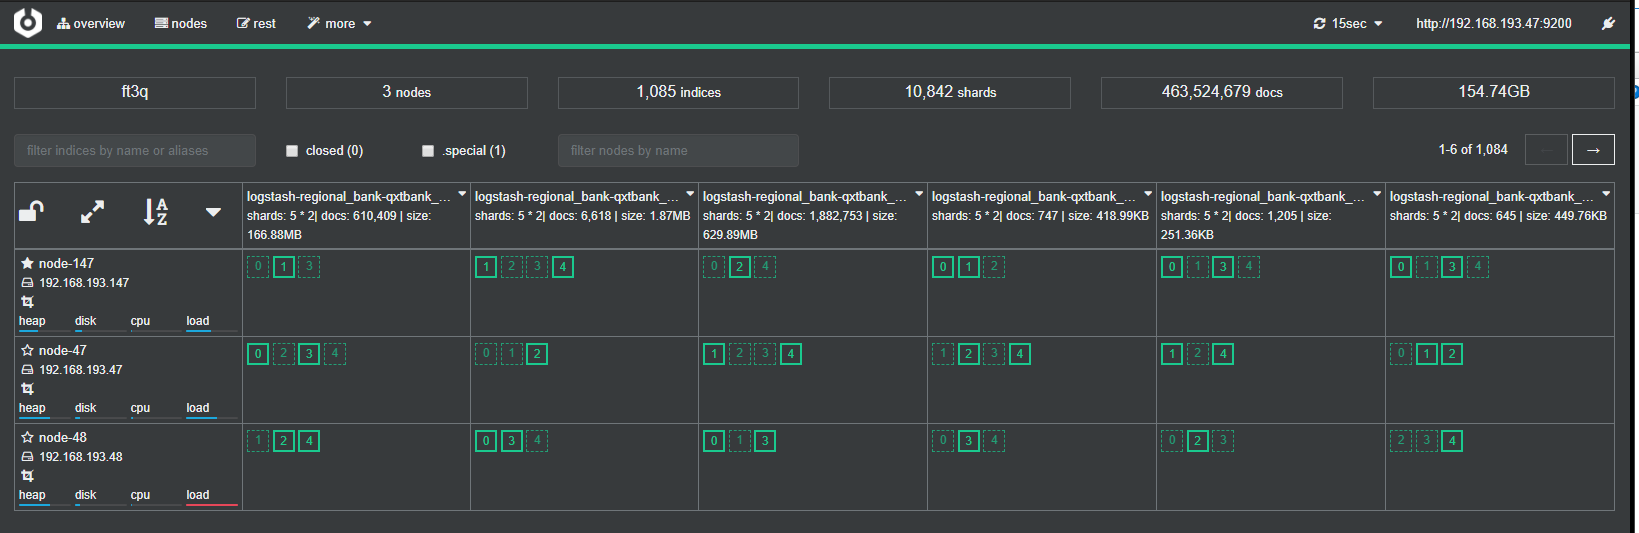
10其他两台也照此安装,最后可以看到,这三台组成集群,5分片*2副本,显示绿色。